TomTom RIDER Reference Guide
Contents What's in the box 7 What's in the box ................................................................................................................................7 Read me first 9 Mounting your navigation device ......................................................................................................9 Using a headset ................................................................................................................................10 Switching on ..................
Advanced Lane Guidance 27 About lane guidance ........................................................................................................................27 Using lane guidance .........................................................................................................................27 Itinerary planning 29 About Itineraries ...............................................................................................................................29 Creating an Itinerary ..
Sounds and voices 49 About sounds and voices ................................................................................................................49 Sound and volume control ..............................................................................................................49 Change voice ....................................................................................................................................49 Disable voice / Enable voice ...................................
Language ..........................................................................................................................................66 Manage POIs.....................................................................................................................................66 Map corrections ................................................................................................................................67 Mobile phone menu ..................................................
Using Help to phone a local service ................................................................................................84 Help menu options ...........................................................................................................................84 TomTom HOME 85 About TomTom HOME ....................................................................................................................85 Installing TomTom HOME .......................................................
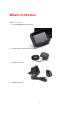
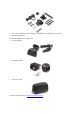
What's in the box What's in the box TomTom RIDER navigation device Charging bike mount and battery cable USB home charger RAM mounting kit 7
Tyre route software for your computer - installation file is supplied on your device Documentation pack Extra items supplied in Premium pack: Car mounting kit Anti-theft solution Travel carry case For more information, go to tomtom.com/accessories.
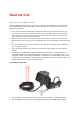
Read me first Mounting your navigation device Attach the RAM™ mount kit to your motorcycle as shown on the Installation Poster, then place your TomTom RIDER in the holder. When you are attaching the mount kit to your motorcycle, follow these guidelines: If you are unsure about attaching the mount kit yourself, ask a professional to fit it for you. If you choose to attach the mount kit yourself, note that the Active Dock has a built-in fuse.
3. The dock connector needs to be plugged into the TomTom RIDER dock. Using a headset We recommend using a compatible headset with your TomTom RIDER to hear spoken instructions, make and receive hands-free phonecalls and hear warning sounds on your TomTom RIDER. This makes riding with your TomTom RIDER as safe as possible. For more information and a full list of compatible headsets, go to tomtom.com/riderheadsets. The instructions below describe how to set up a Bluetooth® headset.
Switching on Your TomTom RIDER switches on when you switch your motorcycle ignition on. Your TomTom RIDER switches off when you switch your ignition off. The first time you switch on your TomTom RIDER, it may take up to 20 seconds to start. Before you use your TomTom RIDER for the first time, it’s a good idea to charge it fully. The battery in your TomTom RIDER navigation device charges when you connect it to the home charger or to your computer.
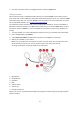
Important: Both locks have keys so you need to make sure that you keep these two extra keys with you at all times! TomTom RIDER shown without locks TomTom RIDER shown with both locks 12
Safety Safety messages Please read and take note of the following important safety messages: Check your tyre pressure regularly. Service your vehicle regularly. Medication can affect your riding or driving ability. Always use seat belts if available. Before setting off on a motorbike, fasten your helmet correctly. If riding a bike, always wear protective clothing and equipment. When riding a motorbike, be extra vigilant and always ride defensively. Don’t drink and drive.
The Driving View About the Driving View When your TomTom RIDER navigation device starts for the first time, you are shown the Driving View along with detailed information about your current position. Tap the centre of the screen at any time to open the Main Menu. The Driving View 1. Zoom button - tap this button to zoom in and out. When tapped, large + and - buttons appear for easy use when wearing gloves. 2. Quick menu.
4. The name of the next major road or road sign information, if applicable. 5. Battery level indicator. 6. Your speed and the speed limit, if known. Tap this area to repeat the last spoken instruction and to change the volume. When tapped, large + and - buttons appear for easy use when wearing gloves. 7. Navigation instruction for the road ahead. Tap this panel on the status bar to switch between 2D and 3D views of the Driving View. Quick Menu option! 8. The name of the street you are on. 9.
Main Menu About the Main Menu The Main Menu is the starting point for planning a route, looking at a map or changing your device settings. To open the Main Menu from the Driving View, tap the centre of the screen. To return to the Driving View from the Main Menu, tap done. Main Menu buttons The following buttons are shown on the Main Menu: Tap this button to plan a new route. This button is shown when you have not planned a route. Plan route Tap this button to change the current route.
sound Quick Menu option! Tap this button to turn the sound off. Tap this button to turn the sound off. sound Tap this button to adjust the settings for your device. For more information, see About Options in this guide. options Tap this button to look at the map.
Quick Menu About the Quick Menu The Quick Menu offers a fast and safe way to use your TomTom RIDER. When you use the Quick Menu, the number of taps you need to make is reduced and this makes the device easier to use with gloves. There are several Quick Menu items to choose from. You can choose just one or several depending on the features you use the most. Tip: When you see this symbol in the guide, it means that this is an option that can be added to your Quick Menu for easy access.
Planning a route Planning a winding route 1. Tap the screen to open the Main Menu. 2. Tap Plan winding route. You can enter an address in various ways, but we will enter the full address. 3. Tap Address. 4. Tap Street and house number. 5. Start to type the name of the town where your journey will begin and tap on the name when it appears in the list. Tip: When you plan a route for the first time you are asked to select the country or state. Your choice is saved and used for all future routes.
1. Tap the screen to open the Main Menu. 2. Tap Plan route. 3. Tap Depart from. You can enter an address in various ways, but we will enter the full address. 4. Tap Address. 5. Tap Street and house number. 6. Start to type the name of the town where your journey will begin and tap on the name when it appears in the list. Tip: When you plan a route for the first time you are asked to select the country or state. Your choice is saved and used for all future routes.
7. Enter the street name and the house number, then tap Done. Tip: Before you start to enter a street name, City centre is shown at the top of the list. This is useful if you do not have an address and only need general directions. 8. Enter the destination address, then select Now when asked for the departure time and then tap Done. The route is planned and a summary of the route is shown. Tip: Quick Menu option! You can add route summary to the Quick Menu. 9. Tap Done.
5. Start to type the name of the town where your journey will begin and tap on the name when it appears in the list. Tip: When you plan a route for the first time you are asked to select the country or state. Your choice is saved and used for all future routes. You can change this setting by tapping on the flag and selecting a new country or state. 6. Enter the street name and the house number, then tap Done. Tip: Before you start to enter a street name, City centre is shown at the top of the list.
8. Tap Done. Your navigation device is ready to guide you to your destination.
Winding routes About winding routes The winding routes feature is for planning a route that avoids unnecessary motorways and includes winding roads, with the aim of making the route a fun and entertaining ride. When planning the route, your TomTom RIDER tries to guide you out of the city as quickly as possible. Switching on winding routes 1. Tap the screen to bring up the Main Menu. 2. Tap options. 3. Tap Winding routes preferences.
Tip: When you plan a route for the first time you are asked to select the country or state. Your choice is saved and used for all future routes. You can change this setting by tapping on the flag and selecting a new country or state. 6. Enter the street name and the house number, then tap Done. Tip: Before you start to enter a street name, City centre is shown at the top of the list. This is useful if you do not have an address and only need general directions. 7. Tap Done.
For more information, see Creating an itinerary with a winding route.
Advanced Lane Guidance About lane guidance Note: Lane guidance is not available for all junctions or in all countries. Your TomTom RIDER navigation device helps you prepare for motorway exits and junctions by showing the correct driving lane for your planned route. As you approach an exit or junction, the lane you need is shown on the screen. Using lane guidance There are two types of lane guidance: Lane images Lane images are permanently switched on.
Tip: If no lane guidance is shown in the status bar and all lanes are highlighted, you can use any lane.
Itinerary planning About Itineraries An Itinerary is a plan for a journey including more locations than your final destination. You could use an Itinerary for trips such as: A riding holiday through a country with lots of stops. A two day bike ride with an overnight stop. A short ride which passes by Points of Interest. A scenic route from a friend that you downloaded using HOME or the internet. In all these examples you could tap Navigate to... for each place.
Start using an Itinerary When you use an Itinerary to navigate, the route will be calculated to the first destination on the Itinerary. Your TomTom RIDER calculates the remaining distance and time to the first destination and not for the whole Itinerary. As soon as you start to use an Itinerary, the route is calculated from your current position. When you have passed a waypoint or reached a destination, it is marked as visited. Waypoints are shown on the map.
Tap this button to miss out part of your Itinerary. Your TomTom RIDER will ignore this item and all the items before it in the Itinerary. It will navigate you to the next item in the Itinerary. Mark "visited" This button is only shown if you are still due to visit this item. Tap this button to repeat part of your Itinerary. Your device will navigate you to this item followed by the rest of the items in the Itinerary. This button is only shown if you have already visited this item.
7. Tap the itinerary file that you want to share. The file is sent. Receiving a file 1. Tap the screen to bring up the Main Menu. 2. Tap Manage itineraries. 3. Tap Share. 4. Tap Receive from another device. 5. If the file is waiting already, tap Yes to receive it. Tip: Your device name is TomTom RIDER. Deleting an Itinerary 1. Tap the screen to bring up the Main Menu. 2. Tap Manage itineraries. 3. Tap Delete. Your list of itineraries opens. 4. Tap an itinerary to select it. 5.
To reverse the order of locations in your current Itinerary, tap Reverse route. Reverse route Saving an Itinerary To save an itinerary with a new name or overwrite an existing stored itinerary, do the following: 1. Tap the screen to bring up the Main Menu. 2. Tap Manage itineraries. 3. Tap Edit current. Your current itinerary opens. 4. Make your changes. 5. Tap Options. 6. Tap Save route. 7.
5. If you choose city centres, your Itinerary looks like this: A route is planned using the city centres as a guide for planning the winding road. You are not directed into the city centres as a part of your route. Note: To plan a circular route using city centres, the city centres should be at least 30km apart. 6. If you choose specific locations in your Itinerary, your route takes you to your waypoints and destination using winding roads. 7. Tap Done.
Changing your route Making changes to your route After you plan a route, you may want to change the route or even the destination. There are various ways to change your route without the need to completely replan the entire journey. To change the current route, tap Change route in the Main menu: Tap this button to change the current route. This button is only shown while there is a planned route on your device.
Tap this button to show another winding route. This button is only shown when there is a planned winding route on your TomTom RIDER device. Show another Tap this button to change your route by selecting a location you want to travel past, maybe so you can meet someone on the way. Travel via... When you select a location to travel past, you are shown the same options and asked to enter the new address in the same way as when you plan a new route.
Recording your route About recording your route There are several reasons why you may want to record a route. You may be on the riding holiday of a lifetime and want to share the route with fellow bikers or you may simply wish to build a collection of your favourite routes. When the recording of a route stops, two files are created. The first file is a GPX file that holds very detailed information and can be viewed with software such as Google Earth.
Uploading and sharing routes Installing Tyre Tyre, a tool for managing routes, has been included with your TomTom RIDER. Tyre enables you to search, design and edit routes, send them to your device and share them with other riders. To install Tyre, do the following: 1. Connect your TomTom RIDER to your PC using the supplied USB cable. A drive called “RIDER” appears in Windows Explorer. 2. In Windows Explorer, double click on the RIDER drive to open it. Look for a file called “TyreSetup". 3.
For the time being, you might consider installing a Windows emulator (like WINE, a piece of free software) on your Mac. It will create a Windows environment on your computer. You can use that environment to run Tyre. On opening the map, I get an error message. There might be an error in the settings of your Internet Explorer. Follow these steps: Open your Internet Explorer. Select Tools > Internet Options > Advanced tab > Restore Advanced Settings. Restart Tyre and your Internet Explorer.
Using manual conversion 1. Connect your TomTom RIDER to your computer. 2. Place your GPX files in the GPX2ITN folder on your device. 3. Disconnect your device from the computer. 4. Turn your device on. Each file is then converted into an ITN file. You can convert up to 50 files in one batch. 5. When the conversion has finished you can load your Itinerary. In the Main menu, tap Manage itineraries, then Open.
Note: If you load an Itinerary that uses a map that is not on your device, the waypoints on the missing map appear crossed out and in orange.
View map About viewing the map You can view the map in the same way as you might look at a traditional paper map. The map shows your current location and many other locations such as Favourites and POIs. To view the map in this way, tap view map in the Main menu. You view different locations on the map by moving the map across the screen. To move the map, touch the screen and drag your finger across the screen. To select a location on the map, tap the location on the map.
Yellow - points to your home location. Red - points to your destination. Tap a marker to centre the map on the location pointed to by the marker. To turn markers off, tap Options, then Advanced and clear the Markers checkbox. 3. Options button Tap this button to choose whether POIs, Favourites, names, markers and coordinates are shown. 4. The cursor with street name balloon. 5. The Find button Tap this button to find specific addresses, favourites or Points of Interest. 6. The cursor button.
Tap this button to find a POI near the cursor position on the map. For example, if the cursor currently highlights a restaurant location on the map, you can search for a nearby parking garage. Find POI nearby Tap this button to create a Favourite at the cursor position on the map. Add as Favourite Tap this button to create a POI at the cursor position on the map. Add as POI Tap this button to call the location at the cursor position.
Map corrections About Map Share Map Share helps you correct map errors. You can correct several types of map error. To make corrections to your own map, tap Map corrections in the Options menu. Note: Map Share is not available in all regions. For more information, go to tomtom.com/mapshare. Correcting a map error Important: For safety reasons, do not enter the full details of a map correction while you are driving. Mark the location of the map error instead and enter the full details later.
Tap this button to block or unblock a street. You can block or unblock the street in one or both directions. (Un)block street For example, to correct a street near to your current location, do the following: 1. Tap (Un)block street. 2. Tap Near you to select a street near your current location. Alternatively, you can select a street by name, a street near your Home location or a street on the map. 3. Select the street or section of a street you want to correct by tapping it on the map.
vidual road sections. 5. Type the correct street name. 6. Tap Continue. Tap this button to change and report incorrect road turn restrictions. Change turn restrictions Tap this button to change and report the road speed limit. Change road speed Tap this button to add or remove a roundabout. Add or remove roundabout Tap this button to add a new Point of Interest (POI). For example to add a new restaurant near to your current location: 1. Tap Add missing POI. Add missing POI 2.
Tap this button to enter a comment about a POI. Use this button if you cannot edit the error with the POI using the Edit POI button. Comment on POI Tap this button to correct the location of a house number. Enter the address that you wish to correct and then indicate on the map the correct location of that house number. Correct house number Tap this button to edit an existing street. Once you have selected the street, you can select an error to report.
Sounds and voices About sounds and voices Your TomTom RIDER device uses sound for some or all of the following: Driving directions and other route instructions Warnings that you set Hands-free phone calls There are two types of voice available for your device: Computer voices Computer voices are generated by your device. They provide route instructions and read aloud city and street names, and other useful information.
marked. You can add and remove voices using TomTom HOME. Note: If you select a recorded voice, this will only be able to announce commands, but not street names. If you would like street names to be announced, you will need to select a computer voice. Disable voice / Enable voice Tap this button to switch off voice guidance. You will no longer hear spoken route instructions, but you will still hear information such as, traffic information and warnings.
Points of Interest About Points of Interest Points of Interest or POIs are useful places on the map. Here are some examples: Restaurants Hotels Museums Parking garages Petrol stations Note: Tap Map corrections in the Options menu to report missing POIs or edit existing POIs. Creating POIs Tip: For help on managing third party POIs, search for "Third party POIs" at: tomtom.com/support. 1. Tap the screen to open the Main menu. 2. Tap options. 3. Tap Manage POIs. 4.
Tap this button to create a POI from a Favourite. Favourite You might want to create a POI from a Favourite because you can only create a limited number of Favourites. If you want to create more Favourites you need to delete some Favourites. To avoid losing a Favourite, save the location as a POI before you delete the Favourite. Tap this button to enter an address as a new POI. When you enter an address, you can choose from four options.
Tip: The last POI you viewed on your TomTom RIDER device is also shown in the menu. 4. Enter the name of the town or city and select it when it is shown in the list. 5. Tap the arrow button to expand the list of POI categories. Tip: If you already know the name of the POI you want to use, you can tap Search by name to enter the name and select this location. 6. Scroll down the list and tap Car park. 7. The car park closest to the city centre is shown at the top of the list. 8.
For example, if you want to call a cinema to reserve a ticket, tap Cinema and then select the name of the cinema you want to call. Then tap Call to make the phonecall. Your TomTom RIDER uses your mobile phone to call the POI. Setting warnings for POIs You can set a warning sound to be played when you approach a selected type of POI, such as a petrol station. The following example will show how to set a warning sound to be played when you are 250 metres from a petrol station. 1.
Hands-free calling About hands-free calls If you have a mobile phone with Bluetooth®, you can use your TomTom RIDER to make phone calls and send and receive messages. Important: Not all phones are supported or compatible with all features. For more information, go to tomtom.com/phones/compatibility. Using a headset We recommend using a compatible headset with your TomTom RIDER to hear spoken instructions, make and receive hands-free phonecalls and hear warning sounds on your TomTom RIDER.
2. On/off button 3. Speakers 4. LED 5. Volume down 6. Volume up 7. Charging connector Before you can use your Bluetooth headset, fully charge the headset using the charger supplied with the headset. Connecting to your phone Important: To hear voice instructions, hands-free calls or warning sounds, you need to use a compatible headset with your TomTom RIDER. For more information and a full list of compatible headsets, go to tomtom.com/riderheadsets.
Quick Menu option! To setup a speed dial number that is accessible from the Driving View, do the following: 1. Tap Quick menu preferences in the Options menu 2. Tap Call... This displays the button in the Driving View. 3. Choose your speed dial number by tapping one of following buttons: Tap Home to use your home number as your speed dial number. If you have not entered a number for your home location this button is unavailable. Tap Phone number to enter a phone number to use as your dial number.
Not all phones can transfer the phonebook to your device. For more information, go to tomtom.com/phones/compatibility. Tap Recently dialed to select from a list of people or numbers you have called recently using your device. Tap Recent caller to select from a list of people or numbers who called you recently. Only calls you have received on your device are saved in this list. Receiving a call When someone calls you, the caller's name and phone number are shown.
Mobile phone menu Tap options and then tap Mobile phone to use the following options: Quick Menu option! Call Tap this button to make a phone call using your mobile phone. This button also appears in the Driving View while a call is active. Tap this button in the Driving View to open the Call menu where you can see the details of the caller or end the call. Tap this button to redial a telephone number using your mobile phone.
Favourites About Favourites Favourites provide an easy way to select a location without the need to enter the address. They do not need to be favourite places, they can simply be seen as a collection of useful addresses. Creating a Favourite To create a Favourite, do the following: 1. Tap the screen to bring up the Main menu. 2. Tap options. 3. Tap Home and Favourites. 4. Tap Add Favourite. 5.
1. Narrow your choice of POIs by selecting the area where the POI is. You can select one of these options: POI near you - to search from a list of POIs near your current position. POI in city - to choose a POI in a particular town or city. You have to specify a town or city. POI near Home - to search from a list of POIs near your Home location. If you are currently navigating to a destination, you can also select from a list of POIs which are on your route or near your destination.
Your device immediately starts guiding you to your destination with spoken instructions and visual instructions on the screen. Changing the name of a Favourite To change the name of a Favourite, do the following: 1. Tap the screen to bring up the Main menu. 2. Tap options. 3. Tap Home and Favourites. 4. Tap Rename Favourite. 5. Tap the Favourite you want to rename. Tip: Use the left and right arrows to choose another Favourite from your list. 6. Tap Rename. 7. Type in the new name and then tap OK. 8.
Options About Options You can change the way your TomTom RIDER looks and behaves. Tap options in the Main Menu. Battery saving To change the power saving settings, tap this button on your device. Battery saving Brightness preferences Tap this button to set the brightness of the screen. Move the sliders to set the brightness separately for day map colours and for night map colours.
Connect to headset Tap this button to setup and connect your headset to your navigation device. Connect to headset Safety Alerts menu Important: Outside of France, you receive warnings about speed cameras. Inside France, you receive warnings about danger zones. When you cross the border, the type of warning you receive changes. To open the Danger zones menu, tap options in the Main Menu and then tap Danger zones. Tap this button to report a new danger zone location.
location. Tap Phone for help to view the location and contact details for a service. Tap Drive to help to plan a route by bike to a service. Home and Favourites Tap this button to manage your Home and Favourite locations. For more information, see About Favourites. Home and Favourites Keyboard preferences You use the keyboard to enter your destination or to find an item in a list, such as a POI.
Language Tap this button to change the language used for all the buttons and messages you see on your device. Language You can choose from a wide range of languages. When you change the language, you are also given the opportunity to change the voice. Manage POIs Tap this button to manage your own Point of Interest (POI) categories and locations. Manage POIs You can set your TomTom RIDER device to let you know when you are near to selected POI locations.
Note: To hear spoken instructions, handsfree phonecalls and warning sounds on your TomTom RIDER, you need to use a compatible headset. For more information and a full list of compatible headsets, go to tomtom.com/riderheadsets. Map corrections Tap this button to correct errors on your map. Map corrections Mobile phone menu Tap options and then tap Mobile phone to use the following options: Quick Menu option! Call Tap this button to make a phone call using your mobile phone.
Tap this button to load the contacts and phone numbers from your mobile phone onto your TomTom RIDER. Get numbers from phone Important: Not all phones are supported or compatible with all features. Planning preferences Tap this button to set the kind of route planned when you select a destination.
For more information, see About the Quick Menu in this guide. Reset factory settings Tap this button to delete all your personal settings and restore the standard factory settings to your TomTom RIDER device. Reset factory settings This is not a software update and will not affect the version of the software application installed on your device.
Speed Cameras menu To open the Speed Cameras menu, tap options in the Main Menu and then tap Speed Cameras. Quick Menu option! Report speed camera Tap this button to report a new speed camera location. Tap this button to set the warnings you will receive and the sounds used for each warning. Change warning preferences Tap this button to disable warnings. Disable speed cameras Tap this button to enable the report button. The report button is shown in the Driving View or in the Quick Menu.
Start up Tap this button to set what happens when your device starts. Start up Tap this button to find technical information about your TomTom RIDER. Status & information Status bar preferences Tap this button to select the information you want to see on the status bar: Status bar preferences Horizontal - show the status bar at the bottom of the Driving View. Vertical - show the status bar on the right-hand side of the Driving View.
Street name settings Tap this button to set the information that is shown on the map in the Driving View. The following options are available: Street name preferences Show house number before street name Show street names - if you are using a computer voice for spoken instructions and have selected that street names should be read aloud, you do not need to select this option, since the street names will be read aloud even though this option is not selected.
map in darker colours. When riding at night or when riding through a dark tunnel, it is easier to view the screen and less distracting for the driver if the brightness of the screen is dimmed. You can download additional colour schemes using TomTom HOME. Quick Menu option! Use day colours Tap this button to increase the brightness of the screen and display the map in brighter colours. You can download additional colour schemes using TomTom HOME. Voices Tap Voices to manage your TomTom voices.
Speed Cameras About Speed Cameras The Speed Cameras service warns you about the following roadside camera locations: Speed camera locations. Accident blackspot locations. Mobile speed camera locations. Average speed camera locations. Traffic light camera locations. Note: In France, no warnings are given for individual cameras or different types of camera. It is only possible to warn about danger zones. Danger zones are areas where there may be cameras.
Your device plays a warning sound. The type of speed camera and your distance from the camera location is shown in the Driving View. If a speed restriction has been reported for the camera, the speed is also shown in the Driving View. The location of the speed camera is shown on the map. Note: For average speed cameras, you are warned by a combination of icons and sounds at the start, middle and end of the average speed check zone.
Fixed speed camera - this type of camera checks the speed of passing vehicles and is fixed in one place. Mobile camera - this type of camera checks the speed of passing vehicles and is moved to different places. Traffic light camera - this type of camera checks for vehicles breaking traffic rules at traffic lights. Average speed check - these types of cameras measure your average speed between two points. You are warned at the start and end of the average speed check area.
Restricted road camera Other camera Mobile camera hotspot - this type of warning shows places where mobile cameras are often used. Bidirectional camera Report button To show the report button in the Driving View, do the following: 1. Tap options in the Main Menu. 2. Tap Speed Cameras. 3. Tap Enable report button. 4. Tap Done. The report button is shown on left-hand side of the Driving View or if you are already using the Quick Menu, it's added to the buttons available in the Quick Menu.
You see a message thanking you for adding the camera. Note: It's possible to report or confirm the location of danger zones, but it's not possible to remove them. Reporting a new speed camera while at home You do not need to be at the location of a speed camera to report the new location. To report a new speed camera location while you are at home, do the following: 1. Tap options in the Main Menu. 2. Tap Speed Cameras. 3. Tap Report safety camera. 4.
This type of camera monitors traffic at toll road barriers. Toll road camera This type of speed camera checks the average speed of vehicles between two fixed points. Average speed check This type of camera checks traffic on roads where access is restricted. Vehicle restriction All other types of camera that do not fall into any of the above categories.
Intermediate warning - type 3 Once in the speed check zone, if you are driving faster than the permitted speed and have not received a start of zone warning, you see a visual warning in the Driving View indicating the maximum permitted speed. You also hear a loud audible warning. These warnings occur at the FIRST intermediate point only and are there to remind you to slow down...
Danger Zones Danger zones in France About danger zones Since 3rd January 2012, it has been illegal to receive warnings about the position of fixed or mobile speed cameras when you are driving in France. To be compliant with this change in French law, all types of speed camera locations and safety-related features are no longer reported but instead, areas of danger are indicated as zones. In France, TomTom terminated the Speed Cameras service and introduced a new service called TomTom Danger Zones.
2. Tap Danger zones. 3. Tap Change warning preferences. 4. Select when you want to be warned about danger zones. You can select to always be warned, never be warned or only be warned if you are speeding. 5. Tap the sound you want to be used for the warning. The warning sound is played and you are asked to confirm that you want this warning sound. Tap No to select another sound. 6. Tap Done to save your changes. Report button Note: It is not possible to remove a danger zone.
Safety Alerts menu Important: Outside of France, you receive warnings about speed cameras. Inside France, you receive warnings about danger zones. When you cross the border, the type of warning you receive changes. To open the Danger zones menu, tap options in the Main Menu and then tap Danger zones. Tap this button to report a new danger zone location. Report danger zone Tap this button to set when you receive warnings and the sound. Change warning preferences Tap this button to disable warnings.
Help About getting help Help me provides an easy way to navigate to emergency services centres and other specialist services and contact them by phone. For example, if you are involved in a car accident, you could use Help me to call the nearest hospital and tell them your exact location. Quick Menu option! Note: Information may not be available for all services in all countries.
TomTom HOME About TomTom HOME Using TomTom HOME you can register and manage your TomTom RIDER to receive free updates and buy new services. It's a good idea to connect frequently to HOME so you can do the following: Download for free the most recent map available for your device. Download for free updates for your device, including Map Share updates and other services included with your product.
Note: If you have more than one TomTom device, you need a separate MyTomTom account for each device. If you have a MyTomTom account, you can access the following benefits online using HOME or by using the MyTomTom section of tomtom.com: Services - click Services on the TomTom website to subscribe to services such as real-time traffic and safety camera information.
Backing up your navigation device The easiest way to make a backup of all the contents of your TomTom navigation device is by using TomTom HOME. You can make one backup per device and store it on your computer. When you make a new backup, the old backup for that device is overwritten. 1. Insert your memory card into the card reader connected to your computer. TomTom HOME starts automatically.
Addendum Important Safety Notices and Warnings Global Positioning System The Global Positioning System (GPS) is a satellite-based system that provides location and timing information around the globe. GPS is operated and controlled under the sole responsibility of the Government of the United States of America which is responsible for its availability and accuracy. Any changes in GPS availability and accuracy, or in environmental conditions, may impact the operation of this device.
THE BATTERY CONTAINED IN THE PRODUCT MUST BE RECYCLED OR DISPOSED OF PROPERLY ACCORDING TO THE LOCAL LAWS AND REGULATIONS AND ALWAYS KEPT SEPARATE FROM HOUSEHOLD WASTE. BY DOING THIS YOU WILL HELP CONSERVE THE ENVIRONMENT. USE YOUR TOMTOM DEVICE ONLY WITH THE SUPPLIED DC POWER LEAD (CAR CHARGER/BATTERY CABLE), AC ADAPTER (HOME CHARGER), IN AN APPROVED CRADLE OR USING THE SUPPLIED USB CABLE TO CONNECT TO A COMPUTER FOR BATTERY CHARGING.
CE marking This equipment complies with the requirements for CE marking when used in a residential, commercial, vehicular or light industrial environment, achieving all the appropriate provisions of the relevant legislation in the EU. R&TTE directive Hereby, TomTom declares that TomTom personal navigation devices and accessories are in compliance with the essential requirements and other relevant provisions of the EU Directive 1999/5/EC. The declaration of conformity can be found here: tomtom.com/legal.
Customer support contact Malaysia 1800815318 Singapore 8006162269 Thailand 0018006121008 Indonesia 0018030612011 FCC information for the user THE DEVICE COMPLIES WITH PART 15 OF THE FCC RULES Federal Communications Commission (FCC) Statement Radio and television interference This equipment radiates radio frequency energy and if not used properly - that is, in strict accordance with the instructions in this manual - may cause interference to radio communications and television reception.
FCC Declaration of Conformity Tested to comply with FCC standards for home or office use. This device complies with part 15 of the FCC rules and with RSS-210 of Industry Canada. Operation is subject to the following two conditions: This device may not cause harmful interference. This device must accept any interference received, including interference that may cause undesired operation.
Minnesota State Legislature Statutes Section 169.71, subdivision 1, section 2 provides that "A person shall not drive or operate with any objects suspended between the driver and the windshield other than sun visors and rearview mirrors and electronic toll collection devices." Note: this Minnesota Stature applies to anyone driving in Minnesota, not just Minnesota residents. TomTom Inc. bears no responsibility for any fines, penalties or damage that may be incurred by disregarding this notice.
Copyright notices © 2013 TomTom. All rights reserved. TomTom and the "two hands" logo are registered trademarks of TomTom N.V. or one of its subsidiaries. Please see tomtom.com/legal for limited warranty and end user licence agreements applying to this product. © 2013 TomTom. All rights reserved. This material is proprietary and the subject of copyright protection and/or database rights protection and/or other intellectual property rights owned by TomTom or its suppliers.