
User's Manual
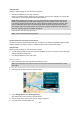
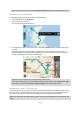
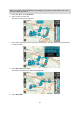
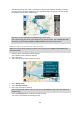
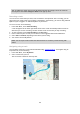
Table Of Contents
- Welcome to navigation with TomTom
- Features
- Get going
- TomTom services
- Connecting a smartphone
- Wi-Fi connection
- What's on the screen
- Traffic
- TomTom MyDrive
- Quick search
- Choosing which search to use
- Using quick search About search
- Entering search terms
- Working with search results
- About postcodes
- About mapcodes
- List of POI type icons
- Planning a route to an address
- Planning a route to a city centre
- Planning a route to a POI
- Planning a route to a POI using online search
- Planning a route using the map
- Planning a route using My Places
- Planning a route using coordinates
- Planning a route using a mapcode
- Planning a route in advance
- Finding a car park
- Finding a petrol station
- Step by step search
- Choosing which search to use
- Using step by step search About search
- Entering search terms
- Working with search results
- About postcodes
- List of POI type icons
- Planning a route to an address
- Planning a route to a POI
- Planning a route to a city centre
- Planning a route to a POI using online search
- Planning a route using the map
- Planning a route using My Places
- Planning a route using coordinates using step by step search
- Planning a route in advance
- Finding a car park
- Finding a petrol station
- Changing your route
- The Current Route menu
- Avoiding a blocked road
- Avoiding part of a route
- Finding an alternative route
- Types of route
- Avoiding features on a route
- Avoiding an incident or route feature using the route bar
- Adding a stop to your route from the current route menu
- Adding a stop to your route using the map
- Deleting a stop from your route
- Skipping the next stop on your route
- Reordering stops on a route
- My Routes
- About My Routes
- About GPX and ITN files
- Saving a route
- Navigating using a saved route
- Navigating to a stop on a saved route
- Adding a stop to a saved route using the map
- Recording a track
- Navigating using a track
- Deleting a route or a track from My Routes
- Exporting tracks to a memory card
- Importing routes and tracks from a memory card
- Map Share
- Speed Cameras
- Danger Zones
- My Places
- About My Places
- Setting your home or work location
- Changing your home location
- Adding a location from My Places
- Add a location to My Places from the map
- Adding a location to My Places using search
- Adding a location to My Places by marking
- Deleting a recent destination from My Places
- Deleting a location from My Places
- Using community POI lists
- Smartphone notifications
- Settings
- Appearance
- Display
- Route Bar
- Guidance view
- Automatic Zoom
- Motorway exit previews
- Route Planning
- Bluetooth
- Wi-Fi
- Updates and New Items
- Maps
- Sounds and Warnings
- Voices
- MyDrive
- Language and Units
- System
- Automatic route recording
- Enable IFTTT service
- About
- Choose a search style
- Quick search
- Step by step search
- Format memory card
- Reset device
- Battery settings
- Your information & privacy
- Use my location and the information I enter to receive TomTom services
- Keep journey history on this device for optional features
- Help
- Getting Help
- Product certification
- UsingTomTom MyDrive Connect
- TomTom account
- Addendum
- Important Safety Notices and Warnings
- Safety messages
- Use with care warning
- Notice for oversized/commercial vehicles
- Proper mounting
- Pacemakers
- Other medical devices
- Device care
- Rating: DC5V, 1.2A
- Environmental and Battery information
- Operating temperature
- Device battery (Non-replaceable)
- Battery waste disposal
- WEEE – e-waste disposal
- Triman logo
- Warning for Australia
- Certification for New Zealand
- Customer support contact (Australia and New Zealand)
- TomTom MyDrive app
- Terms and Conditions: Limited warranty and EULA
- This document
- Model numbers
- CE mark and Radio Equipment Directive for TomTom GO Basic
- EU Specific Absorption Rate (SAR) compliance
- Accessories supplied with this device
- Copyright notices

109
Recording a track
You can record a track while you drive, with or without a route planned. After recording, you can
then export your track so that you can share it with others. Alternatively, you view it using TomTom
MyDrive if you’re logged in to TomTom MyDrive on your device.
To record a track, do the following:
1.
In the Main Menu, select Start Recording.
A red dot appears in the lower right-hand corner of the screen and initially flashes 3 times to
show that you are now recording. The dot remains on the screen until you stop recording.
2.
To stop recording, select Stop Recording in the Main Menu.
3.
Enter a name for your track or you can leave it at the suggested date-time combination.
4.
Select Add or Finished, depending on the device you are using.
5.
Your track is saved in My Routes.
Navigating using a track
You can import tracks on to your TomTom GO BASIC using TomTom MyDrive. To navigate using an
imported track, do the following:
1.
In the Main Menu, select My Routes.
2.
Select a track from your list.
The track route is shown on the map view.
Tip: To update the saved route in your My Routes list with the changes, select the route om
the map then select Save Changes to Route in the pop-up menu.
Note: You can export tracks as GPX files and save them on a memory card for sharing with
others.