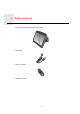
TomTom GO
1.
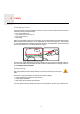
2. Read me first Read me first Mounting your device in your car Make sure that both the mount and your windscreen are clean and dry before you attach the mount. Place the device so that it does not interfere with your view of the road or of any of the controls in your car. To attach the mount, press the suction cup firmly against the windscreen on an area where the glass is flat. Then twist the grip on the base of the mount in a clockwise direction until you hear a click.
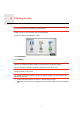
to frequently connect your navigation device to MyTomTom, to ensure you always have the latest updates. You can also log in to MyTomTom on the TomTom website. Tip: We recommend using a broadband internet connection whenever you connect your navigation device to MyTomTom. Setting up MyTomTom 1 2 To set up MyTomTom, do the following: 1. Connect your computer to the internet. 2. Start a browser and go to tomtom.com/getstarted. 3. Click Download now.
Charging your device The battery in your TomTom GO navigation device charges when you connect it to the car charger or to your computer. Important: You should plug the USB connector directly into a USB port on your computer and not into a USB hub or USB port on a keyboard or monitor. Safety Notice Some TomTom navigation devices contain a GSM/GPRS module which can interfere with electrical devices such as cardiac pacemakers, hearing aids and aviation equipment.
3. Safety Safety Installing the mount Consider carefully where to attach the mount in your car. The mount should not block or interfere with any of the following: • Your view of the road • Any of the controls in your car • Any of your mirrors • The airbag When your navigation device is in the mount, you should be able to reach the device easily without leaning or stretching. You can attach the mount to the windscreen, side window or use a Dashboard Mount Disk to attach the mount to your dashboard.
4. Planning a route Planning a route Important: In the interest of safety and to reduce distractions while you are driving, you should always plan a route before you start driving. To plan a route on your TomTom GO, do the following: 1. Tap the screen to open the Main menu. 2. Tap Navigate to... 3. Tap Address. Tip: The first time you plan a route, you are asked to select a country, state or region. Your selection is saved and used for all future routes until you change this setting.
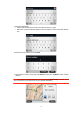
5. Enter the streetname. • Streets with similar names are shown in the list while you type. • When the correct streetname appears in the list, tap the name to select the destination. 6. Enter the house number, then tap Done. 7. The location is shown on the map. Tap Select to continue or tap Back to enter another address. Tip: If you want your final destination to be a car park, tap Park nearby and select a location from the list of car parks close to your general destination.
8. Select the type of route you want to plan. 9. When the new route is shown, tap Done. • For more information about the route, tap Details. • To plan a different route, tap Change route. Your TomTom GO starts to guide you to your destination, using spoken instructions and onscreen directions. Route summary The route summary shows an overview of your route, the remaining distance to your destination and the remaining estimated journey time.
To view LIVE summary information, tap the LIVE tab on the route summary screen. Tap any of the panels for more detailed information. The LIVE tab panels show the following information: • Traffic on route - tap this panel to view detailed information about traffic delays and other incidents on your route. • Speed cameras - tap this panel to open the Speed Camera menu. You can then report a speed camera or change your settings for speed camera warnings.
1. Tap Start-up settings in the Settings menu and then select Ask for a destination. 2. Tap Yes, then tap Yes again to begin entering information about the destination. 3. Select a symbol for the destination and tap Done to set the symbol, then tap Yes. Tip: To add new destinations, select one of the numbered symbols and enter a name for the new destination button. 4. Tap Yes and if required enter a new name, then tap Done. 5.
Navigation menu options When you tap Navigate to..., you can set your destination in many ways, not just by entering the address. The other options are listed below: Tap this button to use TomTom Local Search with Google to help you find shops and businesses in and around your current location. Local search You can choose to search for shops and businesses near you, near your destination, near any other destination or in a city.
Planning a route in advance You can use your TomTom GO to plan a route in advance, selecting your starting point and your destination. Here are some more reasons to plan a route in advance: • Find out how long a journey is going to take before you start. You can also compare journey times for the same route at different times of the day or on different days of the week. Your GO uses IQ Routes when planning a route. IQ Routes calculates routes based on the real average speeds measured on roads.
You can then select from the following options: Tap this button for a list of all the turn instructions on the route. This is very useful if you need to explain a route to someone else. Show instructions Tap this button to see an overview of the route using the map browser. Show map of route Tap this button to watch a demo of the journey. You can interrupt the demo at any time by tapping the screen. Show route demo Tap this button to open the route summary screen.
5. Voice control Voice control About voice control Instead of tapping the screen to control your TomTom GO, you can use your voice to control your GO. For example, to increase the volume on your GO, you can say, "Increase volume." To view the list of available commands, tap Help in the Main menu or the Setting menu then tap Product manuals and then tap What can I say? Important: Voice control requires a computer voice.
If the command is incorrect, say, "No" and repeat the command after you hear the tone. Your GO plans a route from your current location to your Home address. Tip: To stop your GO from listening out for further commands, say "Back" or "Cancel" or "Quit" or simply tap the screen. Planning a journey using your voice Important: In the interest of safety and to reduce distractions while you are driving, you should always plan a route before you start driving.
Tip: Different locations may have the same name, such as a road that spans multiple postcodes. When this happens you need to look at the screen and tap the correct location. If the street name you hear is incorrect, but the correct streetname is in the list, say the number next to the correct streetname or tap the streetname in the list. If the streetname is not shown in the list, say "Back" or "No" or tap Back to return to the previous screen and then say the streetname again when you hear the tone. 5.
To enter the destination using your voice, tap one of the following buttons: Tap this button to enter an address entirely using speech. Spoken address Spoken address helps you to enter information without tapping the screen. This option recognises the following spoken terms: • Commands: Yes, No, Back, Done, OK, Crossing. • Streetnames. • Cities and towns and their centres. • Favourites, postcodes and POIs.
6. Driving View Driving View About the Driving View When your TomTom GO device starts for the first time, you are shown the Driving View along with detailed information about your current position. Tap the centre of the screen at any time to open the Main Menu. You can choose the screen shown when you switch on your device by tapping Settings in the Main Menu, then tapping Start-up settings.
9. The name of the street you are on. 10.Navigation instruction for the road ahead and the distance to next instruction. If the second instruction is less that 150m after the first instruction, you see it shown immediately instead of the distance. Tap this part of the status bar to repeat the last voice instruction and to change the volume. You can also tap here to mute the sound. 11.The remaining journey time, the remaining distance and your estimated arrival time.
7. Advanced Lane Guidance Advanc ed Lane Guidance About lane guidance Note: Lane guidance is not available for all junctions or in all countries. Your TomTom GO helps you prepare for motorway exits and junctions by showing the correct driving lane for your planned route. As you approach an exit or junction, the lane you need is shown on the screen. Using lane guidance There are two types of lane guidance: • Lane images To turn lane images off, tap Settings in the Main Menu, then tap Advanced settings.
Tip: If no lane guidance is shown in the status bar and all lanes are highlighted, you can use any lane.
8. Making changes to your route Making change s to your route About route changes After you plan a route, you may want to change the route or even the destination. There are various ways to change your route without the need to completely replan the entire journey. To change the current route, tap Change route in the Main menu: Tap this button to change the current route. This button is only shown while there is a planned route on your GO.
Tap this button to avoid traffic delays on a planned route. Minimise delays It is not always possible to avoid all traffic delays. Your GO will check for traffic delays on your route and calculate the best route to avoid all or most of the delays. Note: This button is only available when Traffic is enabled in the Services menu. For more information about TomTom traffic information services, go to tomtom.com/services. Tap this button to change the current destination.
9. View map View map About viewing the map You can view the map in the same way as you might look at a traditional paper map. The map shows your current location and many other locations such as Favourites and POIs. To view the map in this way, tap View map or View route in the Main menu. You view different locations on the map by moving the map across the screen. To move the map, touch the screen and drag your finger across the screen. To select a location on the map, tap the location on the map.
You can also set your own marker. Tap the cursor button, then tap Set marker position to place a green marker at the cursor position. To turn markers off, tap Options, then Advanced and clear the Markers checkbox. 4. Options button 5. The cursor with streetname balloon. Tap the button in the streetname balloon to open the cursor menu. You can navigate to the cursor position, make a Favourite of the cursor position, or find a Point of Interest near the cursor position. 6.
Position the cursor on a location on the map, then tap Cursor and then tap one of the following buttons: Tap this button to plan a route to the cursor position on the map. Navigate there Tap this button to view information about the location on the map such as the address. View location Tap this button to create your own green marker and place it at the cursor position. Set marker position If a green marker exists, this button changes to Delete marker.
10. Map corrections with TomTom Map Share™ Map corrections with TomTo m Map Share™ About TomTom Map Share TomTom Map Share helps you correct map errors and share map corrections with the rest of the TomTom Map Share community. To correct your map and share map corrections with other Map Share users, tap Map corrections in the Services menu. Map Share allows you to send and receive map corrections for one year after the new version of a map is released.
These corrections are investigated and verified by TomTom and are included when the next map version is released. Map correction settings You can decide which map corrections from the Map Share community are used to correct your maps. To select a category, tap Map corrections settings in the Map corrections menu. There are three categories of map corrections: • Corrections verified by TomTom - this category only includes corrections investigated by TomTom.
Important: For safety reasons, do not enter the full details of a map correction while you are driving. Mark the location of the map error instead and enter the full details later. To show the report button in the Driving view, do the following: 1. Tap Map corrections in the services menu. 2. Tap Map correction settings. 3. Select the type of corrections you want to download. Then tap Done. 4. Read the instructions on the screen. Then tap Continue. 5. Select how you want to share your map corrections.
Tap this button to block or unblock a street. You can block or unblock the street in one or both directions. (Un)block street For example, to correct a street near to your current location, do the following: 1. Tap (Un)block street. 2. Tap Near you to select a street near your current location. You can select a street by name, a street near your Home location or a street on the map. 3. Select the street or section of a street you want to correct by tapping it on the map.
Tap this button to change the name of a street on your map. For example, to rename a street near to your current location: Edit street name 1. Tap Edit street name. 2. Tap Near you. 3. Select the street or section of a street you want to correct by tapping it on the map. The street you select is highlighted and the cursor shows the name of the street. 4. Tap Done. 5. Type the correct street name. 6. Tap Done. Tap this button to change and report incorrect road turn restrictions.
Tap this button to edit an existing POI. You can use this button to make the following changes to a POI: Edit POI • Delete the POI. • Rename the POI. • Change the telephone number of the POI. • Change the category that a POI belongs to. • Move the POI on the map. Tap this button to enter a comment about a POI. Use this button if you cannot edit the error with the POI using the Edit POI button. Comment on POI Correct house number Tap this button to correct the location of a house number.
11. Sounds and voices Sounds and voices About sounds and voices Your TomTom GO uses sound for the following: • Driving directions and other route instructions • Traffic information • Warnings that you set • Hands-free phone calls There are two types of voice available for your GO: • Computer voices Computer voices are generated by your GO. They provide route instructions and read aloud city and street names, traffic and weather reports, user messages and tutorials.
Tap the central panel on the status bar and move the slider to adjust the volume. The last route instruction is played so you can hear the new volume level. • In the Settings menu. Tap Settings in the Main menu, then tap Volume settings and move the slider to adjust the volume. Tap Test to listen to the new volume level. Automatic volume control To set your TomTom GO to automatically adjust the volume, do the following: 1. Tap Settings in the Main menu. 2. Tap Volume settings. 3.
12. Settings Settings About settings You can change the way your TomTom GO looks and behaves. Most of the settings on your device can be accessed by tapping Settings in the Main Menu. Use night colours / Use day colours Tap this button to reduce the brightness of the screen and display the map in darker colours. Use night colours When driving at night or when driving through a dark tunnel, it is easier to view the screen and less distracting for the driver, if the brightness of the screen is dimmed.
Phone settings Tap this button to open the phone settings menu. Phone settings For more information on connecting your phone and making hands-free calls, see Hands-Free calling. Status & Information Tap this button to find technical information on your TomTom GO such as the device serial number, application version and the map version. Status & Information You can also view the current status for GPS reception and your LIVE Services. For more information on LIVE Services, see LIVE Services.
Make your own menu Tap this button to add up to six buttons to your own personalised menu. Make your own menu If there are only one or two buttons in your menu, both buttons are shown in the Driving view. If you have three or more buttons in your menu, then a single button is shown in the Driving view which opens your menu when tapped. Voices Tap this button to change the voice that gives spoken directions and other route instructions. Change voice A wide range of voices are available.
MyTomTom account Tap this button to log in to your TomTom account. MyTomTom account You can only log in to one account at a time on your TomTom GO. If you have more than one account or several people share the same device, you can switch from one account to another as required. Manage POIs Tap this button to manage your own POI categories and locations.
Change Home location Tap this button to set or change your Home location. You enter the address in the same way as you do when you plan a route. Change Home location Your Home location provides an easy way to plan a route to an important location. For most people, your Home location will be your home address. However, you might prefer to set the location to another regular destination, such as your workplace. Switch map Tap this button to select the map you want to use for route planning and navigation.
Change car symbol Tap this button to select the car symbol that shows your current location in the Driving view. Change car symbol 2D/3D settings Tap this button to set the default view of the map. To switch between 2D and 3D views while driving, tap the centre part of the status bar in Driving View. 2D/3D settings It is sometimes easier to view the map from above, such as when navigating a complex road network. The 2D view shows a two dimensional view of the map as though viewed from above.
Change map colours Tap this button to select the colour schemes for day and night map colours. Change map colours Tap Search to search for a colour scheme by typing the name. To download more colour schemes, go to tomtom.com. Brightness settings Tap this button to set the brightness of the screen. Move the sliders to adjust the brightness level. Brightness settings To view the map and menus in day or night colours, tap Use night colours or Use day colours in the Settings menu.
Battery saving settings Tap this button to set the power saving features on your GO. Battery saving settings Advanced settings Tap this button to select the following advanced settings: Advanced settings • Show house number before street name - when this setting is selected, addresses are shown with the house number followed by the streetname, such as 10 Downing street. • Show street names - when this setting is selected, street names are shown on the map in the Driving View.
13. Points of Interest Points of Interest About Points of Interest Points of Interest or POIs are useful places on the map. Here are some examples: • Restaurants • Hotels • Museums • Parking garages • Petrol stations Tip: To report incorrect or missing information about an existing Point of Interest included with your map, use the Map Share service to share your corrections with the Map Share community. Creating POIs Tip: You can download POI sets and share your own POI sets using MyTomTom. 1.
Tap this button to set your Home location as a POI. Home This is useful if you decide to change your Home location, but first want to create a POI using the current Home address. Tap this button to create a POI from a Favourite. Favourite You might want to create a POI from a Favourite because you can only create a limited number of Favourites. If you want to create more Favourites you need to delete some Favourites. To avoid losing a Favourite, save the location as a POI before you delete the Favourite.
Tap this button to create a POI by saying the address. Spoken address Tap this button to select the location where your GO was last docked. Position of last stop The POI is created and saved in the selected category. Using POIs to plan a route When you plan a route, you can use a POI for the destination. The following example shows how to plan a route to a car park in a city: 1. Tap Navigate to... in the Main menu. 2. Tap Point of Interest. 3. Tap POI in city.
Tip: You can also use Local Search to find useful locations. For more information, about Local Search and other LIVE Services go to tomtom.com/services. Show POI on map Tap this button to select the types of Point of Interest (POI) you want to see on the map. 1. Tap Show POI on map in the Settings menu. Show POI on map 2. Select the POI categories you want to be shown on the map. Tap Search and use the keyboard to search for a category name. 3.
Tip: To remove a warning, tap on the category name and then tap Yes. POI categories which have been set with a warning, have a sound symbol next to the category name. 4. Set the distance as 250 metres and tap OK. 5. Select Sound effect and then tap Next. 6. Select the warning sound for the POI and then tap Next. 7. If you only want to hear the warning when the POI is directly on a planned route, select Warn only if POI is on route. Then tap Done. The warning is set for the selected POI category.
14. Help Help About getting help Tap Help in the Main menu or the Settings menu to navigate to emergency services centres and other specialist services and contact them by phone. For example, if you are involved in a car accident, you could use the Help menu to call the nearest hospital and tell them your exact location. Using Help to phone a local service To use Help to locate a service centre, contact the centre by phone and navigate from your current location to the centre, do the following: 1.
Tap this button to navigate your way on foot to a service centre. Walk to help Tap this button to see your current location on the map. You can then tap Phone for help and select the type of service you want to contact and tell them your exact location. Where am I? Tap this button to read a selection of guides including a First Aid guide. Safety and other guides Tap this button to read a selection of guides relating to your navigation device.
15. Hands-free calling Handsfree calling About hands-free calls If you have a mobile phone with Bluetooth®, you can use your TomTom GO to make phone calls and send and receive messages. Important: Not all phones are supported or compatible with all features. For more information, go to tomtom.com/phones/compatibility. Connecting to your phone First you must establish a connection between your mobile phone and your TomTom GO.
• Tap Phonebook entry to select a contact from your phonebook. Note: Your phonebook is automatically copied to your GO when you first establish a connection with your mobile phone. Not all phones can transfer the phonebook to your GO. For more information, go to www.tomtom.com/phones/compatibility. • Tap Recently dialed to select from a list of people or numbers you have called recently using your GO. • Tap Recent caller to select from a list of people or numbers who called you recently.
Tap this button to change the auto-answer settings. Auto-answer settings Tap this button to change your Home phone number. Change Home number Tap this button to disable Bluetooth on your TomTom GO. Disable Bluetooth Tap this button to select information you want to delete. You can delete the list of recent callers and the list of recently dialled numbers.
16. Favourites Favourites About Favourites Favourites provide an easy way to select a location without the need to enter the address. They do not need to be favourite places, they can simply be seen as a collection of useful addresses. Creating a Favourite To create a Favourite, do the following: 1. Tap the screen to bring up the Main Menu. 2. Tap Settings to open the Settings menu. 3. Tap Manage Favourites. 4. Tap Add. 5.
If you visit a POI you particularly like, for example a restaurant, you can add it as a Favourite. Point of Interest Tap this button to add your current location as a Favourite. My location For example, if you stop somewhere interesting, while you are there you can tap this button to create the Favourite. Tap this button to create a Favourite using the Map Browser. Select the location of the Favourite using the cursor, then tap Done.
5. Tap Select to choose to navigate to this Favourite. Tip: Use the left and right arrows to choose another Favourite from your list. Your GO calculates the route for you. 6. When the route is calculated, tap Done. Your GO will immediately start guiding you to your destination with spoken instructions and visual instructions on the screen. Changing the name of a Favourite To change the name of a Favourite, do the following: 1. Tap the screen to bring up the Main Menu. 2.
17. LIVE Services LIVE Services About LIVE Services There are a range of LIVE Services available for your TomTom GO. These services are subscription-based and currently include the following: • TomTom HD Traffic • Speed Cameras • Weather • Local Search with Google™ • QuickGPSfixTM Regional availability Note: Not all LIVE services are available in all countries. You may be able to use LIVE services when travelling abroad. For more information on available services, go to tomtom.com/services.
2. Tap on the service you want to renew. Your GO confirms that you want to renew your subscription. 3. Tap Yes. The renewal request is sent to TomTom. You should complete payment online, on or before the date shown on your GO. Renewing your LIVE Services subscription using the TomTom website 1. Go to tomtom.com/getstarted to install the TomTom driver, if it’s not already installed, and start using MyTomTom. 2. When prompted, connect your device to your computer using the USB cable.
The locations that match your search are shown in a list with their distance from your current location and Google star rating. 5. Tap one of the locations in the list. The location is shown on the map. Tap Show info to see more information about this location. 6. Tap Select. Choose whether you want to navigate there, show the location on a map, travel via that location or add it as a favourite.
18. Traffic information Traffic information Introducing traffic information You can receive traffic information in two ways: • TomTom HD Traffic • Traffic Message Channel (RDS-TMC) Using traffic information, your TomTom GO can automatically adjust your route to minimise any delays. About TomTom HD Traffic TomTom HD Traffic is a unique TomTom service providing real-time traffic information. For more information about TomTom services, go to tomtom.com/services.
Using Traffic information The traffic sidebar is shown on the right side of the Driving view. The sidebar informs you about traffic delays while you drive, using glowing dots to show you where each traffic incident is located on your route. The top of the traffic sidebar represents your destination and shows the total time delay due to traffic jams and other incidents on your route. The central section of the traffic sidebar shows individual traffic incidents in the order they occur on your route.
Setting the radio frequency for RDS-TMC information Note: Not all devices support setting the radio frequency. If you know the frequency of a particular radio station you want to use for RDS-TMC traffic information, you can set the frequency manually. To activate this feature, you must first enable manual tuning. 1. Tap the Traffic bar in the Driving View, then tap Traffic settings. 2. Select Tune manually by entering a frequency and then tap Done. Now you can enter the frequency of the radio station. 3.
The first time you use Home to work, you must set your traffic home and work locations. 1. Tap the traffic sidebar to open the Traffic menu. 2. Tap Show home-work traffic. Change homework 3. Set your home location and your work location. If you have already set the locations and want to change them, tap Change home-work. You can now use the Home to work and Work to home buttons. Note: The home location you set here is not the same as the home location you can set in the Settings Menu.
Note: You can also access the Show traffic on route screen by tapping the traffic area of the LIVE Route summary tab. Tap the left and right arrow buttons to move through each incident in turn, viewing the details of each one. This includes the type of incident, for example road works, and the length of delay caused by this incident. You can also access the details about individual incidents by tapping View map in the Main Menu and then tapping on the traffic incident symbol.
2. Tap Traffic settings. Traffic settings 3. To hear a beep sound when a new traffic incident occurs on your route, select Report if traffic on route changes and then tap Done. 4. If a faster route is found while you are driving, Traffic can replan your journey to use the faster route. Select one of the following options and then tap Done.
Wind Ice Snow Note: The incident avoided symbol is shown for any traffic incident that you avoid using a traffic service. Traffic menu To open the Traffic menu, tap the Traffic sidebar in the Driving View or tap Traffic in the Services menu. The following buttons are available: Minimise traffic delays Tap this button to re-plan your route based on the latest traffic information. Show home-work traffic Tap this button to calculate the quickest route from your home location to your place of work and back.
19. Weather Weathe r About Weather The TomTom Weather service provides detailed weather reports and 5-day weather forecasts for towns and cities. The information is provided by local weather stations and is updated hourly. Requesting a weather report To request a weather report for a specific location, such as the town or city for your final destination, do the following: 1. Tap Services in the Main Menu. 2. Tap Weather. 3.
Tap this button to enter an address. Address Tap this button to select a location in a list of recently used destinations. Recent destination Tap this button to select a location using a local search. Local search Tap this button to select a Point of Interest (POI). Point of Interest Tap this button to select your current location. My Location Tap this button to select a point on the map. Point on map Tap this button to enter a latitude and longitude map reference.
20. Speed Cameras Speed Cameras About Speed Cameras The Speed Cameras service warns you about the following roadside camera locations: • Speed camera locations. • Accident blackspot locations. • Mobile speed camera locations. • Average speed camera locations. • Toll road camera locations. • Traffic light camera locations. Speed camera warnings By default, warnings are given 15 seconds before you reach a speed camera location. You are warned in three ways: • Your TomTom GO plays a warning sound.
Tip: To change the number of seconds or warning sound, tap Alert settings in the Speed Cameras menu. Changing the way you are warned To change the way your TomTom GO warns you about speed cameras, tap the Alert settings button. Alert settings You can then set how close you want to be to a speed camera before you are warned and what type of sound will be played. For example, to change the sound that is played when you approach a fixed speed camera, do the following: 1. Tap Services in the Main Menu. 2.
Toll road camera Restricted road camera - located on a minor road that reduces traffic on a larger road Other camera Mobile camera hotspot Average speed check Accident black spot Bi-directional speed camera Ungated railway crossing Report button To show the report button in the Driving View, do the following: 1. Tap Services in the Main Menu. 2. Tap Speed Cameras. 3. Tap Enable report button. 4. Tap Done.
Note: If the type of camera you choose has a speed restriction, you can also enter the speed. A message confirms that your camera has been reported to the Speed Camera team at TomTom. Reporting a new speed camera while at home You do not need to be at the location of a speed camera to report the new location. To report a new speed camera location while you are at home, do the following: 1. Tap Services in the Main Menu on your navigation device. 2. Tap Speed Cameras. 3. Tap Report safety camera. 4.
This type of camera monitors traffic at toll road barriers. Toll road camera This type of speed camera checks the average speed of vehicles between two fixed points. Average speed check This type of camera checks traffic on roads where access is restricted. Vehicle restriction All other types of camera that do not fall into any of the above categories.
Intermediate warning - type 3 Once in the speed check zone, if you are driving at over 100% of the permitted speed and have not received a start of zone warning, you see a visual warning in the Driving View indicating the maximum permitted speed. You also hear a loud audible warning. These warnings occur at the FIRST intermediate point only and are there to remind you to slow down...
21. MyTomTom MyTo mTom About MyTomTom MyTomTom helps you manage the contents, maps and services of your TomTom GO navigation device, as well as giving you access to the TomTom community. It is a good idea to frequently connect your navigation device to MyTomTom, to ensure you always have the latest updates. You can also log in to MyTomTom on the TomTom website. Tip: We recommend using a broadband internet connection whenever you connect your navigation device to MyTomTom.
Tip: When you connect your navigation device to your computer, MyTomTom tells you if there are any updates for your device. MyTomTom account To download content and services from TomTom, you need a MyTomTom account. You can create an account when you start using MyTomTom. Note: If you have more than one TomTom device, you need a separate account for each device.
22. Customer support Customer support Getting help to use your navigation device You can find further online help at tomtom.com/support. Status & information Tap this button to open the Status & information menu. Status & information Tap this button to view technical information about your device, such as your serial number for your device and the TomTom App version. Version information Tap this button to check the status of your subscriptions to TomTom Services.
23. Addendum Addendum Important Safety Notices and Warnings Global Positioning System The Global Positioning System (GPS) is a satellite-based system that provides location and timing information around the globe. GPS is operated and controlled under the sole responsibility of the Government of the United States of America which is responsible for its availability and accuracy. Any changes in GPS availability and accuracy, or in environmental conditions, may impact the operation of your TomTom device.
For replacement chargers, go to tomtom.com for information about approved chargers for your device. The stated battery life is a maximum possible battery life. The maximum battery life will only be achieved under specific atmospheric conditions. The estimated maximum battery life is based on an average usage profile. For more information, see tomtom.com/batterytips.
Model names 4EH52, 4EH51, 4EH44, 4EH45, 4EJ51, 4EJ41, 4EJ41, 4ER41, 4ER5, 4EN42, 4EN52, 4EV42, 4EV52, 4ER51 80
24. Copyright notices Copyright notices © 2011 TomTom N.V., The Netherlands. TomTom®, and the "two hands" logo, among others, are Trademarks owned by TomTom N.V. or one of its subsidiaries. Please see www.tomtom.com/legal for warranties and end user licence agreements applying to this product. © 2011 TomTom N.V., Niederlande. TomTom®, das 'Zwei Hände'-Logo usw. sind registrierte Marken von TomTom N.V. oder eines zugehörigen Tochterunternehmens.
a www.tomtom.com/legal para consultar as garantias e o contratos de licença do utilizador final aplicáveis a este produto. © 2011 TomTom NV, Holland. TomTom™ og logoet med "de to hænder" er blandt de varemærker, produkter og registrerede varemærker, der tilhører TomTom International B.V. Vores begrænsede garanti og slutbrugerlicensaftale for indlejret software gælder for dette produkt; begge dokumenter findes på www.tomtom.com/legal. © 2011 TomTom N.V., Alankomaat.
produktui taikomas garantijas ir licencijavimo galutiniam vartotojui sutartis skaitykite internete adresu www.tomtom.com/legal. © 2011 TomTom N.V., Nīderlande. TomTom® un “divu rociņu” logotips ir prečzīmes, kas pieder TomTom N.V. vai kādam tā meitas uzņēmumam. Garantijas un gala lietotāja līgumus, kas piemērojami šim izstrādājumam, skatiet vietnē www.tomtom.com/legal. © 2011 TomTom N.V., Hollanda. TomTom® ve diğer logolar ile birlikte "iki el" logosunun mülkiyeti, TomTom N.V.
TomTom customer support team, visit tomtom.com/support and upon your request we will send you a CD with the corresponding source code. Linotype, Frutiger and Univers are trademarks of Linotype GmbH registered in the U.S. Patent and Trademark Office and may be registered in certain other jurisdictions. MHei is a trademark of The Monotype Corporation and may be registered in certain jurisdictions.