TomTom GPS User Manual 1.
Contents Welcome 5 What's new 6 What's new in this release ........................................................................................ 6 Getting started 7 Your watch 9 About your watch .................................................................................................. 9 Wearing your watch ............................................................................................... 9 Cleaning your watch....................................................................
Music 33 About music ....................................................................................................... 33 Charging supplied headphones ................................................................................ 33 Pairing headphones to watch .................................................................................. 34 Changing earbuds ................................................................................................ 36 Wearing your headphones ..............
Cadence and Speed Sensor .....................................................................................
Welcome This User Manual explains everything you need to know about your new TomTom Runner 3, TomTom Spark 3 or TomTom Adventurer watch. If you want a quick read of the essentials, we recommend that you read the Getting started page. This covers downloading TomTom MySports Connect and using the desk dock.
What's new What's new in this release TomTom Runner 3 / Spark 3 Route Exploration Explore new terrain and upload trails to your watch. To learn more, go to Following a new trail in this manual You can use MySports to preload a trail onto your TomTom GPS watch for use during an activity and to manage trails. To learn more, go to Manage trails with MySports. Leave a path as you run to find your way back. Available on GPS-based activities: Run, Cycle, Freestyle.
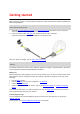
Getting started Before you start training, it's a good idea to charge your watch, download any software updates and download QuickGPSfix. Note: QuickGPSfix helps your watch get a GPS fix and find your location quickly. It also saves your battery and prolongs its life. 1. Download TomTom MySports Connect from tomtom.com/123 and install it on your computer. TomTom MySports Connect is available for free. 2. Place your watch in the desk dock and connect the dock to your computer.
Pairing your watch with your phone To learn more, go to Phone in this guide.
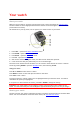
Your watch About your watch When you use your watch, you start from the clock screen. This screen shows the time and date. The hour number is shown slightly dimmed and the minutes are shown brighter so you can see the precise time more clearly. Use the button to press up, down, left or right to go to other screens on your watch. 1. 2. 3. 4. 5. 6. Press LEFT - opens the ACTIVITY TRACKING screen. Press DOWN - opens the SETTINGS menu. Press RIGHT - opens the ACTIVITIES menu.
Wear the watch in the normal way, with the watch face on top of your wrist and the bottom of the watch touching your skin, away from the wrist bone. Do the strap up so that it is tight to your wrist without being uncomfortable. You get the most accurate results from the heart rate sensor when you are warmed up. Important: To improve accuracy, KEEP STILL until your heart rate is detected. Cleaning your watch It is recommended that you clean your watch once a week if you use it frequently.
Using the heart rate sensor To get the best performance from the heart rate sensor, see Wearing your watch. Continuous heart rate tracking is switched OFF by default. Note: The sensor cannot measure your heart rate while swimming. Removing your watch from the strap You may want to remove your watch from the wrist strap in order to charge it or before placing it in the holder before using the bike mount. To remove your watch from the wrist strap, do the following: 1.
Important: When you place your watch in the dock, you may get one of three types of connection: Charging using a wall socket or USB socket with no data capabilities. Full connection including access to MySports. 3. To remove your watch from the desk dock, pull the watch away from the dock, following the curve of the back of the watch.
1. Slide the handlebar strap into the hook at the back of the watch holder. Choose the right length for the size of your handlebars. Tip: The strap has two holes so that it fits a range of different sizes of handlebars from 22 mm to 32 mm. Select the hole that fits your handlebars best.
2. Place the watch holder on your handlebar and wrap the strap around the bar. 3. Use the clip on the bottom of the holder to attach the handlebar strap. The strap should now be attached securely around the handlebar.
4. Remove your watch from the wrist strap. Open the holder by pressing as shown below. Lift the cover. 5. Slide your watch into the holder as shown. 6. Make sure your watch clicks securely into place.
7. Close the holder over the top of the watch, ensuring that it clicks as you close it. You are now ready to go cycling! Removing your watch from the holder You may want to remove your watch from the holder in order to charge it or while attaching the bike mount to your handlebars. To remove the watch from the holder, do the following: 1. Open the holder by pressing as shown below and then lift the cover. 2. Push the watch back towards you to unlock it from the holder.
3. Slide the watch out towards you into the palm of your hand. Using an O-ring If you lose your bike mount strap, you can use a standard O-ring to mount your watch on your handlebars. To use an O-ring, do the following: 1. Turn the watch over and insert the O-ring in the hook nearest the front of the watch. 2. Find a piece of rubber, for example, a piece of an old bicycle inner tube. This is needed to sit between the mount and handle bars and prevents slipping. 3.
About screen From the clock screen, press DOWN. Press UP until you see ABOUT at the top of the menu. Press RIGHT to open the About screen. The About screen shows the following information: BATTERY - the battery power left on your watch. To charge the battery, place the watch in the desk dock and connect the dock to your computer. STORAGE - the amount of space used up on your watch. If you are running out of space, connect your watch to your computer.
Performing a reset Soft reset A soft reset is performed each time you disconnect your watch from a wall charger or computer. To perform a soft reset on your watch, follow these steps: 1. Connect your watch to a wall charger or computer. Wait until your watch shows a battery symbol. If you are using a computer, wait until MySports Connect finishes updating your watch. 2. Disconnect your watch from the wall charger or computer. The software on your watch restarts. This performs a soft reset on your watch.
5. Keep your watch connected when the window for MySports Connect opens again. 6. Follow the instructions in MySports Connect to setup your watch.
Route Exploration About viewing trails Note: Available for all GPS-based activities: Run/Cycle/Freestyle (Runner3 and Spark3) and Trail running/Hiking (TomTom Adventurer) To view a trail while doing an activity, do the following : 1. Start an activity that uses a trail, for example, trail running. 2. To see your trail, press RIGHT and then press UP from the Heart Rate Zone screen. Tip: If a trail has been pre-selected, you see it automatically. You see the full trail displayed as a thin line.
Tip: A scale bar is shown at the bottom of the screen and the trail orientation is always North Up. Following a new trail Note: Available for all GPS-based activities: Run/Cycle/Freestyle (Runner3 and Spark3) and Trail running/Hiking (TomTom Adventurer) You can use your TomTom Adventurer Watch to follow a new trail that has been uploaded to your watch from MySports. During your trail run, you see the same metrics as for a run but with the addition of elevation information.
Upload trails from MySports to your watch 15 trails can be stored on your watch. Any changes are automatically synced using the MySports Mobile app or the MySports website. Uploading a trail from a GPX file To upload a trail to your watch from a .GPX file do the following: 1. Download a GPX file from a third party website such as Strava.com, RidewithGPS.com, Mapmyrun.com etc. 2. Log in to the MySports website. 3. Click on the Planning tab. 4. Click Upload trail. 5. Double-click a GPX file on your computer.
3. Click More in the top right hand corner of the screen. 4. Click COPY TO TRAILS. The trail then appears in the trails list of the PLANNING section. 5. Connect your watch to your computer. Your trail is automatically uploaded to your watch when a synchronisation is done.
2. After starting your activity, press RIGHT to review your heart rate if you have a Cardio watch and you'll automatically see the breadcrumb trail. For more information about what you see on the screen, see About viewing trails. Using the compass Note: Available for all GPS-based activities: Run/Cycle/Freestyle (Runner3 and Spark3) and Trail running/Hiking (TomTom Adventurer) Your TomTom GPS Watch has a compass so that you can instantly see which direction you are going.
The compass works best when the watch is kept level. If the compass doesn't show the correct direction, you need to calibrate the compass. Note: The compass may not work correctly when the watch is close to a magnetic object such as when it is mounted on the steel handlebars of a bicycle. Calibrating the compass It is important to regularly calibrate your compass to maintain its accuracy. To calibrate your compass, follow these steps: 1. 2. 3. 4. From the Clock screen, press DOWN to go to SETTINGS.
b. One full rotation forwards. c. One full rotation with the screen facing you. Repeat steps a-c until the compass is calibrated. When calibrated the watch gives an alert and shows a tick. To see a video of how to calibrate your watch, go to https://youtu.
Adventurer activity types This section of the manual covers features that are specific to the TomTom Adventurer watch. Trail running You can use your TomTom Adventurer Watch for trail running. During your run, you see the same metrics as for a run but with the addition of elevation information as follows: 3D distance Gradient Altitude Altitude delta Total ascent or climb. To run a trail, do the following : 1.
Tip: If a trail has been pre-selected, you see it automatically. For more information about what you see on the screen, see About viewing trails. Note: It is important to regularly calibrate the compass to ensure its accuracy. Note: If your watch gets dirty or wet, clean the holes around the barometer so that it can measure pressure accurately. Skiing and snowboarding Note: Available on TomTom Adventurer watches only. You can use your TomTom Adventurer Watch for skiing and snowboarding.
Activity tracking About activity tracking You can use your TomTom GPS Watch to track how active you are. Here are some of things you can do: Track steps, time spent being physically active, calories burned and distance moved. Set a daily goal for one of these metrics on your watch. Use a weekly goal that is automatically generated based on your daily goal multiplied by 7. See your daily and weekly progress for your set goal.
Monitoring your activity To see how active you have been, do the following: 1. 2. 3. 4. From the Clock screen, press LEFT to see how you are progressing towards your goal. Press UP or DOWN to see distance, time, or calories, depending on the goals you have set. To see steps per week, press LEFT again. Press RIGHT twice to go back to the Clock screen.
Sleep tracking About sleep tracking You can track how much you sleep using your TomTom GPS Watch. Here are some of things you can do: Track your how long you are sleeping for each day, week, month or year. You can upload your sleep tracking metrics to the TomTom MySports website and TomTom MySports mobile app. Your watch measures sleep based on motion and it makes an assumption that when you are not moving after a certain time in the afternoon, you are asleep.
Music About music You can store and play music on your TomTom GPS Watch and listen to it during your activities. After you have paired your headset and started an activity, you see a music screen. Pairing headphones to watch Wearing your headphones Putting music on your watch Playing music Note: Music is not available on all watch models. Charging supplied headphones Some TomTom GPS watches are supplied with their own headphones for listening to music.
Note: When the USB socket cover is open, be careful not to get dirt, sand or water etc. in the socket. Pairing headphones to watch Some TomTom GPS watches are supplied with their own headphones for listening to music. Alternatively you can use most Bluetooth headsets or speakers to listen to music played on your watch. Tip: If you wish to use or buy your own headphones, search for the 'Headphone Compatibility' FAQ at tomtom.com/support to see a list of compatible headphones.
You could also put one earbud in one ear so you can hear the audio feedback during pairing. 3. Press UP from the Clock screen. Your watch searches for headphones. 4. If only one set of headphones is found, pairing starts. Note: If more than one set of headphones are found, move at least 10m away from the other sets of headphones. 5. When pairing between your watch and headphones is successful, a tick appears with the name of your headphones shown.
Important: If pairing is not successful, switch OFF your headphones and try again. Changing earbuds Some TomTom GPS watches are supplied with their own headphones for listening to music. The supplied headphones come with either the medium or large earbuds fitted, and with other sizes in the box.
Putting music on your watch You can store and play music on your TomTom GPS Watch and listen to it during your activities. Your watch supports the following music file types: MP3 Sample rate: 16KHz to 48KHz Bit rate: 8 kbps to 320 kbps Mono/stereo channels and joint stereo. Artist, track title and length are displayed for the following languages: English, Czech, Danish, German, Spanish, French, Italian, Dutch, Norwegian, Polish, Portuguese, Finnish and Swedish.
2. Press the middle button for 3 seconds to switch off the headphones - the red light flashes twice. Using the headset controls To play music using the controls on the supplied headset, do the following: PLAY Press the middle button to play music. PAUSE Press the middle button to pause the music. Tip: You can also press UP on your watch to pause a track. VOLUME UP Press the right-hand button as shown in the image above to increase the volume.
Note: You cannot play music while swimming or using the stopwatch. 4. To select the next song, press RIGHT. 5. If more than 3 seconds of the track has played, press LEFT to restart the track. Pressing LEFT again takes you to the previous song. Tip: When you are carrying out an activity the Music player screen can be found at the very top of the metric list. The same player controls apply. Tip: To select a music playlist, press DOWN when you see the GO message on starting an activity.
About the voice coach When playing music, a voice coach guides you through the important stages of your training. The voice coach is on by default and you hear the voice coach every time the watch beeps or buzzes with a message that needs your attention. As you are listening to music, the buzzer in the watch cannot be heard so your watch interrupts the music with a brief message. General prompts: Watch ready, Demo mode, Bluetooth not working when swimming.
Activities About activities In the activities menu, you can start one of the activities available on your watch: Run Cycle Swim Treadmill Freestyle Gym Indoor cycling Stopwatch When you select RUN, CYCLE or FREESTYLE, your watch uses its internal GPS receiver to measure your speed, and to record the route you have taken. If your watch has a heart rate sensor and the heart rate sensor is set to ON, your heart rate is shown during your activity. This includes running, cycling, treadmill and freestyle.
About calorie estimation Calories are estimated based on the type of sport, your gender, your weight and the intensity and duration of the exercise. 24x7 calorie estimation is based on your BMI and then adjusted for steps, active time, sports activities, etc., to generate a theoretical total for the day. Heart rate is not used during 24x7 calorie counting because it would drain the watch battery too quickly. Note: Not all activities are available on all watches.
2. Click All sports and select Activity tracking. 3. Click All and select Day. 4. At the bottom of the page, select Max Heart Rate. View your heart rate in the MySports mobile app Note: 24x7 heart rate information is only available in the daily view, day by day. 1. On the ACTIVITIES screen, tap Today. 2. Below the date, swipe left. 3. Tap Max Heart Rate. Starting an activity To start an activity on your watch, do the following. 1. From the clock, press RIGHT. 2.
Press RIGHT to start your activity. 1. When you are doing an activity, your watch shows information, such as the distance, time, pace and heart rate if you have a monitor. Press UP and DOWN to change the information that you see. 2. You can pause the activity if you're just taking a break, or stop the activity completely. For each type of activity, you can select different training programs, and select to see different information while you are training.
Some examples of metrics available: PACE - your current pace. For swimming, this is shown in minutes per 100m. AVG PACE - your average pace for the current activity. HEART RATE - your heart rate. This metric is only available if you have a Heart Rate Sensor connected. SPEED, PACE or BOTH - for activities other than swimming, you can choose to see speed, pace or both metrics at once. SWOLF - this metric is only given for swimming activities.
Settings for Running Before you start an activity you can choose a training program and also decide what information you would like to see as you train. There are a wide range of metrics that you can choose to see while running including calories, heart rate, heart rate zone and distance. Choosing other metrics to display Note: To get help on choosing which metrics you want to see during an activity, see Choosing which metrics to display.
As you swim, your watch registers your strokes and the number of turns you make in the pool. To calculate the distance you have swum and your speed, your watch uses the pool size and the number of turns you have made. If the pool size is not accurate, the metrics for your swimming activity cannot be worked out correctly. To change the POOL SIZE settings, do the following: 1. 2. 3. 4. 5. 6. From the activity start screen, press DOWN to open the SETTINGS menu. Select POOL SIZE, then press RIGHT.
1. When prompted to calibrate your watch, pause the treadmill. To pause your watch, press LEFT during the activity. 2. On your watch, press DOWN to open the SETTINGS menu. 3. Select CALIBRATE then press RIGHT. 4. Change the distance to match the distance shown on the treadmill. 5. Press RIGHT to go immediately back to the activity screen. Choosing other metrics to display Note: To get help on choosing which metrics you want to see during an activity, see Choosing which metrics to display.
To find the circumference of your rear wheel, you can either measure the wheel yourself using a tape measure, or look up the value in an online calculator. For example, on this site you can find the circumference using the diameter of the wheel and the thickness of the tyre: www.bikecalc.com/wheel_size_math For example, if your wheel size is 700c and the tyres are 25 mm thick, the circumference is 2111 mm. This is the value you should enter.
Training programs About training programs For each type of activity, the following training programs are available: NONE GOALS INTERVALS LAPS ZONES RACE From the clock screen, do the following to see the list of training programs: 1. 2. 3. 4. Press Press Press Press RIGHT and then select your choice of activity. RIGHT. DOWN and select TRAINING. RIGHT and choose a training program.
This screen shows the percentage of your target you have reached and the remaining distance, time or number of calories. Tip: When running, you can head away from home until your progress reads 50% and then turn and come back again. Progress alerts When training to a goal, your watch alerts you at these stages: 50% 90% 100% 110% Intervals How to get there: Activity screen > Press DOWN > TRAINING > INTERVALS > WARMUP, WORK, REST, # SETS, or COOLDOWN. Select this option to use interval training.
During interval training, you see an alert for the next stage of interval training: You see the name of what you are doing, and how long this part of the set is in either time or distance. You are also warned with beeps and buzzes when you need to switch to the next stage in your interval training. Tip: When you use interval training on the watch, interval sections are marked as laps so you can better track pace and other metrics for each interval section.
Zones How to get there: Activity screen > Press DOWN > TRAINING > ZONES > PACE, SPEED, HEART or CADENCE. Select this option to train within a target zone. You can select from the following training zones, depending on the activity: PACE - select this option to set your target time per mile or kilometre. You can set your target time and a minimum and maximum above and below the target that you allow yourself.
Monitoring your progress From the activity progress screen, press RIGHT to see a graphical overview of how close your training is to the zone you set. The graph shows if you are above or below your target zone and by how much, throughout your activity. You regularly receive alerts to tell you if you are in your zone or outside your zone: If you are outside your training zone, an alert is played and the screen shows if you are above or below your zone.
4. Press RIGHT and choose ZONES. 5. Press RIGHT and choose HEART. 6. Press RIGHT and choose from the following heart rate zones: SPRINT - select this zone when using interval training. SPEED - select this zone for high tempo training to improve your speed and fitness. ENDURE - select this zone for moderate to high tempo training to improve your lung and heart capacity. FAT BURN - select this zone for moderate tempo training that is great for weight loss.
This graph, shown above, is a heart rate zone summary. It shows the percentage of time spent in each zone with your current zone highlighted in white. This graph shows your heart rate over the last 2.5 minutes of activity and the percentage of time spent in each heart rate zone after an activity. Tip: You can view your progress in a heart rate zone even when you are using a Graphical Training Partner like Race or Goal.
Note: If your watch is already connected to the website and you make changes to your races, the changes won’t get synchronised automatically - you need to disconnect and reconnect your watch. The activity or race from the MySports website consists of a distance and a time. When you use the Race training program, you can see if you are ahead or behind in the race and by how much, as you train. On your watch, press RIGHT from the activity screen to see a representation of the race.
Transferring your activities to TomTom MySports Connect your watch to your computer to transfer details of your activities to TomTom MySports or another sports website that you choose, using TomTom MySports Connect. You can also transfer details about the activity to your computer in several different file formats.
Settings About settings From the clock screen, press DOWN to open the SETTINGS menu. These settings determine the overall behaviour of your watch. For each activity, there are also settings related to that activity.
Tracker Switching off activity tracking From the Clock screen on your watch, press DOWN to open the SETTINGS menu, then select TRACKER. Activity tracking is ON by default so select OFF to switch off activity tracking. GOALS From the Clock screen on your watch, press DOWN to open the SETTINGS menu, then select TRACKER. Press RIGHT to select GOALS. For more information, see Setting a daily activity goal. SLEEP From the Clock screen on your watch, press DOWN to open the SETTINGS menu, then select TRACKER.
Tip: When the heart rate is detected, the monitor stays active for another 30 seconds in case you want to start an activity straight away. Phone For information as to why you should want to pair your watch with your phone or mobile device, see TomTom MySports app. To pair your watch with a phone or mobile device, do the following: 1. Make sure that your phone or mobile device is close by. 2. On your phone, make sure that Bluetooth is enabled. 3.
As long as you have the mobile app active or running in the background on your phone or mobile device, the watch automatically tries to connect when it has a new activity to upload or when the QuickGPSfix data is out-of-date. If you open the MySports app on your phone and it is trying to connect to your watch, you may need to wake up your watch by moving away from the clock screen. Press DOWN, LEFT or RIGHT from the clock screen.
DEMO Select DEMO to turn the demo mode on and off. In demo mode, your watch behaves as if it has a GPS fix and you are training, even if you are not. Any activities completed in demo mode are not added to your history of activities. NIGHT Select NIGHT to turn the night mode on or off. If the night mode is on, the backlight comes on and stays on during an activity. When you stop the activity, the light goes off again.
Adding sensors About sensors Sensors are external devices which you can link to your watch to provide information about your activity. Two types of sensors can be used with your watch: External Heart Rate Sensor - this measures your heart rate as you train. The external TomTom Heart Rate Sensor is included in some products and available as an accessory for others. Cadence & Speed Sensor - this measures your cadence and speed as you cycle.
5. Select HEART, then press RIGHT to turn it on. 6. When you begin an activity, your watch connects to the sensor and you see a heart icon at the bottom of the screen. When your watch is trying to connect to the sensor, the heart flashes. The first time your watch tries to connect to your sensor, if it finds more than one sensor, your watch doesn't know which sensor to connect to. Move to a place where there are no other sensors within range of your watch.
Important: The smaller part of the sensor needs to face the crankarms and should not be attached to the top of the chainstay. You may have to tilt the main body of the sensor towards the wheel depending on your bike. You should make this adjustment after you have attached the spoke magnet. 2. Attach the spoke magnet to one of the spokes on your bike. The magnet should face the chainstay where you attached the chainstay sensor. 3.
4. Attach the crankarm magnet to one of the crankarms on your bike. The magnet should face the chainstay where you attached the chainstay sensor. Tip: Make sure the different parts of the Cadence & Speed Sensor are lined up correctly on your bike. The spoke magnet should pass the main body of the chainstay sensor and the crankarm magnet should pass the tip of the sensor. 5. 6. 7. 8. 9. 10. Once you have adjusted the sensors to the right position, tighten the cable ties so they are held securely in place.
When you have connected to your sensor once, your watch always reconnects to your sensor. When the chainring icon has stopped flashing, your watch is ready to measure your speed and cadence. You can start cycling with no GPS fix but for proper GPS tracking, wait until the GPS icon has also stopped flashing before you start your cycling activity. Tip: When you are using the Cadence & Speed Sensor for cycling activities, you are warned when no speed data is being received from the sensor.
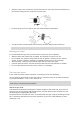
TomTom MySports account Your TomTom MySports account is a central storage location for all your training and fitness information. To create an account, click the button in TomTom MySports Connect, or go directly to the website: mysports.tomtom.com As you can see from the diagram below, you can transfer your activities to your MySports account using either TomTom MySports Connect or the TomTom MySports app.
TomTom MySports Connect TomTom MySports Connect does the following: Helps you set up your watch. Updates the software on your watch when new versions become available. Transfers your activity information to your TomTom MySports account or another sports website that you choose. We can currently transfer activity information to Endomondo, Strava, MapMyFitness, RunKeeper, Jawbone and Nike+. TomTom MySports Connect can also transfer activity information to your computer in a number of file formats.
TomTom MySports mobile app The TomTom MySports mobile app does the following: Transfers your activity information to your TomTom MySports account automatically when in range of your phone. See: Exporting your activities to other websites and file types Transfers any settings you make on TomTom MySports to your watch. Updates the QuickGPSfix information on your watch.
Sharing your activities You can share MySports activities using the Social Sharing feature of your MySports account. To start sharing, do the following: 1. 2. 3. 4. Log in to MySports. Select an activity from your MySports dashboard. Click the Share button in the top-right corner. Choose, for example, Facebook or Twitter and add a comment to personalise your post.
Addendum Warning Warning - TomTom GPS watch The TomTom GPS watch provides you with information that encourages you to adopt a more active lifestyle. The information and data provided is a close estimate of your activity and may not be completely accurate. Data shown can vary per device used or per person and may be dependent on their height, weight, age, build, and activity level. The TomTom GPS watch cannot be relied on or used as a replacement for medical advice.
WEEE directive The wheelie bin symbol on the product or its packaging indicates that this product shall not be treated as household waste. In line with EU Directive 2012/19/EU for waste electrical and electronic equipment (WEEE), this electrical product must not be disposed of as unsorted municipal waste. Please dispose of this product by returning it to the point of sale or to your local municipal collection point for recycling. By doing this you will help conserve the environment.
Changes or modifications not expressly approved by the party responsible for compliance could void the user's authority to operate the equipment. FCC ID: S4L-4REM, S4L-4RFM, S4L-4R0M IC ID: 5767A-4REM, 5767A-4RFM, 5767A4R0M FCC RF Radiation Exposure Statement The transmitters within this device must not be co-located or operating in conjunction with any other antenna or transmitter. Responsible party in North America TomTom, Inc.
New Zealand: 0800 450 973 Accessories supplied with this device USB cable Headphones supplied with some models Model names TomTom GPS: TomTom GPS Watch: 4REM TomTom GPS Cardio Watch: 4RFM TomTom GPS Watch Cable: 4R00 TomTom GPS Watch: 4REM, TomTom GPS Cardio Watch: 4RFM, TomTom GPS Watch Cable: 4R00, TomTom Bluetooth Sports Headset: 4R0M 76
Copyright notices © 2014 - 2016 TomTom. All rights reserved. TomTom and the "two hands" logo are trademarks or registered trademarks of TomTom N.V. or one of its subsidiaries. Please see tomtom.com/legal for limited warranty and end user licence agreements applying to this product. Linotype, Frutiger and Univers are trademarks of Linotype GmbH registered in the U.S. Patent and Trademark Office and may be registered in certain other jurisdictions.