TomTom NAVIGATOR
Chapter 1 Before you start... Before you start... Installation If you have purchased TomTom NAVIGATOR on a TomTom memory card, insert the memory card in your device. Then go to step 4 below. If you are installing TomTom NAVIGATOR from a DVD do the following: 1. Connect your device to your computer, or insert the memory card you are using into a card reader/writer attached to your computer. 2. Insert the DVD in your computer. 3. Follow the instructions in the setup program.
Tap Automatic, then enter your product code. The product code is printed on the product code card that is included with your product. TomTom NAVIGATOR will connect to TomTom using the wireless data connection and activate the map. • Manually To activate a map manually, do the following: 1. Tap Manual. 2. Go to this website: www.ttcode.com 3. Follow the instructions on this page to get an activation code. 4. Enter the activation code on your device to activate the map.
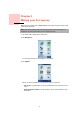
Chapter 2 Making your first journey Making your first journey Planning a route with TomTom NAVIGATOR is very simple. To plan your first route, follow the steps below. Note: You should always plan your journeys before you start driving. It is dangerous to plan routes when you are already moving. 1. Tap the screen to bring up the main menu. 2. Tap Navigate to... For your first journey, we will navigate to an address. 3. Tap Address.
• Postcode - tap this button to enter a postcode as your destination. Note: You can enter a postcode for any country. In the UK and the Netherlands, postcodes are detailed enough to identify a house on their own. In other countries you can enter a postcode to identify a town or area. You will then have to enter a street and house number. • Crossing or intersection - tap this button to set your destination as the point where two streets meet. For your first journey, we will enter an exact address. 4.
Tap YES to enter an arrival time. NAVIGATOR shows you whether you will arrive on time. For more information, see Arrival times on page 6. The route is then calculated by your TomTom NAVIGATOR. 9. When the route has been calculated, tap Done. TomTom NAVIGATOR will immediately start guiding you to your destination with spoken instructions and visual instructions on the screen. Note: Before you can plan a route in this way, TomTom NAVIGATOR must first locate your current position.
Your arrival time is constantly recalculated during your journey. The status bar shows whether you will arrive on time or late, as shown below: You will arrive 55 minutes before the arrival time you entered. If the estimated arrival time is more than five minutes before the time you entered, it is shown in green. You will arrive 3 minutes before the arrival time you entered. If the estimated arrival time is less than 5 minutes before the time you entered, it is shown in yellow.
Tap this button to navigate to the current position of a TomTom Buddy. Don’t forget that the Buddy may move before you reach him. TomTom Buddy For more information about TomTom Buddies, see TomTom PLUS on page 38. Tap this button to navigate to the address of a contact on your device. Contact Planning in advance You can also use your NAVIGATOR to plan journeys in advance by selecting both your starting point and your destination.
More information about a route To find out about your route in detail, tap the Details button on the route summary screen. You can then select from the following options: Tap this button for a list of all the turn instructions on the route. This is particularly useful if you need to explain a route to someone else. Browse as text Tap this button to see each turn in the journey. Tap the right and left arrows to move forwards and backwards through the journey.
Chapter 3 Driving View Driving View A Buttons to zoom in and zoom out on your position (touchscreen devices only). To zoom in and out on your position on devices without a touchscreen, push the joystick up to zoom in, and push the joystick down to zoom out. B Your current position. C The name of the next major road or road sign information, if applicable. D The next instruction. This area shows you what to do and when you will have to do it.
Chapter 4 Menus Menus Main menu Tap the screen at any time when TomTom NAVIGATOR displays the Driving View to open the Main Menu. • Navigate to... Tap this button to start planning a route. • Find alternative... Tap this button if you want to avoid part of your route, travel via a specific location or calculate an alternative route. • TomTom Traffic Tap this button to enable or disable traffic information. For more information, see TomTom Traffic on page 36.
Chapter 5 Finding alternative routes Finding alternative routes Once you have planned a route, you may want to change something about the route, without changing your destination. Why change the route? Maybe for one of these reasons: • You can see a roadblock or a line of traffic ahead. • You want to travel via a particular location, to pick someone up, stop for lunch or fill up with petrol. • You want to avoid a difficult junction or a road you don’t like. Tap Find alternative...
Tap this button to change your route so that it passes a particular location, perhaps to pick someone up on the way. Travel via... You choose the location you want to pass in the same way as you choose a destination. So you can select from all the same options: for example, Address, Favourite, Point of Interest and Point on map. Your NAVIGATOR will calculate a new route to your destination that passes the location you chose. Using this button, you can only travel via one location.
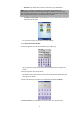
Chapter 6 Using the map Using the map Every time you use your TomTom NAVIGATOR to plan a route, you are using the map. However, you can use the map in many other ways. To open the map, tap Browse map in the Main Menu. Note: If you are using TomTom NAVIGATOR on a device without a touchscreen, the map browser looks slightly different. There is no scale bar and there are only two buttons: Options and Done. The Find and Cursor buttons are part of the Options menu. Use the number keys to zoom.
in the map browser: the Find button and the Cursor button. You can also set what is shown on the map and centre the map on your GPS position. E The cursor F The Find button Tap this button to find specific addresses and Points of Interest on the map. G The Cursor button Tap this button to navigate to the cursor position, make a Favourite of the cursor position, or find a Point of Interest near the cursor position. See below for more information. H The zoom bar.
Tap this button to create a POI at the cursor position. For more information about POIs, see Points of Interest on page 21. Add as POI Tap this button to travel via the cursor position. This button is only available if you are currently navigating to a destination. Travel via...
Chapter 7 Favourites Favourites What are Favourites? Favourites are places that you go often. You can create Favourites so that you don’t have to enter the address every time you want to navigate there. They don’t have to be places you like, just useful addresses. How can I create a Favourite? From the Main Menu, tap Add Favourite. Note: The button Add Favourite may not be shown on the first page of the Main Menu. Tap the arrow to open other pages in the Main Menu.
You can add a Point of Interest (POI) as a Favourite. Does it make sense to do this? Point of Interest If you visit a POI you particularly like, for example a restaurant, you can add it as a Favourite. To add a POI as a Favourite, tap this button, then do the following: 1. Narrow your choice of POIs by selecting the area where the POI is. You can select one of these options: • POI near you - to search from a list of POIs near your current position.
Tap this button to create a Favourite by entering latitude and longitude values. Latitude Longitude Tap this button to make a Favourite of the current position of a TomTom Buddy. TomTom Buddy For more information about TomTom Buddies, see TomTom PLUS on page 38. Tap this button to make a Favourite of the address of a contact on your device. Contact How can I use a Favourite? You will normally use a Favourite as a way of navigating to a place without having to enter the address.
2. Tap Change preferences to open the Preferences menu. 3. Tap Manage Favourites. Tip: Tap the arrow to move to the next page buttons. 4. Tap the Favourite you want to rename. 5. Tap Rename.
Chapter 8 Points of Interest Points of Interest Points of Interest or POIs are useful places on the map. Here are some examples: • Restaurants • Hotels • Museums • Parking garages • Petrol stations Showing POIs on the map 1. Tap Enable/disable POIs in the Preferences menu. 2. Select the POI categories to display on the map. Enable/ disable POIs Tap Find to search for a POI by name. 3. Tap Done. The POIs you selected are shown on the map as symbols. Navigating to a POI 1.
You can select one of these options: • POI near you - to search from a list of POIs near your current position. • POI in city - to choose a POI in a particular town or city. You have to specify a town or city. • POI near Home - to search from a list of POIs near your Home location. If you are currently navigating to a destination, you can also select from a list of POIs which are on your route or near your destination. Choose one of these options: • POI along route • POI near destination 5.
For example, you could create a category of POIs called ‘Favourite restaurants’. With each POI, save their phone number so that you can call them from your NAVIGATOR to reserve a table. How can I create my own POIs? 1. Tap the screen to bring up the Main Menu. 2. Tap Change preferences. 3. Tap Manage POIs. 4. Before you can add a POI, you have to create at least one POI category. Every POI is assigned to a POI category. You can only add POIs to POI categories you have created yourself.
Tap this button to add your current postion as a POI. GPS postion For example, if you stop somewhere you like, while you are there you can tap this button to create the POI. Tap this button to create a POI using the map browser. Select the location of the POI using the cursor, then tap Done. Point on map For more information about the map browser, see Using the map on page 14. Tap this button to create a POI by entering latitude and longitude values.
7. Choose the warning sound for the category of POI you selected.
Chapter 9 Itinerary planning Itinerary planning What is an Itinerary? An Itinerary is a plan for a journey with more stops than just your final destination. An Itinerary is made up of the following items: • Destinations - the end of a particular journey, the place where you want to stop. • Waypoints - points on your journey that you want to pass. Here’s an example of an Itinerary: Destinations are shown with this symbol. Waypoints are shown with this symbol.
Creating an Itinerary 1. Tap the screen to bring up the Main Menu. 2. Tap Itinerary planning. Itinerary planning The Itinerary planning screen opens. At first, there are no items on the Itinerary. 3. Tap Add and select a location. Tip You can add items to your Itinerary in any order and organise them into the Itinerary later. Following an Itinerary When you use an Itinerary to navigate, the route will be calculated to the first destination on the Itinerary.
Tap this button to move the item up the Itinerary. This button is unavailable if the item is at the top of the Itinerary. Move item up Tap this button to move the item down the Itinerary. This button is unavailable if the item is at the bottom of the Itinerary. Move item down Tap this button to see the location of the item on the map. Show on map For more information about the map browser, see Using the map on page 14. Tap this button to delete the item from the Itinerary.
Chapter 10 Preferences Preferences You can change many things about the way your TomTom NAVIGATOR looks and behaves. Tap Change preferences in the Main Menu. Use night colours / Use day colours Tap this button to reduce the brightness the of the screen and use darker colours on the map. Use Night colours When should I use this? When it’s dark outside, it’s easier to see the screen of your NAVIGATOR if it isn’t so bright.
The Main Menu shows only a few buttons that may be needed while you are driving. As soon as your car stops moving, you will be able to access all of the buttons and features again. Turn off map display When you turn off the map display, instead of seeing your position on a map in the Driving View, you will only see information about the next instruction. When you tap this button, you have to specify when the map should be turned off.
Turn off sound / Turn on sound Tap this button to turn the spoken instructions off. The button changes to Turn on sound. If you turn the sound off, warnings for upcoming POIs are also turned off. Turn off sound Tip To change the volume, tap Volume preferences in the Preferences menu. For more information, see Volume preferences on page 31. To change the volume quickly while you are driving, tap the bottom lefthand section of the Driving View and move the slider.
Change language Tap this button to change the language used for all the buttons and messages you see on your NAVIGATOR. Change language You can choose from a wide range of languages. When you change the language, you are also given the opportunity to change the voice. Backlight preferences Depending on your device, this button may not be available. On many devices, the backlight preferences can be set in the operating system on the device itself.
Don’t delete a map unless you have already made a backup of the map. If you delete a map before you make a backup, you won’t be able to put the map back on your NAVIGATOR. For more information about making a backup, see Using TomTom HOME on page 40. You can also download, add and delete maps using TomTom HOME. Manage POIs Tap this button to do the following: • Set alerts for when you are near POIs. Manage POIs For example, your NAVIGATOR can tell you when there is a petrol station nearby.
Planning preferences Tap this button to set the kind of route planned when you select a destination. The following options are available: • Ask me every time I plan Planning preferences • Always plan fastest routes • Always plan shortest routes • Always avoid motorways • Always plan walking routes • Always plan bicycle routes • Always plan for limited speed Toll road preferences Tap this button to set how your NAVIGATOR handles toll roads if they are on the route to a destination you set.
• Temperature • Air pressure Operate left-handed / Operate right handed Tap this button to move important buttons, for example, the Done and Cancel buttons as well as the zoom bar, to the left hand side of the screen. This makes it easier to tap the buttons with your left hand without blocking the screen. Operate lefthanded To move the buttons back to the right hand side of the screen, tap Operate righthanded.
Chapter 11 TomTom Traffic TomTom Traffic TomTom Traffic TomTom Traffic is a TomTom PLUS service that sends up-to-date traffic information to your NAVIGATOR. To use TomTom Traffic you must have a mobile phone with Bluetooth and a wireless data connection, for example, GPRS, EDGE, UMTS, CDMA. TomTom Traffic takes the most up-to-date information from the best local sources. Use the free trial to try TomTom Traffic. For more information, see the TomTom PLUS leaflet.
TomTom Traffic will immediately try to retrieve the latest traffic information. Note: TomTom Traffic retrieves traffic information from TomTom using a wireless data connection on your mobile phone. You must be connected to your phone and you must have a wireless data subscription with your mobile network operator. Updating traffic information With TomTom Traffic, there are two ways to update the traffic information: • Tap Update traffic info in the Traffic menu.
Chapter 12 TomTom PLUS TomTom PLUS TomTom PLUS is a collection of services that keep you informed and entertained while you’re on the road. You can subscribe to a range of extras and download them either directly to your NAVIGATOR, or to your computer from where you can transfer them to your NAVIGATOR. Tips • New services are being added regularly. Use TomTom HOME or visit www.tomtom.com/plus to find out what’s available.
Points of Interest Find the places you need quickly with the locations of thousands of Points of Interest (POIs).
Chapter 13 Using TomTom HOME Using TomTom HOME Using TomTom HOME, you can, for example, do the following: • Make and restore backups of your TomTom NAVIGATOR. • Manage the maps, voices, POIs and other extras on your NAVIGATOR. • Read the full version of the user manual, available in 21 languages. • Buy TomTom PLUS services and manage your subscriptions. Installing TomTom HOME To install TomTom HOME, put the CD which came with your NAVIGATOR into your computer.
Restoring a backup If you ever have a problem with your NAVIGATOR, you can restore the backup. Follow steps 1 and 2 above, then select the latest backup and click Restore. The latest backup will be restored to your NAVIGATOR. For more information, see the Help included with TomTom HOME.
Chapter 14 How does navigation work? How does navigation work? Global Positioning System (GPS) In order to navigate you to your destination, your TomTom NAVIGATOR must know where you are now. To find your current position, your TomTom NAVIGATOR uses the Global Positioning System (GPS). GPS is available for free and without subscription. The GPS uses satellites to transmit signals to GPS receivers. Using the GPS signal, your TomTom NAVIGATOR can work out where you are and how fast you are going.
Chapter 15 TomTom limited warranty TomTom limited warranty WARRANTOR Non-U.S. and non-Canadian purchases: If you have made your purchase outside the United States and Canada, this Limited Warranty is granted by and this Limitation of Liability is stipulated for the benefit of TomTom International B.V., Rembrandtplein 35, 1017 CT Amsterdam (The Netherlands). WHAT THIS WARRANTY COVERS 1) TomTom International B.V.
5) This Limited Warranty is the only express warranty made to you and is provided in lieu of any other express warranties or similar obligations (if any) created by any advertising, documentation, packaging, or other communications.
Chapter 16 Addendum Addendum Important Safety Notices and Warnings Global Positioning System The Global Positioning System (GPS) is a satellite-based system that provides location and timing information around the globe. GPS is operated and controlled under the sole responsibility of the Government of the United States of America which is responsible for its availability and accuracy.
Chapter 17 Copyright notices Copyright notices © 2006 TomTom International B.V., The Netherlands. Patents Pending. All rights reserved. TomTom and the TomTom logo are registered trademarks of TomTom International B.V., The Netherlands. All other trademarks are the property of their respective owners. Our end user license agreement and a limited warranty apply to this product; they are included in this package. You can also review both at www.tomtom.com/legal Data Source © 2006 Tele Atlas N.V.