TomTom XL
1.
2. Getting started Getting started Install your TomTom XL in your car following the instructions on the installation poster at the start of this book. To switch on your TomTom XL, press and hold the On/Off button for 2 seconds. The first time you switch on your device, it may take a short while to start. You have to answer a few questions to set up your device. Having problems? In rare cases, your XL may not start correctly or may stop responding to your taps.
You can set a password for your TomTom XL which must be entered every time you start your XL. It is important to take care of your XL. • Your XL is not designed for use in extreme temperatures and any such exposure may cause permanent damage. • Do not open the casing of your XL under any circumstances. Doing so may be dangerous and will invalidate the warranty. • Wipe or dry the screen of your XL using a soft cloth. Do not use any liquid cleaners.
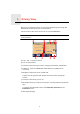
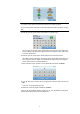
3. Driving View Driving View When your TomTom XL starts, you are shown the Driving View along with detailed information about your current location. Tap the center of the screen at any time to open the Main Menu. Note: The Driving View is shown in black and white until your XL locates your current position. A B E F C G A D H A Tap + and - to zoom in and out. B Your current position. C The name of the next major road or road sign information, if applicable.
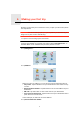
4. Making your first trip Making your first trip Planning a route with your TomTom XL is easy. To plan your first route, follow the steps below. Important: You should always plan your journey before you start driving. It is dangerous to plan a route while driving. 1. Tap the screen to bring up the main menu. Note: The buttons on your XL are shown in full color unless a button is currently unavailable. For example, the button named Find alternative...
Note: When planning a trip for the first time your XL asks you to choose a state or country. Your choice is saved and used for all routes you plan. You can change this setting at any time by tapping the state symbol or country flag. 5. Start to type the name of the town where you want to go. As you type, the names of the towns that match what you have typed are shown. When your destination appears in the list, tap the name of the town to set the destination. 6.
Arrival times When you plan a route, your TomTom XL asks you if you need to arrive at a particular time. Tap YES to enter a preferred arrival time. Your XL calculates your arrival time and shows you whether you will arrive on time. You can also use this information to work out when you need to leave. If your XL shows that you will arrive 30 minutes early, you can wait and leave in 30 minutes time, rather than arrive early. Your arrival time is constantly recalculated during your trip.
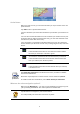
Tap this button to select a Favorite as your destination. Favorite Tap this button to enter an address as your destination. 1 22 3 Address Tap this button to select your destination from a list of places you have recently used as destinations. Recent destination Tap this button to navigate to a Point of Interest (POI). Point of Interest Tap this button to select a point on the map as your destination using the map browser.
Prepare route 3. Select the starting point for your trip in the same way that you would select your destination. 4. Set the destination for your trip. 5. Choose the type of route that should be planned. • Fastest route - the route which takes the least time. • Shortest route - the shortest distance between the locations you set. This may not be the quickest route, especially if the shortest route is through a town or city. • Avoid freeways - a route which avoids freeways.
5. Finding alternative routes Finding alternative routes Once you have planned a route, you may want to change something about the route, without changing your destination. Why change the route? Maybe for one of these reasons: • You can see a roadblock or a line of traffic ahead. • You want to travel via a particular location, to pick someone up, stop for lunch or fill up with gas. • You want to avoid a difficult intersection or a road you don’t like. Tap Find alternative...
Tap this button to change your route so that it passes a particular location, perhaps to pick someone up on the way. Travel via... You choose the location you want to pass in the same way as you choose a destination. So you can select from all the same options: for example, Address, Favorite, Point of Interest and Point on map. Your XL will calculate a new route to your destination that passes the location you chose. Unlike your final destination, your XL does not inform you when you pass by this location.
6. Sounds and voices Sounds and voices The sound on your TomTom XL is used for features such as: • Spoken instructions • Warnings How do I change the volume level? You can change the volume in three ways: • Tap the bottom left hand area of the Driving View. The last spoken instruction is repeated and the volume level is shown. Move the volume slider to adjust the volume. • In the Main Menu, tap Change preferences, then tap Volume preferences. Tap Test to check your changes.
7. Help me! Help me! Help me! provides an easy way to navigate to emergency services centers and other specialist services and contact them by phone. For example, if you are involved in a car accident, you could use Help me! to call the nearest hospital and tell them your exact location. How do I use Help me! to call a local service? You can use Help me! to find and make contact with a service center.
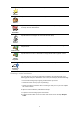
Options Use your TomTom XL to find the location of a service and the contact details. Phone for help • Emergency services • Emergency breakdown services • Nearest police station • Nearest doctor • Nearest hospital • Nearest public transport • Nearest car repair services • Nearest dentist • Nearest pharmacy • Nearest vet Note: In some countries, information may not be available for all services. Use your TomTom XL to navigate your way by road to a service center.
Tap this button to read the British Red Cross First Aid guide. First Aid Guide Tap this button to read a selection of useful guides.
8. Favorites Favorites What are Favorites? Favorites are places that you often visit. You can create Favorites so that you don’t have to enter the address every time you want to navigate there. They don’t have to be places you especially like, just useful addresses. How can I create a Favorite? From the Main Menu, tap Add Favorite. Note: The button Add Favorite may not be shown on the first page of the Main Menu. Tap the arrow to open other pages in the Main Menu.
Select a Favorite location from a list of places you have recently used as destinations. Recent destination You can add a Point of Interest (POI) as a Favorite. Does it make sense to do this? Point of Interest If you visit a POI you particularly like, for example a restaurant, you can add it as a Favorite. To add a POI as a Favorite, tap this button, then do the following: 1. Narrow your choice of POIs by selecting the area where the POI is.
How can I use a Favorite? You will normally use a Favorite as a way of navigating to a place without having to enter the address. To navigate to a Favorite, do the following: 1. Tap the screen to bring up the main menu. 2. Tap Navigate to... 3. Tap Favorite. 4. Select a Favorite from the list. Your XL calculates the route for you. 5. When the route is calculated, tap Done. Your XL will immediately start guiding you to your destination with spoken instructions and visual instructions on the screen.
9. Browse map Browse map To look at the map in the same way as you might look at a traditional paper map, tap Browse map in the Main Menu. You can move the map by touching the screen and moving your finger across the screen. A The scale bar B Your current position. C GPS button Tap this button to center the map on your current position. D Options E The cursor F The Find button Tap this button to find specific addresses.
Position the cursor over a location on the map, then tap one of the following buttons: Tap this button to navigate to the cursor position. Your XL will calculate the route. Navigate there Tap this button to find a POI near the cursor position. For example, if you have found a restaurant to go to, you can search for a parking garage nearby. Find POI nearby Tap this button to bring the location currently highlighted by the cursor to the center of the screen when looking at the map.
10. Points of Interest Points of Interest Points of Interest or POIs are useful places on the map. Here are some examples: • Restaurants • Hotels • Museums • Parking garages • Gas stations How can I create my own POIs? 1. Tap the screen to bring up the main menu. 2. Tap Change preferences. 3. Tap Manage POIs. 4. Before you can add a POI, you have to create at least one POI category. Every POI is assigned to a POI category. You can only add POIs to POI categories you have created yourself.
You can set your Home location as a POI. If you want to change your Home location, you can create a POI of the Home location before you change it. Home You can create a POI from a Favorite. Favorite 1 22 3 Address You can only create a limited number of Favorites. If you want to create more Favorites you have to delete some Favorites first. Before you delete a Favorite, make it into a POI so that you don’t lose the address. You can specify an address to be a POI.
Navigating to a POI You can use a POI as your destination. For example, if you are traveling to an unfamiliar city, you could choose a POI to help find a parking garage. 1. Tap the screen to bring up the main menu. 2. Tap Navigate to... in the Main Menu. 3. Tap Point of Interest. 4. Tap POI in city. 5. Narrow your choice of POIs by selecting the area where the POI is located. You can select one of these options: • POI near you - to choose from a list of POIs near to your current location.
The next screen shows more detailed information including the location of the POI on the map and the phone number of the POI, if available. Tap Select to confirm you want to plan a route to this POI. Once you have selected a POI, the route to the POI is calculated by your TomTom XL. Showing POIs on the map 1. Tap Show POIs on map in the Preferences menu. Show POI on map 2. Select the POI categories to display on the map. Tap Find to search for a POI by name. 3. Tap Done.
A POI acts like a shortcut - once you have saved a location as a POI you never have to type the address of that POI again. But when you create a POI you can save more than just the location. • Phone number - when you create a POI, you can save a phone number with it. • Categories - when you create a POI you have to put it in a category. For example, you could create a category of POIs called ‘Favourite restaurants’.
11. Itinerary Planning Itinerary Planning What is an Itinerary? An Itinerary is a plan for a trip including more locations than your final destination. An Itinerary can include the following items: • Destination - a location on your trip where you want to stop. • Waypoint - a location on your trip you want to travel through without stopping. Here’s an example of an Itinerary: Destinations are shown using this symbol. Waypoints are shown using this symbol.
The Itinerary planning screen opens. At first, there are no items on the Itinerary. Itinerary planning 3. Tap Add and select a location. Tip: You can add items to your Itinerary in any order and rearrange the order later. Following an Itinerary When you use an Itinerary to navigate, the route will be calculated to the first destination on the Itinerary. Your TomTom XL calculates the remaining distance and time to the first destination and not for the whole Itinerary.
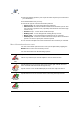
Tap this button to move the item up the Itinerary. This button is unavailable if the item is at the top of the Itinerary. Move item up Tap this button to move the item down the Itinerary. This button is unavailable if the item is at the bottom of the Itinerary. Move item down Tap this button to see the location of the item on the map. Show on map Tap this button to delete the item from the Itinerary. Delete item Start Using an Itinerary Tap Options, then tap Start navigation.
12. Preferences Preferences Use night colors / Use day colors Tap this button to reduce the brightness of the screen and show darker colors on the map. When should I use this? Use night colors When it’s dark, it is easier to see the screen if the display on your XL is not brightly lit. To change back to a brighter screen showing brighter colors on the map, tap Use day colors.
Safety preferences Tap this button to set the following safety preferences: • Hide most menu options while driving Safety preferences • Suggest driving breaks • Show safety reminders • Warn when near places of worship or schools • Warn when driving faster than allowed • Warn when driving faster than a set speed • Warn not to leave the device in the car If you select one or more of the warnings, you will also be asked to select a sound to be played whenever a warning is displayed.
Turn off sound / Turn on sound Tap this button to turn off sound. If you turn off the sound, warnings for upcoming POIs are also turned off. The button changes to Turn on sound. Turn off sound Tips To change the volume, tap Volume preferences in the Preferences menu. To change the volume quickly while you are driving, tap the bottom lefthand section of the Driving View and move the slider. To change the voice being used by your XL, tap Change voice in the Voice preferences menu.
Status bar preferences Tap this button to select the information shown on the status bar: • Remaining time - the estimated time left until you reach your destination. Status bar preferences • Remaining distance - the distance left until you reach your destination. • Current time • Arrival time - your estimated arrival time. • Speed • Direction • Show next street name - the name of the next street on your trip.
Change 2D/3D display / Turn on 2D display Tap Turn on 2D display to change the perspective for viewing the map. For example, the 2D view shows a two dimensional view of the map as though viewed from above. Turn on 2D display To switch the view to a three dimensional perspective, tap Change 2D/3D display and select a view from the list. Change 2D/3D display When should I use this? In some situations, it is easier to see the map from above.
Manage maps Tap this button to do the following: Manage maps • Download a map - tap this button to download a map you have bought using TomTom HOME. It may not be possible to download maps on all devices. • Switch map - tap this button to change the map you are using. • Download free map corrections - tap this button to download map corrections provided as part of the Map Share service. • Delete a map - tap this button to delete a map.
Set owner Tap this button to enter your name and address as the owner of your XL and to change or delete a 4-digit password for your XL. Set owner Note: You can only change or delete a 4-digit password on your TomTom XL. You can create a 4-digit password for your XL using TomTom HOME: 1. Connect your XL to your computer and turn on your XL and your computer. TomTom HOME starts automatically. 2. Click on Operate my XL in TomTom HOME. Your XL appears and can be controlled using TomTom HOME. 3.
Set units Tap this button to set the type of units that will be shown for the following: • Distance Set units • Time • Latitude and longitude • Temperature • Air pressure Set clock Tap this button to select the type of clock that is shown and set the time. The easiest way to set the time is by tapping the Sync button. Your XL will then take the time from GPS information. Set clock Note: After using Sync to set the time, you may have to adjust the hours depending on your time zone.
Compass preferences Tap this button to configure the compass. The following options are available: • None - the compass is not shown. Compass preferences • One with arrow pointing north - the arrow always points towards north and the direction you are moving is shown at the top of the compass. • One with arrow showing your heading - the arrow always shows the direction you are moving.
13. TomTom Map Share TomTom Map Share TomTom Map ShareTM is a free service that lets you make updates to your map and if you want to, share those updates with other members of the TomTom Map Share community. If you find a street that has recently been blocked to traffic but was open before, you can use Map Share to update your map and then share the update with other Map Share members. You can use Map Share to send and receive map updates during the first year after the map’s release date.
Making a map update 1. Tap Map corrections in the Main Menu. 2. Tap Correct a map error. Correct a map error A list of possible map updates is shown. 3. Select the type of update you want to report. Note: If you tap Add missing POI or Report other error you will be asked for some additional information before the next step. 4. Select the method you want to use for selecting the location of the update. 5. When you have found the location, tap Done. 6. Enter update or confirmation of update now.
When you connect your TomTom XL to computer, TomTom HOME automatically downloads any available map updates and sends any changes you have made, to the Map Share community. Changing my preferences for map updates Correction preferences is used to set the way TomTom Map Share runs on your device. You can set the following preferences: • Choose what types of updates you want to use on your maps. • Decide if you want to share your updates with others. • Show or hide the Report button in the Driving View.
To make an update to your map, tap Map corrections in the Main Menu then tap Correct a map error. The following types of updates are shown. Tap this button to block or unblock a street. You can block or unblock the street in one or both directions. (Un)block street For example, to correct a street near to your current location, do the following: 1. Tap (Un)block street. 2. Tap Near you to select a street near your current location.
Tap this button to change the name of a street on your map. vabckc sdn vk fbks sdjv Edit street name For example, to rename a street near to your current location: 1. Tap Edit street name. 2. Tap Near you. 3. Select the street or section of a street you want to correct by tapping it on the map. The street you select is highlighted and the cursor shows the name of the street. 4. Tap Done. 5. Type the correct street name. 6. Tap Done. Tap this button to change and report incorrect road turn directions.
Tap this button to edit an existing POI. You can use this button to make the following changes to a POI: Edit POI • Delete the POI. • Rename the POI. • Change the telephone number of the POI. • Change the category that a POI belongs to. • Move the POI on the map. Tap this button to report other types of update. These updates are not immediately corrected on your map. Your TomTom XL sends a special update report to TomTom Map Share.
14. Traffic Information using RDS-TMC Traffic Information using RDS-TMC The Traffic Message Channel (TMC) You can receive traffic information on your TomTom XL using the TomTom RDS-TMC Traffic Receiver. The TMC transmits traffic information as a radio signal. Tip: The TomTom RDS-TMC Traffic Receiver is included with some products and available as an accessory for others. Visit tomtom.com for more information. The Traffic Message Channel (TMC) is not a TomTom Service.
4. Then place the remaining suction cups along the edge of the windshield, as shown, keeping the cable straight. 5. Switch on your navigation device. The Traffic bar is shown in the Driving View and your navigation device searches for a radio station that carries RDS-TMC information. These symbols are shown at the top of the traffic sidebar: Your XL has the latest RDS-TMC traffic information. Your XL is waiting to download the latest RDS-TMC traffic information as soon as it is available.
To change your traffic preferences, do the following: 1. Tap the TomTomTraffic button in the Main Menu on your device. Change Traffic preferences 2. Tap Change Traffic preferences. You can change the following preferences: • Automatically minimize delays after every traffic update - if you select this option, your device automatically recalculates when new delays occur on your route.
2. Tap Show home-work traffic. 3. Tap Work to home. The route summary screen is shown, with the expected delay shown after the trip time. To see if there is a quicker way home, tap Find alternative then tap Minimize traffic delays. Tip: You can let your device automatically look for alternative routes by selecting Automatically minimize delays after every traffic update in the Traffic preferences. Checking traffic incidents in your area Get an overview of the traffic situation in your area, using the map.
Setting the radio frequency for RDS-TMC information If you know the frequency of a particular radio station you want to use for RDSTMC traffic information, do the following to set the frequency manually: To activate this feature, you must first enable manual tuning. To do this, tap the Traffic bar in the Driving View, then tap Change Traffic preferences. Select Tune manually by entering a frequency and then tap Done. 1. Tap the Traffic sidebar in the Driving View. 2. Tap Tune Manually. Tune manually 3.
In the example, the Traffic sidebar shows you that there are two incidents ahead. Both incidents are traffic jams, the first is 15km ahead and is expected to delay you by at least 51 minutes. To re-plan your route to avoid these incidents, tap the Traffic sidebar to open the TomTom traffic menu, then use Minimize traffic delays. Traffic incidents Traffic incidents are displayed both on the Driving View and also on the Traffic sidebar as small symbols.
Checks the traffic along your Home to Work route. Show homework traffic Tap this button to show areas of traffic congestion along your current route. Show traffic on route Shows an overview of traffic incidents on the map. Browse map Changes the settings for Traffic services.
15. Introducing TomTom HOME Introducing TomTom HOME TomTom HOME is a free application for your computer that helps you manage the contents of your TomTom device. Connect to HOME frequently to get the latest updates for your device. You can, for example, do the following: • Manage maps, voices, POIs and more. • Buy TomTom services and manage your subscriptions. • Update your TomTom with the latest software and services automatically. • Read the full version of the user manual.
16. Copyright notices Copyright notices © 2008 TomTom International BV, The Netherlands. TomTom™ and the "two hands" logo are among the trademarks, applications or registered trademarks owned by TomTom International B.V. Our limited warranty and end user license agreement for embedded software apply to this product; you can review both at www.tomtom.com/legal © 2008 TomTom International BV, Niederlande.
comerciais registadas cuja proprietária é a TomTom International B.V. A nossa garantia limitada e contrato de licença de utilizador final relativas ao software incorporado dizem respeito a este produto; pode consultar ambos em www.tomtom.com/legal © 2008 TomTom International BV, Holland. TomTom™ og logoet med "de to hænder" er blandt de varemærker, produkter og registrerede varemærker, der tilhører TomTom International B.V.
alkalmazások és bejegyzett védjegyek közé tartozik. A korlátozott garancia és a benne foglalt szoftver végfelhasználói licencszerződése érvényes erre a termékre; melyeket a következő helyen tekinthet át: www.tomtom.com/legal © 2008 TomTom International BV, Holland. TomTom™ ja "kahe käe" logo kuuluvad nende kaubamärkide, rakenduste või registreeritud kaubamärkide hulka, mille omanikuks on TomTom International B.V.
© Swisstopo. © BEV, GZ 1368/2008. © Geonext/DeAgostini. © Norwegian Mapping Authority, Public Roads Administration / © Mapsolutions. © DAV. This product includes mapping data licensed from Ordnance Survey with the permission of the Controller of Her Majesty’s Stationery Office. © Crown copyright and/or database right 2008. All rights reserved. Licence number 100026920. Data Source © 1984 – 2008 Tele Atlas North America. Inc. All rights reserved. Canadian Data © DMTI Spatial.
17. Addendum Addendum Important Safety Notices and Warnings Global Positioning System The Global Positioning System (GPS) is a satellite-based system that provides location and timing information around the globe. GPS is operated and controlled under the sole responsibility of the Government of the United States of America, which is responsible for its availability and accuracy. Any changes in GPS availability and accuracy, or in environmental conditions, may impact the operation of your TomTom device.
Battery This product uses a Lithium-Polymer battery. Do not use it in a humid, wet and/or corrosive environment. Do not put, store or leave your product in or near a heat source, in a high temperature location, in strong direct sunlight, in a microwave oven or in a pressurized container, and do not expose it to temperatures over 60 C (140 F). Failure to follow these guidelines may cause the Lithium-Polymer battery to leak acid, become hot, explode or ignite and cause injury and/or damage.
Radio and Television Interference This equipment radiates radio frequency energy and if not used properly - that is, in strict accordance with the instructions in this manual - may cause interference to radio communications and television reception. This device has been tested and found to comply with the limits for a Class B digital device, pursuant to Part 15 of the FCC Rules. These limits are designed to provide reasonable protection against harmful interference in a residential installation.
Operation is subject to the following two conditions: (1) this device may not cause harmful interference and (2) this device must accept any interference, including interference that may cause undesired operation of the device. This category II radiocommunication device complies with Industry Canada Standard RSS-310. Ce dispositif de radiocommunication de catégorie II respecte la norme CNR310 d’Industrie Canda.
protected by copyright. No part of this document may be photocopied or reproduced in any form without prior written consent from TomTom International B.V.