OPERATING ENVIRONMENTS & NOTES ® When using this device, keep it away from water. ® Use the device In ventilated environment, keep It away from fire Since it's a wireless device, pleas keep it away from other interfering sources. @® Don't take apart the device. ® Oases use the standard power supply, high voltage may damage the device. Crease pace the used batteries into the recycle bin, don't utter them SPECIFICATIONS Frequency Response: 50Hz-15Khz Operating Frequency: 502.
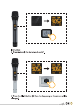
MICROPHONE OPERATION INSTRUCTION shown In above pictures: (D) Display Screen (2) ON/OFF Switch (3) Tai Tube @Buttonhole (5) Battery Compartment Install 2AA batteries before using the wireless microphone and installing instruction is as follows: 1. Take down the tail tube of mic, 2 Install the batteries and tighten tail tube of ic. Note: The positive and negative polarity of battery cannot be reversed.
Instruction: 2.
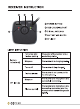
RECEIVER INSTRUCTION D POWER BUTTON {2 USB CHARGING PORT ® SIGNAL ANTENNA {@ BATTERY INDICATOR © RF LIGHT LIGHT INSTRUCTION Turns red and | The power of the receiver is ina flashes quickly | low battery status Eater @ | Aye The receiver is in charging model. Turns off ‘The receiver is uly charged. ‘The receiver is not connected to I 7) Flashes slowly | {he deceivers The receiver and microphone are Stays on successfully connected.
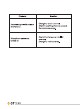
TROUBLESHOOTING Problem Solution Wireless Microphone ID Pairing Stops: 1. Make sure that the receiver and microphone are muted OFF. 2 Unscrew the microphone toil tube and install the batteries into the mic’s battery compartment. 3.
Problem Solution CL Change to other channels; Receiver Salon WOE OF | Check if receiving distance exceeds interference : the dumdum range. Microphone cannot be turned on Check f batteries are installed reversely; Change to new batteries.