240-2078 7-1/4" COMPOUND MITER SAW Operator’s Manual SAVE THIS MANUAL You will need this manual for safety instructions, operating procedures and warranty. Put it and the original sales receipt in a safe dry place for future reference.
IMPORTANT SAFETY INSTRUCTIONS WARNING: When using electric tools, machines or equipment, basic safety ! shock, and personal injury. READ ALL INSTRUCTIONS BEFORE USING THIS TOOL 1. KEEP WORK AREA CLEAN. Cluttered areas can cause injuries. 2. CONSIDER WORK AREA ENVIRONMENT. Don’t use power tools in damp, wet, or poorly lit locations. Don’t expose tools to the rain. Keep the work area 3. KEEP CHILDREN AND BYSTANDERS AWAY. away from the work area. Don’t let them handle machines, tools or extension cords. 4.
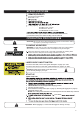
IMPORTANT SAFETY INSTRUCTIONS 15. USE EYE PROTECTION. or coarse dust. 16. SECURE WORK. 17. DON’T OVERREACH. 18. MAINTAIN TOOLS. 19. AVOID UNINTENTIONAL STARTING. Be sure the switch is in the OFF posi 20. ALWAYS CHECK AND MAKE SURE TO REMOVE ANY ADJUSTING KEYS OR WRENCHES 21. DO NOT USE THE TOOL IF IT CANNOT BE SWITCHED ON OR OFF. 22. DISCONNECT THE PLUG FROM THE POWER SOURCE BEFORE MAKING ANY ADJUSTMENTS. if the tool could accidentally start. 23. STAY ALERT. any tool when you are tired. 24.
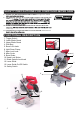
SAFETY PRECAUTIONS FOR COMPOUND MITER SAW 8. ALWAYS USE TABLE EXTENSIONS AND CLAMPS to support the material 9. THE MATERIAL SHOULD BE PLACED FIRMLY AGAINST THE FENCE AND TABLE kick back. 10. DO NOT START THE SAW WITH THE BLADE IN CONTACT WITH ANY SURFACE. cause injury. 11. IF MAKING A CUT USING ONE HAND TO HOLD THE SAW, ensure the free FUNCTIONAL DESCRIPTION 1. Trigger Switch 2. Lower Blade Guard 3. Upper Blade Guard 4. Dust Bag 5. Bevel Lock knob 6. Hold-Down Clamp 7. Miter Lock knob 8. Miter Scale 9.
SPECIFICATIONS Current rating: 7.
OPERATING PROCEDURES REMEMBER: Before use, release the head lock button(#10 on page 4) and raise the handle. the hold-down clamp at any position. operation. MODES OF USE Crosscut: Miter cut: miter lock knob(# 7 on page 4). Move the table rotation to the left or right, up to 45°, either way. Quickly locate 0°, 15°, 22.5°, 30° and 45° left or right by the detent clicks at these angle settings. Tighten the miter lock knob at the desired angle.
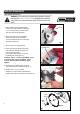
MAINTENANCE ALIGNING MITER AND BEVEL 3 2 1 4 Fig. 1 Fig. 2 8 7 5 6 Fig. 3 Aligning Miter Angle 1. Lower the head assembly and push in the lock pin to lock in the lower position. Make sure table is in 0° detent and tighten miter lock knob. Place a combination square (1) against the fence(2) and next to the blade (3) as illustrated. Locate the square properly so it does not contact the tooth of saw blade. The saw blade should contact the full length of the square. (Figure 1) 2.
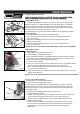
MAINTENANCE MAINTENANCE REPLACING SAW BLADE power cord of the miter saw 1. When replacing the saw blade,make sure the new saw blade has a diameter of 7-1/4", RPM rating of at least 5,500 and arbor hole of 5/8" diameter. Arrow 2. When mounting the new saw blade, the direction arrows on the blade correspond with the arrow on the upper guard.(See Figure.5) 3. Put the saw in its upper position. 4. Press and hold the spindle-lock button, and rotate the blade at the same time until it locks into position.
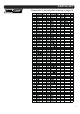
PARTS LIST Please refer to the schematic drawing on page 10.
SCHEMATIC DRAWING 10 ! WARNING Repairs should be made by an authorized repair center. Do not open or disassemble this power tool . Please contact 1-866-915-8626 for questions regarding this power tool.
TOOL SHOP® 7-1/4" 7.5 AMP COMPOUND MITER SAW WARRANTY 1-YEAR LIMITED WARRANTY: This TOOL SHOP® brand power tool carries a 1-Year Limited Warranty to the original purchaser. If the tool fails within one (1) year from the date of purchase, simply bring this tool with your original sales receipt back to your nearest MENARDS® retail store.