
Use And Care Manual

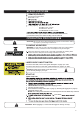

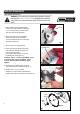


To turn the laser ON, turn the laser guide switch(#13 on page 4) to "ON".
Before plugging in, confirm that the trigger is working correctly.
2. Unlock the saw from its storage and/or shipping position.
5
OPERATING PROCEDURES
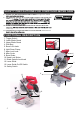
CLAMPING WORKPIECE:
WARNING:
.degamad eb yam eceipkrow dna loot eht esiwrehto ,pmalc nwod -dloh htiw
no part of the tool makes contact with the hold-down clamp.
USING YOUR SAW
CAUTION! Be sure the saw is disconnected from its power source before making
any repairs or performing maintenance!
WARNING:
-
cally.
-
cally.
lower blade
Push forward the safety switch.(#14 on page 4). Pressing the trigger(#1 on page 4)
switch will start the saw.
START UP
It can severely damage your eyes.
LASER GUIDE ON/OFF SWITCH
WARNING: Never stare directly at the laser beam.
To turn the laser OFF, turn the laser guide switch(#13 on page 4) to "OFF".
3. Connect the saw to power.
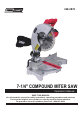
SPECIFICATIONS
Cutting Capacity
Contents: Miter Saw, (1)7-1/4"x24 Tooth Carbide Blade, Blade Wrench,
(1) Hold-Down Clamp, Dust Collection Bag & Product Manual
90° Cross cut: 2" x 4"
45° Miter cut: 2" x 2-1/4"
45° Bevel cut: 3/4" x4"
45° Miter/Bevel cut: 3/4" x 2-1/4"
Blade Size: 7-1/4"
Current rating: 7.5 Amps
No load speed 5,500 RPM
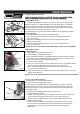
For safe and accurate cuts,affix workpiece firmly into cutting position
NOTE:
The cutting head should be in the raised position and the blade fully enclosed
and shape.Tighten the knob to affix the bracket in place.
Mount the hold-down clamp on left or right side of the blade by inserting shaft
of the hold-down clamp into the mounting hole behind the fence.