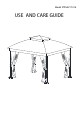
Model #TPGAZ17-018 USE AND CARE GUIDE
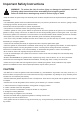
Important Safety Instructions WARNING! To reduce the risk of serious injury or damage to equipment, read all following safety instructions before assembling and using the gazebo. Failure to follow these warnings may result in serious injury or death. • Keep all children and pets away from assembly area. Children and pets should be supervised while gazebo is being assembled.
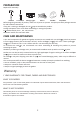
PREPARATION Required for Assembly: Hammer Screwdriver Safety goggles Gloves Hardhat Stepladder Before beginning assembly of product, make sure all parts are present. Compare parts with package contents list and hardware contents list. If any part is missing or damaged, do not a empt to assemble the product. Arrange manpower of 4 or more when assembling or moving the product. Es mated Assembly Time: 90 - 120 minutes. Maximum load for the roof hook: 50lbs.
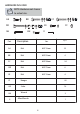
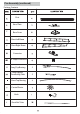
HARDWARE INCLUDED NOTE:Hardware not shown to actual size. AA BB CC EE DD HH GG FF II Part Description Size QTY.
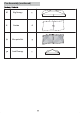
Pre-Assembly (continued) Package Contents Post B Base Plate C Base Cover Short Left Beam Short Right Beam Connector U-shape Connector H Long Top Bracing Long Support Connecting Tube Short Top Bracing Central Device Hook L Short Net Tube
Pre-Assembly (continued) M Big Canopy N Curtain Mosquito Net Small Canopy
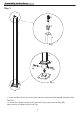
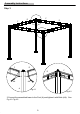
Assembly Instructions Step 1 EE G1 A A Fig.2 A C AA AA B Fig.1 1.1.Insert the Base Cover (C) into the post and then connect the base plate(B) with Bolts (AA) ; See Fig.1 1.2.Screw the U-shape connector (G1) onto the Post (A) and screw the Bolt (EE), taking care not to tighten the bolt. See Fig.
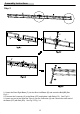
Assembly Instructions Step 2 CC F G E 2.1.Insert the Short Right Beam (F) into the Short Left Beam (E) and screw the Bolt (BB).See Fig.3.1 2.2.Connect the Connector (G) to the Beam (E/F) and tighten it with Bolts (CC),See Fig.3.2. 2.3.Insert one end of the Short Net Tube (L) into the Connector (G) and Connect the other end of the Beam (E/F) with Bolt (DD),See Fig.3.3-Fig..3.4.
Assembly Instructions Step 3 F E E F F E F E F E F E AA AA AA AA A Fig.4.1 Fig.4.2 3.Connect the assembled beam to the Post (A) and tighten it with Bolts (AA),See Fig.4.1-Fig.4.2.
Assembly Instructions Step 4 K H H1 Fig.5 H H1 J H H H1 H1 H H H F G1 J H H CC H1 Fig.7 4.Screw the Hook (K) onto the Center Device (J), then insert the center device (J) into the Long Top Bracing (H).
Assembly Instructions Step 5 H I I H H I I H I J I I H H CC I H G1 H I Fig.8 Fig.9 5.Insert the Central Device (J) into the Short Top Bracing (I) and connect the other end to the U-shape Connector (G1) and tighten with the Bolt (CC),See Fig.8-Fig.9.
Assembly Instructions Step 6 M P H Fig.11 Fig.10 P M 6.Place the Big Canopy (M) onto the frame of the gazebo .At this stage, DO NOT ENFOLD and drage the Conopy (M) , Put the Small Canop (P) onto the small top.see Fig.10-Fig.11.
Assembly Instructions Step 7 M M M Fig.12 Fig.13 7.Finish stretching the Big Canopy (M),See Fig.12-Fig.13.
Assembly Instructions Step 8 M O N FF FF N O Fig.14 Fig.15 8.Hang the Curtain (N) and the Mosquito Net (O) on the the net tube with hanger (FF) , See Fig.14- Fig.15.
Assembly Instructions Step 9 P M O N A C GG B Fig.16 9.Insert the Stake (GG) into the ground through the Base Plate (B),See Fig.16.