
Manual


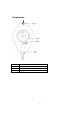


Table Of Contents
6
Installation
The installation must be carried out by skilled personnel who must comply with the directions
outlined in this manual. Incorrect installation could cause injury/damage to people/property.
Perform pre-installation checks
• Check the delivery contents for completeness. Do not install the balancer if parts are
missing.
• Check the spring cable's elasticity by pulling the retainer (NO.1) back and forth by 50 cm
two (2x) times to ensure the cable extends and retracts. If the cable does not operate
normally, do not install the balancer.
Assess the suitability of tools
• Calculate the weight of the tool and accessories (example: air hose).
• Check that the total weight does not exceed the maximum capacity of the balancer as
stated in the “Technical data”. Do not use the tool if the capacity is exceeded.
Determine the installation location
• Assess the range of the work area to determine the best installation location. To avoid
anomalous wear, the load must be applied vertically and in any case the cable must be
free to line up with the direction of the load.
• Hang the balancer on a carriage to use it across a wider range.
Install the balancer
• Fix the balancer to the supporting facility using the mounting point (NO. 4). If screw-fixing
devices are used to install the balancer, use self-locking nuts, split-pins or other safety
systems.
• Connect the safety suspension, using exclusively the supplied standard fittings.
Install and adjust the height of the tool
• Connect the tool to the hook and secure it.
• Firmly hold the tool, then push the cable release lever (NO. 2) fully to the right to release
cable.
• Lower the tool to the optimal working height.
• Rotate the adjustment dial (NO. 3) in the direction of the arrow (counterclockwise direction)
until the tool is balanced in the air. You can only increase the retaining strength but not
lower it. To lower the retaining strenght you must release the cable again.
• Fix the stopper (NO. 1) to the cable to set the height from which the tool cannot be further
lifted up.