
Manual
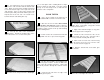


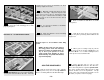

Flap TE to ribs W-2 and W-7. The flap TE
should be centered on the aft edges of the ribs
and should protrude straight back (see the cross-
sections on the wing plan). Make sure all the jig
tabs are contacting the table. A metal straight
edge can be placed on the structure over the jig
tabs to hold them all down.
15. Sight down the TE of the wing from
the root end, making sure all the ribs are aligned
at the same height. Use paper to shim under any
low jig tabs. Glue the Flap TE to the remainder of
the ribs.
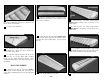
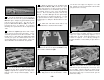
16. Work the upper spar assembly into
place. Make sure it fits well. Put some weights
on top of the structure to make sure it is firmly on
the work surface. Use CA to glue in the top spar.
17. Use a razor saw to put a V-notch in the
shaped balsa Leading Edge to allow it to “bend”
(break) at R-4. Use the LE detail drawing on the
wing plan for reference.
18. Hold the LE centered vertically on the
front edge of the ribs. Use CA to glue it in place.
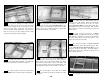
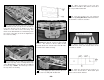
19. Use thick CA to glue in the die-cut 1/8"
plywood Landing Gear Doublers. Since the
wing panels are built upside-down, the “openings”
in the doublers should face upwards as shown in
the photos. The right side wing plan shows the
placement of the two doublers for retract gear
(Z-4 and Z-5). The left side wing plan shows the
placement of the three fixed gear doublers (G-3,
G-4, and G-5).
Retract Doublers shown
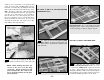
20. Use a sharp knife to trim the balsa ribs
to match the cut-outs in the doublers.
- 15 -