
User Manual


order of the parts (e.g. 4C, 4, 4B, 4D.) Use CA+ to
glue the parts together. Be sure to make a left
and a right of each rib assembly.
❑
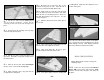
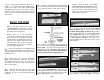
9. Enlarge the pushrod hole in each W-8 until
it is a 5/16” x 5/16” square hole. This will provide
clearance for the clevis.
❑❑
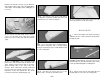
10. Pin a Spar assembly to the building
board at three or four locations using the cross-
pinning technique shown in the sketch.
❑❑
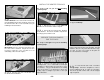
11. Glue the die-cut 3/32” balsa ribs W-2
through W-12 to the spar. These should be
vertical and aligned over their appropriate locations
as indicated on the plans. The jig tabs located
near the aft end of the ribs should all contact the
work surface.
❑❑
12. Glue the aileron trailing edge
assembly to the aft edge of ribs W-8 through W-12.
The upward facing edges of the ribs and the top
surface of the trailing edge should be even, and all
of the jig tabs should touch the work surface.
NOTE: The inboard end of the aileron TE extends
approximately 5/8” inboard of rib W-8, as shown on
the plan.
❑❑
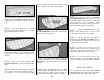
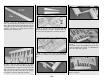
13. Test fit the die-cut 1/8” balsa TE At
Flap to the wing ribs. You will probably have to
angle the notches with your hobby knife to match
the forward sweep of the trailing edge. Place the
TE At Flap back into the wing rib structure but do
not glue yet.
❑❑
14. Sight down the TE of the wing from
the root end; make sure all the ribs are aligned at
the same height. Use paper to shim under the jig
tabs of any ribs that are low. This will put the TE’s
of the ribs in line.
❑❑
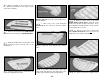
15. When the TE At Flap is fitting in place
well, with all of the rib TE’s aligned, glue it in with
CA+.
NOTE: Do steps 16 and 17 for a plane without
operating flaps. Skip these steps for a plane
with operational flaps.
❑❑
16. Cut the ends of the tapered 1/2" x 19”
balsa Flap TE about 1/8” longer than it
is shown on the plan. Note: This Flap
TE is not used if you build operating
flaps.
❑❑
17. Glue the Flap TE to ribs W-2 and W-7.
The Flap TE should be centered vertically on the
aft edges of the ribs and should be symmetrically
aligned with the top and bottom of the ribs. Make
sure all the jig tabs are contacting the work
surface. A metal straightedge can be placed on
the structure over the jig tabs to hold them down
evenly.
- 16 -