
User Manual


FINAL CLEAR COAT
The model should have a satin or flat finish for
best appearance. K & B clear with satin hardener
was used on the prototypes with good results. It is
very fuelproof and durable. Hobbypoxy clear is
very similar and it is available with a true “flat”
hardener.
Spray a light to medium coat of clear on all of
the parts of the model.
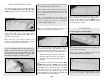
EXHAUST STACKS
❑
1. Trim the Exhaust Stacks as closely as you
can.
❑
2. Paint the exhaust stacks. Aluminum
Chevron Perfect paint was used on the prototypes.
You may "weather" them with some dark paint.
❑
3. Mark the perimeter of the stacks on the
fuselage. Use a pin to perforate the covering
underneath the stacks.
❑
4. Rough up the underside of the plastic
stacks with sandpaper.
❑
5. Glue on the stacks. CA glue was used on
the prototypes.
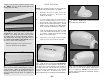
HINGING
NOTE: Hinging is usually done after
covering and priming, but before color
application. The hinge locations are
shown on the plans.
❑
1. Cut 24 hinges (3/4” x 1”)
from the 2” x 9” CA hinge strip.
Trim off the corners for easier
insertion as shown in the
sketch.
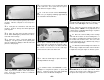
HINGE THE ELEVATOR
❑
2. Test fit the elevators to the stabilizer with all
of the hinges and the wire joiner in place. Make
sure the elevators are both set at the same angle.
Make adjustments if necessary.
❑
3. Work a generous amount of 30-minute
epoxy into the wire joiner holes in the elevators.
Install the wire joiner and wipe away any excess
epoxy.
❑
4. Install the elevators onto the stab and glue
the hinges in place using 4-6 drops of thin CA on
each side of the hinge.
THERE SHOULD BE NO HINGE GAP
HINGE THE AILERONS AND RUDDER
❑
5. Hinge the Ailerons and rudder using the
same technique as the elevators, except, they do
not have any wire torque rods, so they don’t
require any epoxy.
❑
6. Flap hinge installation is covered in the Flap
Fitting Section. On the prototypes, the flap hinges
were epoxied in after the final clear coat was
applied.
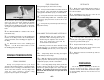
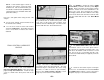
FINAL ENGINE INSTALLATION
The above photo shows the installation of a O.S.
.61SF along with Top Flite's custom muffler and
header (See page 6 for part #'s). A remote glow
plug adapter, fueler valve, and air valve may be
mounted as shown in the photo below. A Hobbico
exhaust deflector (HCAP2175) can be used to
divert the fumes out of the cowl.
The above photo shows the installation of the O.S.
120 Surpass 4-Cycle along with a remote glow
valve, fueler valve, and an air valve.
- 49 -