
Owner's manual


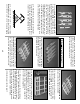

❏❏15. Make two 6”x 30” stab skin planks
from four 1/16” x 3” x 30” balsa sheets. From
these planks, cut four stab skins. See the sketch
for the proper layout on the wood. Refer to the
plans for the exact shapes and sizes, but
remember to make the skins slightly oversize.
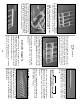
❏❏16. Pin the stab structure to your building
surface using pins only at the tips and diagonally
under the LE & TE. Make sure that the jig tabs
are flat on the building surface. Don’t hide the
pins under the skin.
❏❏17. Use the off-cut 1/16” material from the
skin planks to make a 1” wide cross-grain strip to
fit between the S-1’s from the LE to the TE. Glue
the strip in place between the ribs, flush with the
top edge.
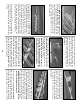
❏❏18. Test-fit the skins over the stab frame.
Make sure the skins meet flush at the center.
Adjust them with a sanding block if necessary.
Apply an even bead of medium or thick CA to
the upward-facing edges on one side of the
frame. Place a skin in its proper position and
press it firmly down until the glue has set.
Repeat this step for the other top skin. Trim off
the excess balsa, but save any big scraps for
use when making the elevators.
❏❏19. Remove the stab from the building board.
Trim off the jig tabs with a sharp knife. Trim and
blend the LE and TE to the ribs as you did before.
Check all glue joints, adding glue as necessary.
❏❏20. Cut another 1” wide cross-grain strip
from 1/16” x 6” off-cut balsa sheeting and glue it
between the two S-1 ribs flush with their bottom
edges.
❏❏21. It’s important to get a good glue bond
between the stab frame and the bottom stab
skins. Apply a heavy bead of medium or thick
STAB SKIN
12-1/8"13"
13"12-1/8"
3"
STAB SKIN
for misalignment. On a large surface such as
the wing, 3/8” extra is suggested.
D. To make skins, the following steps
are suggested:
1. True up the edges of the sheets with a
metal straightedge and a sharp knife or a
“T-Bar” sanding block.
2. Test-fit the sheets together to make sure
they match well.
3. METHOD “A”: Edge glue the sheets
together with thin CA, over a flat surface cov-
ered with waxed paper. A quick wipe of the
joint with a fresh paper towel will remove
excess glue and make sanding easier. Mark
the poorest surface to identify it as the “inside”
surface.
METHOD “B”: Edge glue the sheets
together with Titebond
®
wood glue. (Titebond
is easier to sand and won’t leave a ridge at the
seam, as CA is prone to do.) Smear the glue
lightly along an edge with your finger, then join
the sheets over a flat (waxed paper covered)
building board. Pin the sheets to the board to
hold them together. Wipe off any excess glue
before it dries.
4. Place the skin on a large flat surface
and sand it with a large flat sanding block and
fresh, sharp 220 paper. Use light pressure and
a brisk circular motion.
5. Trim the perimeter of the sheet to even
things out.
11