
Owner's manual
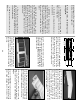


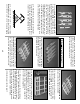

❏ 3. Lay out both sets of balsa Ribs W-2 and W-
3, ply Doublers W-2B and W-2C, and the ply
Wing Bolt Plates exactly as shown in the photo.
This way you won’t assemble two right or two left
sides.
Glue the Doublers to the Ribs and laminate
the two pairs of Wing Bolt Plates with
30-Minute Epoxy. After the epoxy has cured, test
fit the Wing Bolt Plates into the slots at the aft end
of W-2 and W-3. Make slight adjustments to the
slots if required, but don’t make the fit too loose
as this is a critical area for a nice tight bond.
❏ 4. Attach the wing plan (the part showing the
center section) to a flat building board and cover
it with waxed paper.
Cutting apart the wing panel
sections of the plan makes handling easier.
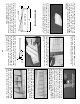
❏ 5. Locate the 3/8” x 3/8” x 20” basswood
Center Spar. Cut two 9-1/4” pieces from it. Pin
one of the 3/8” x 3/8” x 9-1/4” basswood Center
Spars to the plan using the method shown in the
sketch. The Center Spar is a little longer than
actually needed to allow for the dihedral angle at
W-3. It will be trimmed to size later.
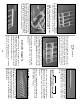
❏ 6. Position rib W-1 and rib assemblies W-2
and W-3 on the Center Spar with the jig tabs
touching the plan. Be sure that the ply doublers
are facing the correct direction.
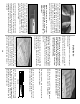
❏ 7. Insert (without gluing) the die-cut 1/8” balsa
Center Aft Spar into the slots above the jig tabs.
Insert the second basswood Center Spar into
the forward rib notches. Make sure that both
Spars are flush with the upper edge of the ribs.
❏ 8. Interlock the 1/8” die-cut ply Center LE with
the tabs on the LE of ribs W-3 and W-1.
❏ 9. Study the structure. Are all parts over their
respective locations on the plans and in align-
ment? If not, lightly use fine grit sandpaper to
adjust the fit.
Don’t reach for the CA yet!
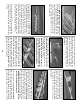
❏ 10. Make sure the W-3 ribs are flush with the
Aft Spar and the Center LE. Use the 1/8” die-cut
ply Dihedral Gauge on the inside of the W-3
ribs at the forward Spars to set the ribs angle at
this location. Hold a straightedge alongside the
W-3’s to check for straightness.
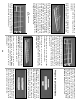
❏ 11. When you are sure that everything is
straight and true (sight down the TE and shim
any low ribs with folded paper under the jig tabs)
wick thin CA into every joint. Hold the LE and
W-3’s in tight contact for a few seconds to allow
the CA to work. Follow the initial gluing by apply-
ing a fillet of medium CA around the joints.
Isn’t interlocking construction great?!
NOTE: Do not use any CA until step 11.
17