
- Top Innovations, Inc. Carpet Cleaner User Manual


8
Top Innovations, Inc.
ASSEMBLING THE
HEAVY-DUTY STEAM CLEANER
ATTACHING UTILITY BRUSHES
WARNING: Do not try to connect accessories while unit is emitting steam.
This section applies to all Utility Brushes. Note that Utility Brushes attach to Steam
Jet Nozzle, not to main steam nozzle.
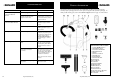
1. Align guide tab on inside of Utility Brush (FIGURE 3-A) with groove on bottom
of Steam Jet Nozzle tip (FIGURE 3-B), and firmly press Utility Brush onto
Steam Jet Nozzle.
2. Press Utility Brush as far on to Steam Jet Nozzle as possible to ensure that it is
properly sealed, to help prevent any steam leakage (FIGURE 4).
3. To remove Utility Brush, simply grip it firmly and pull it off of Steam Jet
Nozzle.
FIGURE 4
FIGURE 5
FIGURE 3
ATTACHING SCRUB PAD
This section applies to the Scrub Pad. Note that Scrub Pad
attaches to Steam Jet Nozzle, not to main steam nozzle.
1. Place Scrub Pad over tip of Steam Jet Nozzle, and firmly
press it as far on to Steam Jet Nozzle as possible to ensure
that it is properly sealed (FIGURE 5). This will help
prevent any steam leakage.
2. To remove Scrub Pad, simply grip it firmly and pull it off of
Steam Jet Nozzle.
Top Innovations, Inc.
USING THE
HEAVY-DUTY STEAM CLEANER
9
FILLING WATER RESERVOIR WITH WATER
1. Place Heavy-Duty Steam Cleaner on a flat, level surface.
2. Make sure Lighted On/Off Switch is set to “Off” position and grounded power cord is
unplugged from electrical outlet.
3. Flip up Storage Compartment lid. Cautiously unscrew and remove Water Reservoir
cap.
4. Water Reservoir should always be emptied after each use. If it was not emptied after
the last use, empty it now. This will prevent over-filling.
5. Fill Measuring Cup to maximum fill line (16 oz. / 473 ml.) with water.
NOTE: To prolong the life of your Heavy-Duty Steam Cleaner, we recommend
using distilled or de-mineralized water.
6. Carefully pour water from Measuring Cup into Water Reservoir through fill hole.
WARNING: Extreme caution should be used when pouring water into the Water
Reservoir. Do not look directly down into fill hole when filling. Keep your free
hand and any children or pets at a safe distance.
7. Depending on how long you intend to steam, you may repeat steps 5 & 6 up to two
more times, to have up to a maximum of 48 oz. (1,420 ml.) of water. See chart for a
comparison of the amount of water vs. approximate steam time.
8. Replace Water Reservoir cap, ensuring that it is screwed on tightly to prevent hot steam
from escaping and causing injury.
9. Lower Storage Compartment lid back down.
REFILLING WATER RESERVOIR AFTER USE
If unit has been in use, always follow the safety precautions below before
removing the Water Reservoir cap:
1. Allow unit to cool for 5-10 minutes.
2. Press and hold Steam Button to release all remaining steam.
WARNING: Failure to follow these precautions may result in burns from
escaping steam when the Water Reservoir cap is removed.