
- Top Innovations, Inc. Fabric Steamer & Iron SteamFast SF-432


Top Innovations, Inc.
FABRIC STEAMER & IRON
PRODUCT INFORMATION
5
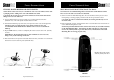
The following features and accessories are included with your Fabric Steamer & Iron. Carefully
inspect Styrofoam packing material for all parts listed below. To obtain possible missing parts, refer
to the Customer Support section on page 14 of this manual.
UNIT FEATURES &ACCESSORIES
1. WALL-MOUNTING BASE
2. BASE UNIT
3. WATER RESERVOIR FILL HOLE
4. WATER RESERVOIR CAP
5. WATER LEVEL WINDOWS
6. LIGHTED ON/OFF SWITCH
7. STEAM NOZZLE HANGER
8. STEAM NOZZLE
9. HEATING INDICATOR LIGHT
10. STEAM BUTTON
11. HANDLE
12. IRONING PLATE
13. STEAM HOSE
14. FABRIC BRUSH
15. MEASURING CUP
12
Top Innovations, Inc.
USING THE
FABRIC STEAMER & IRON
STEAMING GARMENTS
1. Place garment on a clean, rust-free clothes hanger. Hang within easy reach of Steam
Hose / Nozzle.
2. Point Steam Nozzle at bottom of garment. Steam will rise along inside and outside of
fabric, removing wrinkles. Slowly slide Steam Nozzle vertically, from bottom to top of
garment.
NOTE: Do not allow kinks to form in hose at any time during use.
3. Direct Steam Nozzle away from garment and smooth fabric with your free hand.
4. Repeat steps 3 and 4 as necessary until fabric is smooth and wrinkle free.
USING THE IRONING PLATE
Whenever a crisp crease is desired, this can be easily accomplished using the Ironing Plate.
A folded towel placed on a table-top or other flat surface may be used if an ironing board
is not conveniently available.
1. Be sure Fabric Brush has been removed before proceeding.
CAUTION: Use care when removing Fabric Brush from Ironing Plate, as both may be
hot and may cause burns or other injury.
2. If the unit has not recently been in use, allow Ironing Plate at least 45 seconds to heat
up.
3. To form a crease, fold fabric and apply Iron Plate as you would use a regular iron. If a
steam burst is desired, simply press Steam Button.
When you are finished using the Fabric Steamer & Iron, immediately set Lighted On/Off
switch to “Off”position and unplug power cord from electrical outlet. Refer to Care and
Storage Guidelines on page 13 of this manual for proper cleaning and storage procedures.