Top Innovations, Inc. Innovative Products to Make Your Life Easier Steam Cleaner Model MC1275 Owner’s Manual Steam Clean and Mop Hard-Surface Floors Melt Away Grease, Grime, and So Much More! Top Innovations, Inc. 400 NW Platte Valley Drive, Riverside, MO 64150 1-800-711-6617 Tel: 816-584-9700 Fax: 816-584-9066 www.topinnovations.
Index Welcome to the World of Steam . . . . . . . . . . . . 3 Important Safety Guidelines . . . . . . . . . . . . . . 4-6 Product Specifications . . . . . . . . . . . . . . . . . . . . 6 Product Information . . . . . . . . . . . . . . . . . . . . . . 7 Using Your MC1275 Steam Cleaner . . . . . . . 7-11 Care and Storage . . . . . . . . . . . . . . . . . . . . . . . 12 Problem Solving . . . . . . . . . . . . . . . . . . . . . 13-14 Helpful Cleaning Tips . . . . . . . . . . . . . . . . .
Welcome to the World of Steam! Dear Valued Customer: Thank you for purchasing your MC1275 McCULLOCH® Steam Cleaner. Our firm takes pride in providing you with quality, value, and excellent service. The MC1275 McCULLOCH® Steam Cleaner solves a variety of cleaning tasks, including the elimination of unpleasant odors in all areas of your home. Removal of soap scum, mold, mildew, grease, grime, and calcium deposits in kitchens and bathrooms is quick and easy.
IMPORTANT SAFETY GUIDELINES Basic safety precautions should be used when using any electrical appliance. In order to reduce the risk of fire, electric shock, or other injuries, please read all of the following instructions before using your MC1275 Steam Cleaner. 1. Do not leave your MC1275 Steam Cleaner unattended when plugged in or not in use. 2. This unit is not a toy. Close supervision is required when using the unit near children, pets, and plants.
SAVE THESE INSTRUCTIONS! 7. Do not handle or use this unit while hands are wet or when not wearing shoes. To avoid falls and other injuries, be sure to dry any wet areas on floors and to stand away from damp surfaces while using the Steam Cleaner. 8. The MC1275 Steam Cleaner is only meant to be used with recommended MC1275 accessories. Other types of attachments such as those used with vacuum cleaners are not to be used with the Steam Cleaner. Doing so may cause injuries or damage to the unit. 9.
Use Caution When Cleaning Certain Types of Surface Areas 1. Use the cloth-cover attachment on sealed floor surfaces to create a shine. Do not use on unsealed wood products and surfaces. 2. Do not use hot steam on cold glass surfaces; this will cause glass to break. 3. Do not use the MC1275 Steam Cleaner to clean soft plastics. 4. Always test a small area when using the unit to clean carpets, draperies, upholstery, or other fabric surfaces. 5.
Model MC1275 Steam Cleaner: Product Information Your MC1275 Steam Cleaner package includes the following features and accessories: Steam Cleaner (A) Hose (B) with Attached Handle (C) Lift Handle (P) Steam Lock Button (D) Steam Control Switch (E) 2 Extension Wands (F) Steam Jet Nozzle (G) Triangle Brush (J) Upholstery/Floor Brush (I) 1 Utility Brush (M) Terry Cloth Towel for Large Brush (H) Squeegee (N) Measuring Cup (K); Funnel (L) Steam Ready Light (O) Using Your MC1275 Steam Cleaner Important: To insure
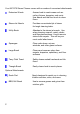
Your MC1275 Steam Cleaner comes with a number of convenient attachments: Extension Wands Access hard-to-reach areas such as ceiling fixtures, draperies, and vents. Use wands and the floor brush to clean floors. Steam-Jet Nozzle Provides concentrated jet of steam for tough cleaning tasks. Utility Brush Attaches to the steam jet nozzle. Use when cleaning ceramic, metal, plastic, and fiberglass surfaces. Use to remove stains from carpets. This will be your most useful attachment.
Assembling Attachments Attachments will become hot while unit is in use. Allow nozzle to cool completely before attempting to change attachments. 1. Screw hose onto threaded valve on unit by turning clockwise until hose is firmly tightened. 2. Prior to filling and using your MC1275 Steam Cleaner, select and install the appropriate attachment.
1. Turn switch off. Push steam control switch on the handle to release steam before unscrewing the cap. Remove the reservoir cap by rotating it counter-clockwise until the cap can be removed. 2. Fill the provided MC1275 Steam Cleaner measuring cup with water. Use distilled or de-mineralized water in areas where tap water contains high mineral concentrations. 3. Using the provided MC1275 Steam Cleaner funnel, pour the contents of the measuring cup into the water reservoir fill hole.
6. Your Steam Cleaner will be ready to use in 2-8 minutes, depending on how much water is in the reservoir tank. The steam ready light will be on while the unit is heating. When the steam ready light is no longer lit, you are ready to utilize the power of steam. The unit is designed to selfregulate the temperature and pressure of the steam in the water reservoir.
Care and Storage Guidelines 1. Preparing your Steam Cleaner for storage is quick and simple. When you have finished your cleaning tasks, turn the power switch to the “Off” position. Unplug the power cord and allow the unit to cool completely. After the unit has cooled, dump any remaining water in the water reservoir into a sink or tub to prevent overfilling during your next use and to minimize potential mineral buildup in the water reservoir. 2. Store small accessories neatly into the accessory compartment.
Problem Solving The following tips are provided for your assistance with common, easilysolved problems. Problem Unit fails to heat Excess water shoots from steam jet nozzle Water spits out from fill spout when adding additional water Possible Cause Solution Check to ensure unit is plugged in. Push plug securely into outlet. Try another outlet. Be sure power switch is in the “On” position. Water has condensed in the wand and/or hose. Check circuit breaker. Check with qualified electrician.
Problem Solving Continued Accessories do not stay firmly attached to handle. Unit heats up, but there is no steam output. Attachments are not installed properly. The water tank is empty. The nozzle or hose is blocked. Review steps for proper installation of attachments. Check to ensure that attachments are installed correctly. Align the groove with the section of attachment. Turn the unit off, and allow to cool. Refill the water tank as instructed.
Helpful Cleaning Tips NOTE: THIS UNIT IS NOT FOR DISINFECTING! Always use your steam cleaner as a first approach to cleaning any stain. In most instances, this approach is all that will be needed to remove stains and soiling. The tips below have been compiled from a variety of sources in order to assist you in the removal of stains and soiling that may remain after your first approach to removal.
Helpful Cleaning Tips Continued Always use your steam cleaner as a first approach to cleaning any stain. In most instances, this approach is all that will be needed to remove stains and soiling. The tips below have been compiled from a variety of sources in order to assist you in the removal of stains and soiling that may remain after your first approach to removal. However, they are not a guarantee that all stains can be effectively treated by using any of the suggested approaches.
LIMITED WARRANTY Top Innovations, Inc. will repair or replace, at its option, without charge to the consumer any McCULLOCH® product that fails due to a defect in material or workmanship within 3 months following the initial consumer purchase. This warranty does not cover damage caused by commercial use, misuse, alteration, or modification.
TOP INNOVATIONS, INC. 400 NW Platte Valley Drive Riverside, MO 64150 Tel: (800) 711-6617 Email: customerservice@topinnovations.com Visit Our Website at: www.topinnovations.com ORDER EXTRA PARTS AT A VERY LOW PRICE Part Genuine Parts for the McCULLOCH STEAM CLEANER Model 2 for or 4 for A275-001 Triangle Brush (Medium Size Brush) $ 7.49 $ 11.99 A275-002 Short Nylon Utility Brush for Most Cleaning Needs (1cm) $ 5.49 $ 7.99 A275-003 Long Nylon Utility Brush for Hard-to-Reach Places (1.5cm) $ 5.
Assembling Attachments 1. Insert the Lift Handle into the Intake Hole on top of the unit. Please follow the instruction according to the illustration. 2. Use the enclosed magnetic Screw Driver and Screw to securely fasten the Lift Handle to the unit.
Printed in China Top Innovations, Inc. 400 NW Platte Valley Drive, Riverside, MO 64150 1-800-711-6617 Tel: 816-584-9700 Fax: 816-584-9066 www.topinnovations.