TABLE OF CONTENTS Before Use…………………...………………………………………….…… 2 Introduction ……………………………………………………..……….… 3 Part Names and Function ……………………………………………….... 4 Installation ……………………………………………………………….… 8 OSD (On Screen Display) Controls ………………………………….…… 11 RS232C Control …………………………………………………………..... 19 Troubleshooting ……………………………………………………….…… 20 Specifications …………………………………………………………….
Before Use Before operating the tv, please read this manual thoroughly. This manual should be retained for future reference. FCC Class B Radio Frequency Interference Statement WARNING: (FOR FCC CERTIFIED MODELS) NOTE: This equipment has been tested and found to comply with the limits residential installation. This equipment generates, uses and can radiate radio frequency energy, and if not installed and used in accordance with the instructions, may cause harmful interference to radio communications.
Introduction The features you’ll enjoy include: y y y y y y Advanced DCDi Sampling Progressive Scan method is employed. 480p, 720p and 1080i HDTV signal compatibility. PCs, VCRs, Laser Disc and DVD player source compatibility. RGB input (2*), Video input (2*), YPbPr or YCbCr input (1*), Audio input (3), External Control input (1). Component video input terminal for DVD, 15.75 kHz (YCbCr), 31.5 kHz (YPbPr).
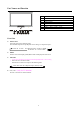
Part Names and Function 1. 2. 3. 4. 5. 6. 7. 8. CH 8 POWER POWER/Standby Indicator REMOTE SENSOR Windows INPUT Select MENU SETTING ADJ. + , ADJ. - / VOL + , VOL CH+, CH- 7 6 5 4 3 2 1 Front View 4. INPUT Select Switch the input in the following order. The available component input depends on the setting of “component input”. Video Æ S-video Æ Component input ( YCbCr or YPbPr ) TV Å DVI Å D-sub 15 PIN 5. MENU Sets the On-Screen Display (OSD) Menu mode and displays the main menu. 6.
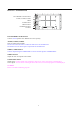
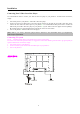
Rear View / Terminal Board EXT SPEAKER L and R OUTPUT AUDIO1, AUDIO2, AUDIO3 VIDEO S-VIDEO INPUT L3 R3 L2 R2 L1 R1 AV - In S -Vi d e o VIDEO OUTPUT AV - Ou t Y Pb Pr COMPONENT INPUT TV INPUT D -SUB DV I RS - 232C AC IN Tu n e r EXT SPEAKER L and R OUTPUT Connect external speakers here. Maintain the correct polarity. AUDIO1, AUDIO2, AUDIO3 These are Audio input terminals. You can select the video source to match the audio source on the OSD menu.
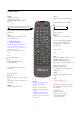
Remote Control POWER MUTE MUTE ON Æ MUTE OFF Æ MUTE ON Switches power ON/OFF. (This does not operate when POWER/STANDBY indicator of the main unit is off.) GRAPHIC POWER VIDEO Press this button to select video source on main screen. Æ VIDEO Æ S-VIDEO Æ COMPONENT VIDEO VIDEO COMP GRAPHIC 1 2 3 VIDEO can also be selected using the INPUT SELECT button on the TV. TV Inputs RGB signal of personal computer, etc.
Battery Installation and Replacement Insert the battery, making sure to set them in with the proper polarity. 1. Press and open the cover. 2. Align the batteries according 3. to the (+) and (-) indication inside the case. Replace the cover. BATTERY CAUTIONS * * * * * * * * * * Use only the size and type of batteries specified. Be sure to follow the correct polarity when installing the batteries as indicated in the battery compartment. Reversed batteries may cause damage to the device.
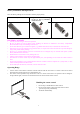
Installation Connecting Your VCR or Laser Disc Player Use common RCA cables to connect your VCR or laser disc player to your plasma tv. To make these connections, simply: 1. 2. 3. Turn off the power to your plasma tv and VCR or laser disc player. Connect one end of your RCA video to the video output connector on the back of your VCR or laser disc player, connect the other end to the Video input on your plasma tv.
Connecting Your DVD Player You can connect your plasma tv to a DVD player. To do so, simply: 1. 2. 3. 4. Turn off the power to your plasma tv and DVD player. Use a video cable (with Yellow RCA terminal) to connect your DVD player to the video input of plasma TV. If your DVD player has component video output (YCbCr or YPbPr), use component cable to connect to component inputs on your plasma TV. Or use the DVD player’s S-Video output.
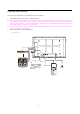
External Speaker Connections External speakers (Option) may be connected to the plasma tv to reproduce sound. External speakers may be connected directly to the EXT SPEAKER L and R Output terminals. (Connect EXT SPEAKER OUTPUTS to external speakers only. DO not connect EXT SPEAKER OUTPUTS to audio power amplifier, because you may damage the audio power amplifier.) CAUTION: Unplug the plasma tv and all connected components before connecting external speakers.
OSD (On Screen Display) Controls Menu Operations Your PDP screen has an easy and convenient menu operation system. It helps you to use each PDP function quickly. PICTURE BRIGHTNESS CONTRAST SHARPNESS COLOR TINT COLOR TEMPERATURE EXIT MENU 08 16 +00 16 +00 NORMAL : SELECT MAIN MENU :OK 1. After powering on PDP, press the MENU button on the remote control. The menu operation system will display on the screen. 2.
Picture Quality Adjustment Your PDP has the following setup options which allow you to improve the picture quality. PICTURE BRIGHTNESS CONTRAST SHARPNESS COLOR TINT COLOR TEMPERATURE EXIT MENU 08 16 +00 16 +00 NORMAL Brightness, contrast, sharpness, color, tint (only for NTSC), and color temperature. When the Picture is selected, you can adjust the following items: 1. : SELECT MAIN MENU on the screen. :OK 2.
Picture-in-Picture You can select Picture-in-Picture (PIP) display mode to display two different pictures on the screen. DISPLAY POSITION SIZE PICTURE MODE PIP SETUP CLOCK FOCUS AUTO FOCUS EXIT MENU Note: TV and composite video pictures cannot be displayed at the SINGLE same time under PIP mode. +000 16 When the component input is YCBCR, if the primary picture input is TV or VIDEO, then YCBCR or S-VIDEO : SELECT MAIN MENU can be displayed as the secondary picture.
Sound Setup ¾ function. You can select different functions based on SOUND TREBLE BASS BALANCE SPEAKER AUDI01 INPUT AUDI02 INPUT AUDI03 INPUT SOUND MODE EXIT MENU Your PDP has an external/internal speaker selecting +00 08 08 +00 INTERNAL VIDEO S-VIDEO YCBCR NORMAL your preferences. ¾ allow you to setup the audio input method as you wish and brings you more enjoyment.
Function Setup Your PDP adds some special functions in the function setup menu to provide you with more benefits. FUNCTION OSD DISPLAY AUTO OFF WHITE SCREEN RESET EXIT MENU ON ON OFF OSD By turning on this function, you can see the current screen display : SELECT MAIN MENU :OK mode while watching and changing programs.
Language Selection CONFIGURATION LANGUAGE COMPONENT INPUT RGB SOURCE DB15 SOURCE COLOR SYSTEM EXIT MENU : SELECT MAIN MENU When you use PDP for the first time, please select the desired OSD language. ENGLISH YCBCR NORMAL GRAPHICS AUTO 1. Press the MENU button on the remote control to display the menu operation interface on the screen. 2. Press the ADJ+/ADJ- button to select the Configuration menu and then press ENTER button. :OK 3.
Information Inquiry You can obtain the information of the current PDP input signal by using this function. INFORMATION 1. INPUT 1 VIDEO interface on the screen. INPUT 2 NONE : SELECT MAIN MENU Press the MENU button to display the menu operation 2. :OK Press the ADJ+/ADJ- button to select the Information menu. The signal input information of the primary and secondary pictures will be displayed on the screen.
TV Setup Operations TV SETUP USER CH SYSTEM SETUP CH MAPPING CH FINE TUNE AUTO FINE TUNE MTS V CHIP SETUP C.C SETUP EXIT MENU 10 User CH +00 OFF MONO : SELECT MAIN MENU TV SETUP USER CH SYSTEM SETUP CH MAPPING CH FINE TUNE AUTO FINE TUNE MTS V CHIP SETUP C.C SETUP EXIT MENU SELECT ITEM :OK 2 +00 OFF MONO :OK SYSTEM SETUP COLOR SYSTEM NTSC SOUND SYSTEM M FREQUENCY TYPE CABLE TV EXIT MENU SELECT ITEM TV SETUP USER CH SYSTEM SETUP CH MAPPING CH FINE TUNE AUTO FINE TUNE MTS V CHIP SETUP C.
RS232C Control Application Only use in factory. Table of HDTV resolution supported. H(KHz) V(Hz) Dot clock 720*480 480p 31.54 60.08 27.00 1280*720 720p 45.00 60.00 74.25 1920*1080 1080i 33.75 30.00 74.
Troubleshooting If the picture quality is poor or there is some other problem, check the adjustments, operations, etc., before requesting service. Symptom Checks Picture appears but no sound is Produced. y Is the volume set at the minimum? y Is the mute mode set? y Are the speakers properly connected? y Is AUDIO INPUT set correctly? Poor picture with VIDEO signal input. y Improper control setting. Local interference. Cable interconnections. Input impedance is not correct level.