
Installation & Assembly


Items:
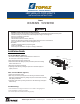
F-FL/15/50K/KN/BZ F-FL/30/50K/KN/BZ
F-FL/45/50K/KN/BZ F-FL/45/50K/YK/BZ
www.topaz-usa.com • 925 Waverly Ave. • Holtsville, NY 11742 • 800-666-2852 • Fax: 631-758-8026
LED SMALL FLOOD LIGHTS
INSTALLATION INSTRUCTIONS
WARNING
-
DANGER- Risk of shock- Disconnect power before installation.
• Electrical connections must be made in accordance with the NEC and all federal and local electrical safety codes.
• Suitable for damp or wet locations and in ambient temperature range of -40° through 113°F
• Not for use in hazardous environments
• Min 75°C supply conductors.
• This luminaire is rated for 120-277VAC, 60Hz only.
• Product must be properly grounded to prevent product malfunction and/or electrical shock
• Do not install if lens is cracked, or fixture is damaged in any way
-
Please Note -
•
Suitable for mounting within 4 ft (1.2m) of the ground
•
Fixture is not dimmable
•
Disconnect power and allow to cool prior to cleaning or maintenance.
Troubleshooting:
1. Check that the line voltage at the fixture is correct. Refer to wiring diagrams.
2. Check that fixture is properly grounded .
3. Be sure the photocell, if used, is functioning properly.
Installation Guide
Silicone gasket
1/2" Screw bracket
1/2" Nut
Waterproof ring
Screw
1/2" Knuckle Mount: (Figure 1)
1. Mount fixture to existing metal 1/2'' NPS threaded mount. Fixture must
be mounted prior to make wiring connections.
2. Route electrical leads through the mounting hole.
3. Seal knuckle threads with sealing compound (not included). Secure the mounting
4. Make wiring connection as per diagram
5. Adjust angle of the fixture by loosening the pivot screw. Set desired angle, then
Yoke / Trunnion Mount: (Figure 2)
1. Affix trunnion to wall using screws.
2. Make wiring connection as per diagram. Ensure all wiring connections and fixture
openings are completely sealed, using sealing compound or silicone caulk to avoid any
water getting into the fixture
3. Adjust angle of the fixture by loosening the side screw. Set desired angle, then tighten
screws securely.
Screw
Trunnion
Figure 1:
Figure 2:
fitter to fixture with lock nut.
tighten pivot screw.