
Operation Manual


5
Babytalker 1020
®
ENGLISH
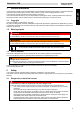
4.2 Display icons (see figure on the fold-out page)
5 Preparing the device for use
5.1 Safety instructions
5.2 Where to set up your device
The device must be set up in a location that meets the following requirements in order to ensure safe and proper
operation:
- Power sockets must be easily accessible so that the mains cable can be easily removed if necessary.
- The device must be set up in a dry place.
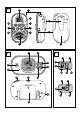
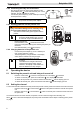
5.3 Removing / Installing the belt clip from the
parents unit
- To remove the belt clip from the unit, push the belt clip (B)
upwards, while pulling the belt clip tab away from the unit (A).
- When re-installing the belt clip , a click indicates that it locked into
position.
5.4 Power supply
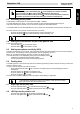
5.4.1 Inserting batteries into the baby unit
- Open the battery compartment.
- Insert the three AAA Alkaline batteries (LR03). Make sure
that you observe the correct polarity.
- Close the battery compartment.
Parent’s unit
25 Receive signal icon
26 Audio volume indicator
27 Channel number
28 Battery level indicator
shows the charge state of the battery:
- battery fully charged
- battery almost empty
29 Privacy mode icon
30 Feeding timer icon
31 Feeding interval time
Baby unit
32 Transmission icon
33 Channel number
34 Battery level indicator
shows the charge state of the battery:
- Battery full
- Symbol flashing: Battery almost
empty
35 Power adapter connected icon
36 Privacy mode icon
WARNING
Injury and material damage can occur when preparing the device for use!
Children must not be allowed to play with packaging material. There is a risk of choking.
• The baby unit can be operated using three AAA Alkaline batteries or via the power
supply provided.
• The baby unit has no charging function.
• We advise inserting batteries even if you intend to run the unit from the mains. This
means that the batteries can automatically power the unit if there is a power cut.
• Do not use empty and new batteries together.
C
A
B
11
11
+
+
+
+
-
+
-
+
-
1 x AAA
1 x AAA
1 x AAA