
Operation Manual


Babytalker 3500 SEDS
4
®
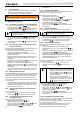
7.1 Baby unit components
See Figure on the fold-out page.
7.2 Parent unit components
See Figure on the fold-out page.
7.3 Display description
8Initial use
8.1 Package content
The equipment is supplied as standard with the following items:
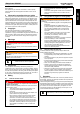
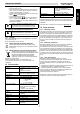
8.2 Installing batteries in the baby unit
– Turn the screw on the cover of
the battery compartment
at the back of the baby unit
90° counter clockwise and
remove the battery
compartment cover.
– Fit four AAA alkaline
cells (LR03) in the
battery compartment.
Ensure that the polarity is
correct.
– Close the battery
compartment.
8.3 Connecting the baby unit to the AC mains
Insert the small plug of the
AC mains adapter in the
mains power connector of
the baby unit and plug
the AC mains adapter into a
mains connector (100~240
V - 50/60 Hz).
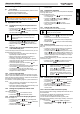
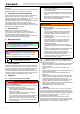
8.4 Installing the rechargeable battery pack in
the parent unit
See Figure on the fold-out page.
– Rotate the belt clip
upward.
– Turn the screw on the
cover of the
battery compartment
at the back of the
parent unit 90°
counter clockwise and
remove the battery
compartment cover.
– Place the Li-ion battery pack in the battery compartment.
Ensure that the battery contacts do make contact with
the charge contacts as illustrated.
– Carefully close the battery compartment and rotate the
belt clip back downwards.
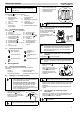
8.5 Connecting the parent unit to the AC mains
– Insert the small plug of the AC mains adapter in the
mains power connector and plug the AC mains
adapter into a mains connector (100~240 V - 50/60 Hz).
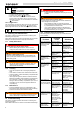
1 On/off LED
2 Night light LED
3 Infrared LED for night
vision
4 On/off switch
5Lens
6 Microphone
7 Wall mounting cavity
8 Crib connector nut
9 Light sensor
10 Battery cover with screw
11 Speaker
12 Connector for AC mains
adapter
13 Room temperature sensor
14 Volume LED
15 Microphone
16 Increase volume /
Next menu item
17 Decrease volume /
Previous menu item
18 Play button
19 Lullaby button
20 3,5” (8,8cm) colour display
21 VOX on/off LED
22
23 Power on/off LED
24 Menu button
25 Push to Talk button
26 On/off button
27 Belt clip
28 Speaker
29 Connector for AC mains
adapter
30 Battery cover with screw
Out of range or no
connection
LCD display
brightness icon
Volume icon Temperature unit
icon
Melody icon Night light icon
- 1 baby unit
- 1 parent unit
- 2 AC mains adapters
- 1 user guide
- 1 service card
- 1 Li-ion rechargeable battery pack
• You can operate the baby unit with 4 AAA
cells (LR03; we recommend alkaline cells)
or the included AC mains adapter.
• The baby unit cannot recharge batteries.
• It is recommended to always leave the
batteries in the unit, even if you use the AC
mains adapter. The unit will automatically
switch to battery power in case of a mains
power interruption.
Do not turn the screw past the “OPEN” point.
A
B
PTTPTT
C
O
P
E
N
90° MAX
OPEN
10
Never mix used cells with fresh cells.
CAUTION
• The mains connector must be within easy reach so
you can quickly unplug the power cable in an
emergency.
• Use only the supplied AC mains adapter (6 V DC /
800 mA).
CAUTION
• Use only the supplied Li-ion battery pack in the parent
unit.
Do not turn the screw past the “OPEN” point.
It takes around 10 hours to fully charge the
batteries.
+
-
1 x AAA
+
-
1 x AAA
+
-
1 x AAA
+
-
1 x AAA
12
B
26
29
28