Xpl871.
Xpl871.
Xpl871.book Page 3 Friday, November 15, 2002 12:08 PM XPLORER 871 3 • • • • • På denna utrustning är det 2 års garanti. Garantin gäller vid uppvisande av originalfaktura eller kvitto, under förutsättning att inköpsdatum och maskintyp står angivet. Under garantitiden utför Topcom kostnadsfritt reparationer på apparater behäftade med fel som orsakats av material- eller tillverkningsfel.
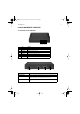
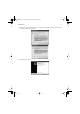
Xpl871.book Page 4 Friday, November 15, 2002 12:08 PM XPLORER 871 4 2. ADSL-MODEMETS FUNKTION 2.1 DE ÖVERSTA LED-LAMPORNA 1 2 3 4 5 6 7 LED Betyder 1 SYS Blinkar när routern fungerar riktigt. 2 ADSL RXD Blinkar när den tar emot data. 3 ADSL TXD Blinkar vid överföring av data. 4 ADSL SYN Lyser grönt när ADSL :ns fysiska skikt är anslutet. 5 LAN LNK Lyser grönt när LAN länken är uppe. 6 LAN ACT Blinkar när aktivitet förekommer på LAN-porten.
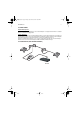
Xpl871.book Page 5 Friday, November 15, 2002 12:08 PM XPLORER 871 5 2.3 KABELFÖRING Genom Ethernet-porten Apparatens LAN-port är kopplad precis som en nätverksadapter. Från apparaten direkt till en PC. Sladden ska vara en Ethernet övergångssladd. Genom USB-porten Apparaten kan användas som en nätverksadapter på din PC. Det innebär att du inte behöver installera en nätverksadaptor på din PC först, innan du ansluter din PC till ADSL-modemet.
Xpl871.book Page 6 Friday, November 15, 2002 12:08 PM XPLORER 871 6 2.
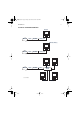
Xpl871.book Page 7 Friday, November 15, 2002 12:08 PM XPLORER 871 7 3. INSTALLATION OCH KONFIGURERING 3.1 INSTALLERA USB-DRIVRUTIN !!! OBS!!! Du behöver bara installera USB-drivrutinerna om du vill använda modemet genom USB-porten och inte genom Ethernet-anslutningen . Om du ansluter ADSL-modemet genom USB-porten första gången till PC :n, kommer Windows automatiskt att söka efter programvaran. Följ dessa steg för att installera USB-drivrutinen. 3.1.1 För Windows XP 1.
Xpl871.book Page 8 Friday, November 15, 2002 12:08 PM XPLORER 871 8 3. När fönstret "Installation av maskinvara" eller "Installation av programvara" dyker upp, trycker du bara på "Fortsätt i alla fall" för att gå vidare. 4. Klicka därefter på "Avsluta".
Xpl871.book Page 9 Friday, November 15, 2002 12:08 PM XPLORER 871 9 5. Efter en stund kommer Windows att visa att den nya maskinvaran, USB ADSL-adaptor, har påträffats. Välj "Installera från en lista eller specifik plats". Klicka på "Nästa >". 6. Klicka på "Nästa >"när följande bild dyker upp. 7. När fönstret "Installation av maskinvara" visas, trycker du på "Fortsätt ändå".
Xpl871.book Page 10 Friday, November 15, 2002 12:08 PM XPLORER 871 8. Klicka därefter på "Avsluta" för att avsluta installationen. 9. När drivrutinen är installerad, bör du följa instruktionerna i avsnittet "3.2 Konfigurera nätverksinställningar" nedan för att ändra nätverksinställningarna på din PC. 10 3.1.2 För Windows 2000 1. När Windows meddelar att den nya maskinvaran påträffats, klickar du på "Nästa >" för att fortsätta. 2. Välj "Sök efter lämplig drivrutin för min apparat".
Xpl871.book Page 11 Friday, November 15, 2002 12:08 PM XPLORER 871 3. Markera "CD-ROM drivenhet" i nästa fönster och klicka på "Nästa>". 4. Följ installationsguiden och klicka på knappen "Nästa >". 5. När fönstret "Hittar inte digital signatur" visas, tryck på "Ja" för att fortsätta installationen.
Xpl871.book Page 12 Friday, November 15, 2002 12:08 PM XPLORER 871 6. Tryck på "Avsluta". 7. Om följande fönster visas: "Hittar inte digital signatur", tryck på "Ja" för att avsluta installationen. 12 3.1.3 För Windows Me 1. När Windows meddelar att ny maskinvara påträffats. Välj "Ange drivrutinens sökväg" och klicka på "Nästa >".
Xpl871.book Page 13 Friday, November 15, 2002 12:08 PM XPLORER 871 13 2. Sätt i installationsCD :n i CD-ROM enheten och markera "Borttagbar media". Klicka "Nästa>" för att fortsätta. 3. Följ installationsguiden och klicka på knappen "Nästa >". 4. Fortsätt följa installationsguiden. Windows kommer att börja kopiera filer till ditt system. Klicka sedan på "Avsluta".
Xpl871.book Page 14 Friday, November 15, 2002 12:08 PM XPLORER 871 3.1.4 För Windows 98 1. När Windows meddelar att ny maskinvara påträffats, klicka på "Nästa >". 2. Välj, i nästa fönster, "Sök efter bästa drivrutin för din apparat" och klicka på "Nästa >".
Xpl871.book Page 15 Friday, November 15, 2002 12:08 PM XPLORER 871 15 3. Sätt i installationsCD :n i CD-ROM enheten och markera "Ange sökväg". Klicka på "Bläddra..." för att ange sökväg, t ex F:\Drivrutin\. Klicka på "OK" och sedan på "Nästa>" för att fortsätta. 4. Fortsätt igenom installationsguiden och klicka på knappen "Nästa >".
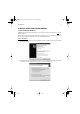
Xpl871.book Page 16 Friday, November 15, 2002 12:08 PM XPLORER 871 16 5. Windows kommer att börja kopiera filer till ditt system. Klicka därefter på "Avsluta". 6. Ett nytt fönster dyker upp, där du ska ange sökvägen till Windows källfiler.. Ange sökväg. Klicka på "OK". 3.2 KONFIGURERA NÄTVERKSINSTÄLLNINGAR I detta avsnitt beskrivs vilken konfigurering som krävs för LAN-anslutna PC som kommunicerar med ADSLmodem. Antingen för att konfigurera apparaten eller för tillgång till nätverket. 3.2.
Xpl871.book Page 17 Friday, November 15, 2002 12:08 PM XPLORER 871 3. Klicka på Egenskaper i fönstret LAN nätverksanslutning. 4. Välj Internetprotokoll (TCP/IP) och klicka på Egenskaper.
Xpl871.book Page 18 Friday, November 15, 2002 12:08 PM XPLORER 871 5. Välj Automatisk IP-adress och Automatisk DNS-serveradress radioknappar. 6. Klicka på OK för att avsluta konfigurationen. 3.2.2 För Windows 2000 1. Gå till Start / Inställningar / Kontrollpanelen. Klicka på Nätverk och Uppringningsegenskaper. 2. Dubbelklicka på LAN nätverksanslutning.
Xpl871.book Page 19 Friday, November 15, 2002 12:08 PM XPLORER 871 3. I fönstret LAN nätverksanslutning, klicka på Egenskaper. 4. Välj Internetprotokoll (TCP/IP) och klicka på Egenskaper.
Xpl871.book Page 20 Friday, November 15, 2002 12:08 PM XPLORER 871 5. Välj Automatisk IP-adress och Automatisk DNS-serveradress radioknappar.. 6. Klicka på OK för att avsluta konfigurationen. 20 3.2.3 För Windows 95/98/Me 1. Gå till Start / Inställningar / Kontrollpanelen. Dubbelklicka på Nätverk i Kontrollpanelen och välj fliken Konfiguration. 2. Välj TCP / IP -> NE2000 Kompatibel, eller namnet på vilket Nätverkskort (NIC) som helst i din PC. 3. Klicka på Egenskaper.
Xpl871.book Page 21 Friday, November 15, 2002 12:08 PM XPLORER 871 21 4. Välj fliken IP-adress. Välj, på denna sida, Automatisk IP-adress och Automatisk DNS-serveradress radioknappar. 5. 6. Välj sedan fliken DNS-konfiguration. Välj Avaktivera DNS radioknapp och klicka på "OK" för att avsluta konfigurationen. 3.2.4 För Windows NT4.0 1. Gå till Start / Inställningar / Kontrollpanelen. I Kontrollpanelen dubbelklickar man på Nätverk och välj fliken Protokoll.
Xpl871.book Page 22 Friday, November 15, 2002 12:08 PM XPLORER 871 2. Välj TCP/IP-protokoll och klicka på Egenskaper. 3. Välj Automatisk IP-adress från en DHCP-server radioknapp och klicka på OK.
Xpl871.book Page 23 Friday, November 15, 2002 12:08 PM XPLORER 871 23 • • • • • This equipment comes with a 24-month warranty. The warranty will be honoured on presentation of the original bill or receipt, provided the date of purchase and the unit type are indicated. During the time of the warranty Topcom will repair free of charge any defects caused by material or manufacturing faults.
Xpl871.book Page 24 Friday, November 15, 2002 12:08 PM XPLORER 871 24 2. USING THE ADSL MODEM 2.1 THE TOP LEDS 1 2 3 4 5 6 7 LED Meaning 1 SYS Flashes when the router is working properly. 2 ADSL RXD Flashes when receiving data. 3 ADSL TXD Flashes when transmitting data. 4 ADSL SYN Lit green when ADSL physical layer is connected. 5 LAN LNK Lit green when the LAN link is up. 6 LAN ACT Flashes when there is activity on the LAN port. 7 PWR Lit green when power adapter is connected. 2.
Xpl871.book Page 25 Friday, November 15, 2002 12:08 PM XPLORER 871 25 2.3 CABLING Through Ethernet Port The product’s LAN port is wired just like a Network Adapter’s port. From the product directly to a PC, the cable should be an Ethernet crossover cable. Through USB Port The product can be used as a Network Adapter on your PC. That means you do not have to install a network adapter first on your PC before connecting the ADSL Modem.
Xpl871.book Page 26 Friday, November 15, 2002 12:08 PM XPLORER 871 26 2.
Xpl871.book Page 27 Friday, November 15, 2002 12:08 PM XPLORER 871 27 3. INSTALLATION AND CONFIGURATION 3.1 INSTALLING THE USB DRIVER !!! NOTE !!! You only need to install the USB-drivers if you want to use the modem through your USB port and not through your Ethernet connection . If you connect the ADSL Modem through the USB port for the first time to the PC, Windows will automatically detect the device. Follow the steps to install the USB driver. 3.1.1 For Windows XP 1.
Xpl871.book Page 28 Friday, November 15, 2002 12:08 PM XPLORER 871 3. When windows titled “Hardware Installation” or “Software Installation” appear, press “Continue Anyway” to go on. 4. Then, click “Finish”.
Xpl871.book Page 29 Friday, November 15, 2002 12:08 PM XPLORER 871 29 5. After a few moments, Windows will show the new device, USB ADSL Adapter, has been detected. Select “Install from a list or specific location”. Click “Next >”. 6. Click “Next >” when the following figure appears. 7. When windows titled “Hardware Installation” appears, press “Continue Anyway”.
Xpl871.book Page 30 Friday, November 15, 2002 12:08 PM XPLORER 871 30 8. Then, click “Finish” to end installation. 9. After installing the driver, follow the section “3.2 Configuring the Network Properties” below to modify the network settings on your PC. 3.1.2 For Windows 2000 1. When Windows tells you that the new device has been detected, click “Next >” to continue. 2. Select “Search for a suitable driver for my device”. Click “Next>”. Then, insert the installation CD into the CD-ROM drive.
Xpl871.book Page 31 Friday, November 15, 2002 12:08 PM XPLORER 871 31 3. In next window, check “CD-ROM drives” and click “Next>”. 4. Continuing through the Wizard, click the “Next >” button. 5. When window titled “Digital Signature Not Found” appears, press “Yes” to continue the installation.
Xpl871.book Page 32 Friday, November 15, 2002 12:08 PM XPLORER 871 6. Press “Finish”. 7. If the following window “Digital Signature Not Found” appears, press “Yes” to end the installation. 32 3.1.3 For Windows Me 1. When Windows tells you that the new device has been detected. Select “Specify the location of the driver” and click “Next >”.
Xpl871.book Page 33 Friday, November 15, 2002 12:08 PM XPLORER 871 33 2. Insert the installation CD into the CD-ROM drive and check “Removable Media”. Click “Next>” to continue. 3. Continuing through the Wizard, click the “Next >” button. 4. Continuing through the Wizard, Windows will start copying files to your system. Then, click “Finish”.
Xpl871.book Page 34 Friday, November 15, 2002 12:08 PM XPLORER 871 3.1.4 For Windows 98 1. When Windows tells you that the new device has been detected, click “Next >”. 2. In the next window, select “Search for the best driver for your device” and click “Next >”.
Xpl871.book Page 35 Friday, November 15, 2002 12:08 PM XPLORER 871 35 3. Insert the installation CD into the CD-ROM drive and check “Specify a location”. Click “Browse…” to specify the driver directory such as F:\Driver\. Click “OK” and then “Next>” to continue. 4. Continuing through the Wizard, click the “Next >” button.
Xpl871.book Page 36 Friday, November 15, 2002 12:08 PM XPLORER 871 36 5. Windows will start copying files to your system. Then, click “Finish”. 6. You will see the following screen prompting for the path of the Windows source files. Please specify a location. Click “OK”. 3.2 CONFIGURING THE NETWORK PROPERTIES This section describes the configuration required by LAN-attached PCs that communicate with the ADSL Modem, either to configure the device, or for network access. 3.2.1 For Windows XP 1.
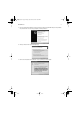
Xpl871.book Page 37 Friday, November 15, 2002 12:08 PM XPLORER 871 3. In the LAN Area Connection Status window, click Properties. 4. Select Internet Protocol (TCP/IP) and click Properties.
Xpl871.book Page 38 Friday, November 15, 2002 12:08 PM XPLORER 871 38 5. Select the Obtain an IP address automatically and the Obtain DNS server address automatically radio buttons. 6. Click OK to finish the configuration. 3.2.2 For Windows 2000 1. Go to Start / Settings / Control Panel. In the Control Panel, double-click on Network and Dial-up Connections. 2. Double-click LAN Area Connection.
Xpl871.book Page 39 Friday, November 15, 2002 12:08 PM XPLORER 871 3. In the LAN Area Connection Status window, click Properties. 4. Select Internet Protocol (TCP/IP) and click Properties.
Xpl871.book Page 40 Friday, November 15, 2002 12:08 PM XPLORER 871 40 5. Select the Obtain an IP address automatically and the Obtain DNS server address automatically radio buttons. 6. Click OK to finish the configuration. 3.2.3 For Windows 95/98/Me 1. Go to Start / Settings / Control Panel. In the Control Panel, double-click on Network and choose the Configuration tab. 2. Select TCP / IP -> NE2000 Compatible, or the name of any Network Interface Card (NIC) in your PC. 3. Click Properties.
Xpl871.book Page 41 Friday, November 15, 2002 12:08 PM XPLORER 871 4. Select the IP Address tab. In this page, click the Obtain an IP address automatically radio button. 5. 6. Then select the DNS Configuration tab. Select the Disable DNS radio button and click “OK” to finish the configuration. 41 3.2.4 For Windows NT4.0 1. Go to Start / Settings / Control Panel. In the Control Panel, double-click on Network and choose the Protocols tab.
Xpl871.book Page 42 Friday, November 15, 2002 12:08 PM XPLORER 871 2. Select TCP/IP Protocol and click Properties. 3. Select the Obtain an IP address from a DHCP server radio button and click OK.
Xpl871.