
Installation Manual


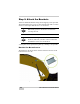
Table Of Contents
- X-22 Excavator Indicate System Installation and Calibration Manual
- Table of Contents
- Introduction
- Installation and Calibration
- Getting Started
- Step 1: Charge the Sensors
- Step 2: Attach the Brackets
- Step 3: Attach the Mast for the PitchRollCompass
- Step 4: Attach the X-22 Display
- Step 5: Measure the Excavator
- Step 6: Entering the Sensors on the X-22 Display
- Step 7: Attach the Sensors to the Excavator
- Step 8: Calibrate the Sensors
- Step 9: Measure and Calibrate the Buckets
- Finding Your Way Around the Software
- Before You Start to Dig
- Important Information On Use
- Machine and Bucket Measurements
- Getting Started
- Troubleshooting
- The X-22 Display is not responding, what should I do?
- The sensors are not responding, what should I do?
- A sensor is damaged, what should I do?
- How do I recalibrate a sensor?
- The system is not measuring accurately, what should I do?
- The compass is measuring incorrectly, what should I do?
- The laser sensor is not working, what should I do?
- Specifications
- Safety Warnings
- Regulatory Information
- Warranty Terms
- Back Cover

X-22 Installation and Calibration Manual
2-2
Step 2: Attach the Brackets
Attach the aluminum brackets using the self-tapping screws provided.
The drill and bit for the screws are also included. The drill is 4.6 mm
and the screws Taptite M5x10 have a recessed head.
A weld plates can be purchased separately, if drilling is not possible.
Bracket for Boom Sensor
The bracket for the boom sensor must be attached to the side of the
boom that faces the cab.
Figure 2-2. Boom Sensor Bracket Location
NOTICE
Rub a little grease or oil onto the screws before
screwing them in.
NOTICE
When determining the location of the sensor
brackets, make sure you allow room to install and
uninstall the sensors onto the brackets.