Instruction Manual - TORBAL AD Series Precision Scales TABLE OF CONTENTS Cautionary Notes and precautions ........................................................................................................ 3 1. Specification ......................................................................................................................................... 4 2. Keys and Display Indicators .............................................................................................................
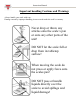
Instruction Manual a Important handling Cautions and Warnings Always handle your scale with care. Damage caused by improper handling is not covered under the scale’s warranty.
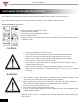
Instruction Manual C CAUTIONARY NOTES AND PRECAUTIONS The TORBAL Precision scale is a sensitive and a delicate instrument. Always handle your scale with care. The correct location and proper environment affect the accuracy of your TORBAL Precision Scale. The best location for your scale: 1.Stable, horizontal, vibration-free surface 2.Away from direct sunlight 3.Not exposed to high temperature variations 4.Away from direct drafts 5.
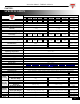
Instruction Manual - TORBAL AD Series CHAPTER 1. SPECIFICATION Model Capacity AD 50 AD100 AD200 AD300 AD500 AD1000 AD2000 AD3000 AD6 50g 100g 200g 300g 500g 1000g 2000g 3000g 6000g Readability (d) 0.001 0.01 0.1 Repeatability (Standard Divination) 0.001g 0.01g 0.1g Linearity +/- 0.002g +/- 0.02g +/- 0.2g Stabilization time (typical) Approx. 3 sec Approx. 3 sec Approx.
Instruction Manual - TORBAL AD Series CHAPTER 2.
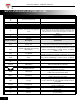
Instruction Manual - TORBAL AD Series CHAPTER 3. COMMANDS AND ABBREVIATIONS Command or Abbreviation Description -----CAL TARING LOAD XXX g C CAL FIN AW – X CONT SAPL ON SPL – XX FILL UNDER OVER ACCEPT TARE SAMPLE Taring or re-zeroing in progress READY YES-NO PRINT COUNT FINISH TO START COUNT PRESS C The scale is in the calibration mode. The scale is taring before the calibration process. Place a calibration weight on the pan to begin calibration.
Instruction Manual - TORBAL AD Series CHAPTER 4.
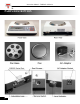
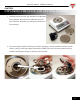
Instruction Manual - TORBAL AD Series CHAPTER 5. UNPACKING THE SCALE AND GETTING STARTED 1. Carefully remove the scale, pan, and all of its components from packaging. Place them on a stable base where the scale will not be affected by any mechanical vibrations or air movements. 2. After removing the pan base and the pan from their packaging, carefully install the pan base onto the scale by seating it on the pan support located in the middle of the scale.
Instruction Manual - TORBAL AD Series 3. Once the pan has been installed, level the scale by adjusting the rear feet until the level indicator shows the “air bubble” is in the center position of the sight glass. The level indicator is located on the rear left side of the scale. 4. After leveling the scale, plug the AC adapter into the AC adapter socket on the rear of the scale. 5.
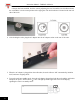
Instruction Manual - TORBAL AD Series CHAPTER 6. WEIGHING 1. To begin weighing, press the power button ( ) to turn the scale on. The scale will initialize and automatically enter weighing mode. The scale is ready to begin weighing as soon as the stabilization ( ) and center of zero ( ) indicators appear on the display. 2. When weighing, always place the mass in the middle of the pan. The weighed result may be taken when the stabilization indicator appears on the display. 6.1.1.Zeroing the scale 1.
Instruction Manual - TORBAL AD Series 6.1.2.Taring 1. If a container is used for weighing, it may be tared. Taring subtracts the weight of the container from the gross weight to obtain the net weight. 2. To tare the weighing container, place it in the middle of the pan. The container’s weight will be shown on the display. 3. Once the stabilization indicator appears on the display, the container is ready to be tared. To tare the container, press the “T” button.
Instruction Manual - TORBAL AD Series 6.1.3.Clearing a Tare 1. To clear the tare, remove the tared object along with the net weight from the pan. The scale will then display a negative net tare result. 2. To clear the tare, press the “T” button. 3. The display will show dashed lines indicating the tare is clearing. 4. When it has finished clearing the tare, the scale will return to weighing mode.
Instruction Manual - TORBAL AD Series CHAPTER 7. MAIN MENU Main Menu is used to configure the scale and its weighing modes. Before entering the menu, complete and clear any active function by pressing the “C” key. To enter the Main Menu press the “M” key. Once the “M” key is pressed the scale will display available Menu options. Commands: CALIB, UNIT, MODE, AUTO, GLP,PRINT, SET TD and RESET will flash sequentially.
Instruction Manual - TORBAL AD Series 7.1.1.1. Setup To change the calibration mass setting, follow the steps below; 1. Press the “M” key to enter the Main Menu 2. When command CALIB is displayed press the “T” (YES) key, 3. The scale will display commands Start and Setup sequentially. Press the “T” key when Setup is displayed. 4. The current calibration mass setting will be displayed. To change the calibration mass, press the 0 (NO) key.
Instruction Manual - TORBAL AD Series 7.1.1.2. Start To calibrate the scale, follow the steps below: 1. Press “M” to enter the Main Menu 2. When CALIB is displayed, press “T” (YES). 3. The scale will display commands Start and Setup sequentially. Press , “T” , when Start is displayed . 4. The scale will display CAL, indicating that the calibration mode has been entered. 5. Before calibration begins, the scale will perform automatic tare. Taring will be displayed during auto tare.
Instruction Manual - TORBAL AD Series 6. Once the scale tares, LOAD will be displayed. At any time during the LOAD command, place a single calibration weight in the middle of the pan. 7. When the calibration weight is placed on the pan, the scale will automatically calibrate. The display will read “C” while calibrating. Because calibration is a very sensitive process, make sure the scale is not exposed to any air movements or vibrations while it is calibrating. 8.
Instruction Manual - TORBAL AD Series 7.1.2. Units of Measure Selection TORBAL AD series scales can operate in nine different units of measure: grams (g), kilograms (kg), carats (ct), pounds (lb), Newton (n), grains (gn), ounces (oz), ounces troy (oz-t), and pennyweights (dwt). By factory default the scale is set to weigh in grams (g). To select a different unit, follow the steps below. 1. Enter the Main Menu by pressing the “M” key. 2. When command UNIT is displayed press the “T” (Yes) key.
Instruction Manual - TORBAL AD Series 3. The scale will display available units of measure sequentially. When the desired unit is displayed, press the “T” (Yes) key to make the selection. Example (Selecting Ounces) 4. To exit the Main Menu, use the “C” key. Important: - The symbols for grams (g), kilograms (kg), carats (ct), pounds (lb), and Newton (n) will appear to the right of the measurement on the LCD display.
Instruction Manual - TORBAL AD Series 7.1.3.Mode configuration TORBAL AD series scales can operate in seven application modes. A- Animal Weighing, B – Parts Counting, C - Check Weighing, D – Display Hold, E-Percent Weighing, and F-Totalizing. Before an application mode can be used, it must be enabled and configured. Once the application mode is enabled it will be available for selection from the Function Menu. By factory default the scale is in the weighing mode (WEIGH).
Instruction Manual - TORBAL AD Series (A) Animal Weighing 1. To enable animal weighing, press the “T” (YES) key when ANIMAL is displayed. 2. Commands An On and An OFF will be displayed sequentially. To enable animal weighing and proceed with configuration press the “T” (YES) key when An On is displayed. If the function is already enabled and you wish to disable it, press the “T” (Yes) key when An OFF is displayed. 3.
Instruction Manual - TORBAL AD Series 4. Once the desired operating mode for animal weighing has been selected, the scale will display time intervals for the animal weighing process. The intervals t-3 (3 seconds), t-5 (5 seconds), t-10 (10 seconds), and t-15 (15 seconds) will display sequentially. To select a time interval, press the “T’ (YES) key when the desired time interval is displayed. Note: Select longer time intervals when weighing very active animals.
Instruction Manual - TORBAL AD Series Table 7.1.3.A: Animal Weighing Operating Modes Automatic Weighing Initialization: Automatic When set to Automatic, the scale will automatically Result Clearing: Automatic begin the animal weighing process. Once the animal Tare: Automatic is removed from the weighing pan, the scale will automatically tare and prepare for the next weighing.
Instruction Manual - TORBAL AD Series 3. After enabling parts counting, select the sample size you want to be used for establishing the average piece weight (APW). SPL – 10 will be displayed indicating that the default sample size setting is 10 pieces. To accept the sample size press the “T” (YES) key. To change the sample size press the 0 (NO) key. To Accept To Change The sample size selection can range from 1 to 100 pieces.
Instruction Manual - TORBAL AD Series (C) Check Weighing 1. To enable check weighing press the “T” (YES) key when Check is displayed. 2. Commands CHK On and CHK OFF will be displayed sequentially. To enable check weighing press the “T” (YES) key when CHK On is displayed. If the function is already enabled and you wish to disable it, press the “T” (Yes) key when CHK OFF is displayed. 3.
Instruction Manual - TORBAL AD Series (D) Display Hold 1. To enable display hold press the “T” (YES) key when Display is displayed. 2. Commands Di On and Di OFF will be displayed sequentially. To enable display hold and proceed with configuration press the “T” (YES) key when Di On is displayed. If the function is already enabled and you wish to disable it, press the “T” (Yes) key when Di OFF is displayed. 3.
Instruction Manual - TORBAL AD Series 4. After enabling the display hold function, DONE will be displayed, indicating that the function has been configured and it is ready to use. To use the function follow the directions in Chapter 8. To exit the mode menu,, use the “C” key Table 7.1.3.
Instruction Manual - TORBAL AD Series (E) Percent Weighing 1. To enable percent weighing, press the “T” (YES) key when Percent is displayed 2. Commands Pe On and Pe OFF will be displayed sequentially. To enable percent weighing press the “T” (YES) key when Pe On is displayed. If the function is already enabled and you wish to disable it, press the “T” (Yes) key when Pe OFF is displayed. 3.
Instruction Manual - TORBAL AD Series (F) Totalizing 1. To enable totalizing press the “T” (YES) key when Total is displayed. 2. Commands tot On and tot OFF will be displayed sequentially. To enable totalizing and proceed with configuration press the “T” (YES) key when tot On is displayed. If the function is already enabled and you wish to disable it, press the “T” (Yes) key when tot OFF is displayed. 3.
Instruction Manual - TORBAL AD Series 4. After enabling the totalizing function, DONE will be displayed, indicating that the function has been configured and it is ready to use. To use the function follow the directions in Chapter 8. To exit the mode menu, use the “C” key. Table 7.1.3.F: Totalizing Operating Modes Automatic Totalizing and Adding: Automatic Manual Totalizing and Adding: Manual When set to Automatic, the scale will automatically add the first stable weight reading to the total.
Instruction Manual - TORBAL AD Series 2. When command AUTO is displayed press the “T” (YES) key. 3. Command AUT On and AUT OFF will flash. 4. To enable AZSM press the “T” (YES) key when AUT On is displayed. To disable AZSM press the “T” (YES) key when AUT OFF is displayed. 5. Once enabled, the AUT indicator will be displayed.
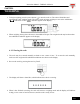
Instruction Manual - TORBAL AD Series 7.1.5.GLP Print and Data Configuration When enabled, GLP data will appear on every printed transaction receipt. The GLP printout includes Model No., Unit ID, User ID, Project No., Notes / Remarks field, and a Signature field. TORBAL Model: AD100 Unit ID: 1234567 User ID: 7654321 Project No.1234657 11/22/2006 10:49pm 100.
Instruction Manual - TORBAL AD Series 2. When command GLP is displayed press the “T” (YES) key. 3. Commands Set, Model, Unit ID, User ID, and Project ID will begin to scroll. 4. To enable or disable GLP press the “T” (YES) key when command SET is displayed. 5. Commands ON and OFF will be displayed. To enable GLP press “T” (YES) when ON is displayed, to disable GLP press “T”(YES) when OFF is displayed.
Instruction Manual - TORBAL AD Series 6. Once enabled, GLP options will begin to scroll on the display: Model No., Unit ID, User ID, and Project No. 7. Press “T” (YES) when the desired option is displayed. 8. A minus sign will be displayed, indicating you may assign a new ID or project number. Note: ID numbers can consist of up to six digits long. 9.
Instruction Manual - TORBAL AD Series Table 7.1.5.
Instruction Manual - TORBAL AD Series 2. When Print is displayed press the “T” (YES) key. 3. Baud and Parity will display. 4. To configure the Baud rate settings press the “T” key when Baud is displayed. To configure the Parity setting press “T” key when Parity is displayed.
Instruction Manual - TORBAL AD Series 5. After pressing “T” when Baud is displayed, the scale will display available baud rates: 1200, 2400, 4800, and 9600. To make a selection press “T” (Yes) when the desired setting is displayed. 6. After pressing “T” when Parity is displayed, the scale will display available parity settings: none, even, odd.
Instruction Manual - TORBAL AD Series 7. To make a selection, press “T” (Yes) when the desired setting is displayed. Note: When connecting the scale to a third-party software or third party printer, make sure that both the host (scale) and the slave are configured with the same Baud and Parity settings. 7.1.6.2. Torbal Printer Configuration (RXP-4)) To connect the AD scale to a TORBAL (RXP-4) printer, use the following settings: Scale settings (follow steps detailed in Section 9.1.
Instruction Manual - TORBAL AD Series Baud Rate: 9600 Data: 8 bits Parity: None / Ignore Column Printing: 40 SW-1 OFF SW-2 OFF SW-3 ON SW-4 ON SW-5 ON SW-6 OFF SW-7 OFF SW-8 OFF 7.1.6.3. Printout Receipts After completing a weighing transaction, result data receipt may be printed. To initiate printing, wait for the weighing result to stabilize and press the “P” key. Note: Examples below include GLP data. For more on GLP printing, turn to Section 7.1.
Instruction Manual - TORBAL AD Series 39
Instruction Manual - TORBAL AD Series 7.1.7.Time and Date To set the current time and date, follow the steps below: 1. Enter the Main Menu by pressing the “M” key. 2. When SET td is displayed press the “T” (YES) key. 3. Commands Time and Date will flash. Time: 1. To set the time press the “T” (YES) key when Time is displayed.
Instruction Manual - TORBAL AD Series 2. The current time setting will be displayed. To adjust the time press the 0 (NO) key. 3. A and P will flash. To set AM press the “T” (YES) key when A is displayed, to set PM press the “T” (YES) key when P is displayed. 4. After making the selection, minutes will scroll. When the desired number is displayed, press the “T” (YES) key to accept and move to the next digit. Follow this sequence until the desired time is set.
Instruction Manual - TORBAL AD Series 7.1.8.Reset (restoring default factory settings) The Reset function allows resetting all modes and applications as well as restoring default factory settings (see Table 7.1.5). To restore default factory settings follow the steps below. 1. Enter the Main Menu by pressing the “M” key. 2. When RESET is displayed press the “T” (YES) key. 3. The scale will display YES – NO in order to confirm reset initialization. 4.
Instruction Manual - TORBAL AD Series Warning: Resetting the scale will restore the default factory setting. Stored values will be lost and all functions will be disabled. Table 7.1.5 Factory Default Settings Weighing Function: Always enabled Animal Weighing Function: Disabled Parts Counting Check Weighing Filtering time: t-3 (3 seconds) Function: Disabled Sample Size: 10 pieces Function: Disabled Under Value: 0.000g Over Value: 0.
Instruction Manual - TORBAL AD Series CHAPTER 8. FUNCTION MENU: USING THE MODES AND FUNCTIONS All enabled and configured modes as well as applications are ready to use from the Function Menu. To select a function that was enabled and configured follow the steps below: 1. Press the “F” (Function) key. 2. The enabled functions will scroll. Note: Scrolling through the options may be accelerated by manually pressing the 0 (NO) key. 3. When the desired function is displayed, press the “T” (YES) key.
Instruction Manual - TORBAL AD Series (A) Animal Weighing 1. Before weighing the animal, place an animal weighing container on the scale’s pan and press “T” to tare the scale. 2. Once the scale has been tared, carefully place the animal in the container. Automatic and Semi-Automatic: When set to Automatic or Semi-Automatic, the scale will automatically begin the animal weighing process. Animal weighing will begin with the first weight reading.
Instruction Manual - TORBAL AD Series Manual: When set to manual, animal weighing must be initialized manually by pressing the “F” key. 3. Once the animal weighing process is initialized, the scale will count down the time interval that was selected in the configuration mode. The countdown will display. During the time interval the scale will record weight readings of the animal and calculate its average weight. 4. After the time interval has elapsed the result will be displayed.
Instruction Manual - TORBAL AD Series Automatic: When set to Automatic, the result will be automatically cleared after the animal is removed. The scale will perform an automatic tare and prepare for the next weighing. If the weighing container is changed the scale must be tared manually by pressing the “T” key. Semi-Automatic and Manual: When set to Semi-Automatic or Manual, the weighing result will remain displayed and it must be manually cleared after the animal has been removed,.
Instruction Manual - TORBAL AD Series (B) Parts Counting 1. Place an empty container on the pan and press the “T” key to tare. 2. After taring the container, the scale will display the sample size setting which was configured in the Mode Menu. For example SPL-10 will be displayed, indicating that the current sample size setting is 10 pieces. To accept the sample size press the “T” (YES) key. To change the sample size use the 0 (NO) key.
Instruction Manual - TORBAL AD Series The sample size selection can range from 1 to 100 pieces. By applying short single presses to the 0 (NO) key the sample size will change in increments of one. By holding the 0 (NO) key pressed, the sample size will change in increments of 5. To select a sample size of 99, press and hold the 0 key until the display reads 95, and apply four single presses until the sample size reads 99.
Instruction Manual - TORBAL AD Series 5. The weight of the sample will be displayed as it is placed on the pan. Note: Minimum individual piece weight must be equal to or greater than 3e. Attempting to set an average individual piece weight which is lower than 3e will result in s Sample Low Error (SAPL LO). To see this limit expressed in grams turn to detailed specifications on page 4. 6.
Instruction Manual - TORBAL AD Series Note: If filling does not begin while the command FILL is displayed, after approximately 5 seconds the scale will display 10pcs and will wait for the count to begin. 8. The display will now indicate the number of pieces placed in the container. Stop filling when the desired count has been reached. 9. Once an accurate piece count has been taken, the container and its contents may be removed from the scale.
Instruction Manual - TORBAL AD Series while command “ ---, COUNT FINISH, TO START COUNT PRESS C” is displayed, but before pressing the “C” key. Once the “C” key is pressed the counting operation will reset. To exit parts counting and switch to a different function, press “C” to clear the current function and then press “F” to select a different function (follow Steps 1 through 3 from Chapter 8 on page 44).
Instruction Manual - TORBAL AD Series 4. To enter a weight, use the following keys: the 0(NO) key to increment a digit; “T” (YES) to accept and go to the next digit; “P” to insert a decimal; “F” to accept the entire setting; and “C” to clear and start over . To become familiar with setting the weigh limits, see Table 8.C.4. Table 8.C.4, Example: Setting a weight limit of 20.123g Current Display Action to take Key to use Number of depressions Display becomes 2 20 20.0 20.1 20.10 20.12 20.120 20.
Instruction Manual - TORBAL AD Series To accept To change 7. To change the OVER limit follow the directions in Step 4 of this section and Table 8.C.4. 8. Once both limits have been set the scale will display a TARE command, indicating that the scale must be tared. Before using the function place a container on the pan and press “T” to tare. 9. The scale is now ready to use. To perform check weighing place your object on the pan to check whether the weight of the object falls within the designated range.
Instruction Manual - TORBAL AD Series Note: To change the limit setting press “C” and repeat Steps 1 to 7. If the same limits are used, the scale can be tared without clearing the function and the new object can be weight-checked. To exit check weighing and switch to a different function, press “C” to clear the current function and then press “F” to select a different function (follow Steps 1 through 3 from Chapter 8 on page 44).
Instruction Manual - TORBAL AD Series 3. Weighing Automatic and Semi-Automatic: When set to Auto and Semi-Auto after weight has been added to the pan, the scale will automatically lock the weighing result on the display as soon as it stabilizes. Note: In Automatic and Semi-Automatic modes the minimum weighing mass must be equal to or greater than 10d. To see this limit expressed in grams turn to detailed specifications on page 4.
Instruction Manual - TORBAL AD Series Semi-Automatic and Manual: When set to Semi-Automatic or Manual, the weighing result will remain displayed and it must be manually cleared after the weight is removed from the pan. To clear the weighing result press the “C” key. After the result has been cleared the scale must be tared. To tare the scale press the “T” key.
Instruction Manual - TORBAL AD Series 2. Press “T” to tare the scale. 3. Once the scale has been tared, the scale will display the weight of a previously stored sample. If this is the first time the function is used, the sample weight will be 0.000g. To accept the current sample setting, press the “T” (YES) key. To assign a new sample, press the 0(NO) key. To accept To change 4. After pressing the 0 (NO) key command SAPL ON will be displayed.
Instruction Manual - TORBAL AD Series 5. Place the sample on the pan. The weight of the sample will be displayed. Note: The reference sample must be equal to or greater than 100d. Attempting to set a sample lower than 100d will result in a SAPL LO error. 6. Once the weight of the sample has stabilized and the stability indicator has been displayed, press “T” to accept the sample. Once a new sample weight is set it will be saved until changed or cleared through the master RESET. 7.
Instruction Manual - TORBAL AD Series Note: To change the percent sample press “C” and repeat Steps 1 to 5. If the same sample weight is used, the scale can be tared without clearing the function and new objects can be weighed. To exit percent weighing and switch to a different function, press “C” to clear the current function and then press “F” to select a different function (follow Steps 1 through 3 from Chapter 8 on page 44). (F) Totalizing Totalizing is used to add and total weighing results.
Instruction Manual - TORBAL AD Series 2. After taking a tare, place the first object on the pan. Automatic When set to Automatic, the weight of the object will be added automatically. Once the weight stabilizes, the TOTAL indicator will appear on the display, signaling that the weight has been added to the grand total. Note: In Automatic and Semi-Automatic modes the minimum weighing mass must be equal to or greater than 10d. To see this limit expressed in grams turn to detailed specifications on page 4.
Instruction Manual - TORBAL AD Series 3. Once a weight of an object has been added to the total, remove the object from the pan or press “T” to tare the scale. 4. After the scale has been tared, Steps 1 through 3 can be repeated to add more weighing results to the grand total. 5. To clear the grand total and reset the function press the “C” key.
Instruction Manual - TORBAL AD Series 6. Once “C” has been pressed, the command YES-NO will be displayed, asking to confirm clearing of the function. To abort the clearing the function press the 0 (NO) key. To clear the function press the “T” (YES) key (all data will be lost). To clear To continue To exit totalizing and switch to a different function, press “C” to clear the current function and then press the “F” key to select a different function (follow Steps 1 through 3 from Chapter 8 on page 44).
Instruction Manual - TORBAL AD Series CHAPTER 9.
Instruction Manual - TORBAL AD Series CHAPTER 10. COMMON ERRORS AND TROUBLESHOOTING Error or Indicator ---- Cause Below zero -- Taring is not allowed - 65 - Re-zeroing is not allowed L Pan error .
Instruction Manual - TORBAL AD Series CHAPTER 11. MAINTENANCE Cleaning and maintaining your AD Precision Scale: Before cleaning the scale always unplug the A/C adapter from the electrical outlet. Use a soft, slightly damp cloth to clean the exterior housing of your scale,. Wipe the scale gently. Do not allow any liquid to enter into the scale. Do not apply extensive pressure to the LCD display. Do not use chemicals or benzene when cleaning the surface.
Instruction Manual - TORBAL AD Series CHAPTER 13. REPLACEMENT PARTS Description A/C Adapter Pan Assembly RS232 Printer Cable Part No. AD9150 AD9160 AD9170 CHAPTER 14. LIMITED WARRANTY PURCHASER’S 36-MONTH WARRANTY Warranty is valid only if the attached warranty registration card is completed and returned within 30 days. This product is a precision device made to exacting standards of scientific accuracy.