
Operator's Manual
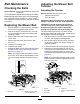


5.EngagethePTOandcheckthebelttension.
6.Ifthereisnoadjustmentleftintheturnbuckle
andthebeltisstillloose,positiontherearidler
pulleyinthemiddleorfronthole(Figure9).Use
theholethatgivesthecorrectadjustment.
7.Whentheidlerpulleyismoved,thebeltguide
mustbemoved.Movethebeltguidetothefront
position(Figure9).
g001848
Figure9
1.Rearidlerpulley4.Beltguideinbackposition
2.Middlehole
5.Frontidlerpulley(122
cm(48inch)mowerdeck
only)
3.Fronthole
8.Checkthebeltguideundertheengineframefor
properadjustment(Figure10).
Note:Whenthemowerbeltisengaged,ensure
thatthedistancebetweenthebeltguideand
themowerbeltis19mm(3/4inch)(Figure10).
Adjustthemowerbeltguideasnecessary.The
disengagedbeltshouldnotdragorfalloffthe
pulleywhentheguidesareproperlyadjusted.
g016078
Figure10
1.Beltguide
9.Checkthebladebrakeadjustment;referto
AdjustingtheBladeBrake(page16).
AdjustingthePTOEngagement
Linkage
ThePTOengagementlinkageadjustmentislocated
beneaththefrontlefthandcorneroftheenginedeck.
1.Parkthemachineonalevelsurface,disengage
thePTO,andengagetheparkingbrake.
2.Shutofftheengine,removethekey,andwait
forallmovingpartstostopbeforeleavingthe
operatingposition.
3.EngagethePTO.
4.Adjustthelinkagelengthtowherethelower
endofthebellcrankjustclearstheaxlesupport
gusset(Figure11).
g001847
Figure11
1.Bellcrank4.Yoke
2.Safetyswitchlocated
underenginedeck
5.Nut
3.Bellcrankjustclearsthe
gussetwiththePTO
engageded
6.Assistarmlink
5.Makesurethattheassistarmisagainsttherear
assistarmstoponthedeck(Figure12).
6.Pushthebladecontrolknob(PTO)downtothe
DISENGAGEDposition.
7.Theassistarmshouldcontactthefrontassist
armstoponthedeck.Ifitdoesnotcontact,
adjustthebellcranksoitisclosertothegusset
(Figure12).
12