
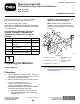
Installation Instructions


g035917
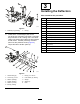
Figure2
1.Locknut(4)
4.Rightlightsupport
2.Washer(8)5.Hex-headscrew(4)
3.Leftlightsupport
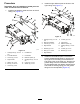
C.Drill2holes(9mm)inthetopofthefront
plateasshowninFigure3.
Note:Usethenewlightsupportsas
templates.
g234606
Figure3
1.Usethishole(rightlight
support).
3.Existinghole
2.Usethishole(leftlight
support).
4.Drillahole(9mm)here.
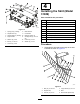
D.Securethenewlightsupportstothe
machinewithhex-headscrews(8x35mm),
washers(8mm),andlocknuts(8mm)as
showninFigure4.
g234607
Figure4
1.Washer(8mm)4.Leftlightsupport
2.Hex-headscrew(8x35
mm)
5.Locknut(8mm)
3.Rightlightsupport
E.Securetheexistingfrontlightbracket
assemblytothenewlightsupportswith
thenewlocknuts(8mm),andtheexisting
hex-headscrews(8x25mm),washers
(5/16inch),andwashers(8mm)asshown
inFigure5.
g234608
Figure5
1.Locknut(8mm),new4.Hex-headscrew(8x25
mm),existing
2.Washer(8mm),existing
5.Frontlightbracket
assembly,existing
3.Washer(5/16inch),
existing
2