
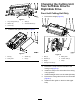
Installation Instructions

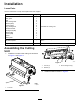
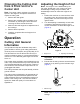
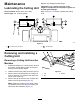
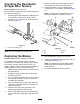

CheckingtheRear-Roller
ScraperWireTension
ServiceInterval:Every50hours
Ensurethatthescraperwiresarecorrectlytensioned
formaximumworkinglife.
1.Carefullytightenthescraperwireretainingnuts
toremoveanyslackfromthescraperwires.
2.Tightenthenuts4fullturnstocorrectlytension
thewire(Figure17).
g014440
Figure17
1.Scraperwireretainingnuts
Note:Donotovertightenthescraperwires.
ReplacingtheBlades
ServiceInterval:Yearly—Replacetheblades.
Tomaintainbalance,replacebladesonlyasan
opposedpairorawholerotoratatime.Alsoreplace
thebushing,thebolt,andthelocknutwhenyou
replaceablade.Thereare2servicekitsavailablefor
bladereplacement;refertothePartsCatalog.
1.Raisethecuttingunitsandsecurethemwiththe
transportlatches.
2.Engagetheparkingbrake,shutofftheengine,
andremovethekey.
3.Ifyouarereplacingbladesonthecentercutting
unit,removetheentirecuttingunitunlessan
overheadliftisavailable.
4.Turntherotorslowlybyhandsothateachrow
ofailsareinthedesiredpositionandyoucan
easilyaccessthem.
5.Usetherotorlockingtool(providedinthe
blade-sharpeningkit)tolocktherotor.
6.Removeanydebrisfromtheboltheadandthe
nutandcleantheprotrudingthreadswithawire
brush.
7.Markthepositionoftheboltheadsothatyou
canreplacetheboltsfromthesameside.
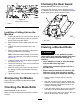
8.Holdingthebladeinaragorpaddedglove,
removethenut,bolt,bushing,andblade(Figure
18).
Note:Ifneeded,applypenetratingoiltothe
threadstomakethenuteasiertoremove.
g036878
Figure18
1.Nut3.Bushing
2.Bolt4.Blade
9.Discardtheblade,bushing,nut,andbolt.
10.Installanewbladeandbushingwithanewnut
andbladebolt(Figure18).
Note:Payattentiontothebolt-head-position
markingssothatyoureplacetheboltinthe
samedirection.
11.Torquethefastenersto45N∙m(33ft-lb).
10