
Installation Instructions
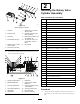


ProcedureDescription
Qty.
Use
Actuatorbracket1
Proximitysensor1
Proximity-sensorbracket1
Setscrew(6x25mm)
2
Washer(6mm)
4
Locknut(6mm)
2
Capscrew(5x20mm)
2
Washer(5mm)
4
Locknut(5mm)
2
Spacer
1
Solenoidvalve(closed)
1
Linebody1
Bondedseal(3/8inch)
2
Adapter(1/4inchfemalex3/8inch
male)
1
Bondedseal(1/4inch)
1
Hose(1/4inchx380mm),90°xstraight
1
Tee(1/4inchmalex1/4inchmalex1/4
inchfemale)
1
Adapter(1/4inchmalex1/4inchmale),
1.4mmorice
1
Cylinderrodspringpin
1
Bush1
Washer(10mm)
1
Valvecylinder1
Bondedseal(3/4inch)
1
Adapter(1/4inchmalex3/4inchmale)
1
Swiveltee(1/4inchfemale)
1
Adapter(1/4inchmalex1/4inchmale),
0.8mmorice
1
Hose(1/4inchx2.156m)
1
Adapter(1/4inchmalex3/8inchmale)
1
Splitpin
1
Cabletie
8
2
Hosetie(368x4.8mm)
1
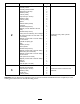
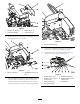
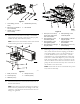
Installtherotaryvalvecylinder
assembly.
Remote-controlbox1
Remote-controlbracket2
Capscrew(8x25mm)
4
Washer(8mm)
8
Nut(8mm)
4
3
Locknut(8mm)
4
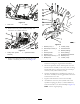
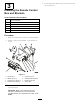
Installtheremotecontrolboxand
brackets.
Important:Donotdiscardanycomponentsthatareremoveduntiltheinstallationhasbeencompleted,assome
existingpartswillneedtobeusedforinstallingthekit.
3