
Installation Instructions

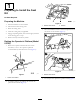

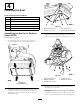


g037076
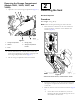
g037047
Figure9
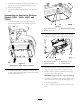
1.Tabs(seat-baseboot)2.Slots(seat-basechannel)
B.Pulleachtabalongtheslotuntilthetabisover
theholeandthenpullthetaboutandawayfrom
theseat-basechannel.
Note:Pullthebootforwardorrearward
dependingonwhichtabyouaretheremoving.
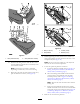
C.Whenallofthetabsareremovedfromtheirslots,
pulltherubberbootdown(AofFigure10).
g036780
Figure10
1.Bolt(8x25mm)3.Locknut(8mm)
2.Seatplatform4.Washer(8mm)
4.Whilesupportingtheseat,removethe4washers(8
mm)and4locknuts(8mm)thatsecuretheseattothe
seatplatform(BofFigure10).
Note:Donotremovethe4bolts(8x25mm)from
theholesintheseatandseatplatform.
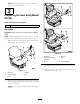
5.Lowertheoperator’splatformasfollows:
A.Lowertheplatformcarefully;refertoFigure5in
RaisingtheOperator’sPlatform(Models30651,
30654,30657,and30659)(page3).
B.Movethelocking-latchhandletowardthefront
ofthemowerastheplatformnearsthefully
loweredposition;refertoFigure5inRaising
theOperator’sPlatform(Models30651,30654,
30657,and30659)(page3).
Note:Thisensuresthatthelatchhooksclearthe
lockingbar.
C.Fullylowertheplatformandmovethelocking
handletowardtherearofthemoweruntilthelatch
hooksfullyengagethelockingbar;refertoFigure
5inRaisingtheOperator’sPlatform(Models
30651,30654,30657,and30659)(page3).
6.Removetheseatfromtheplatform.
5