
Operator's Manual


ServicingtheBedbar
RemovingtheBedbar
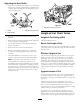
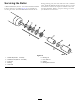
1.Turnbedbaradjusterscrews,counterclockwise,toback
bedknifeawayfromreel(Figure28).
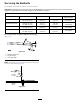
Figure28
1.Bedbaradjustingscrew3.Bedbar
2.Springtensionnut
4.Washer
2.Backoutthespringtensionnut,untilthewasherisno
longertensionedagainstthebedbar(Figure28).
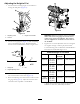
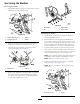
3.Oneachsideofthemachine,loosenthelocknut
securingthebedbarbolt(Figure29).
Figure29
1.Bedbarbolt2.Locknut
4.Removeeachbedbarboltallowingbedbartobepulled
downwardandremovedfrommachinebolt(Figure
29).Accountfor2nylonand1stampedsteelwashers
oneachendofbedbar(Figure30).
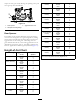
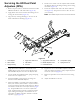
Figure30
1.Bedbarbolt
3.Steelwasher
2.Nut4.Nylonwasher
AssemblingtheBedbar
1.Installbedbar,positioningmountingearsbetween
washerandbedbaradjuster.
2.Securebedbartoeachsideplatewithbedbarbolts
(nutsonbolts)and6washers.Anylonwasheristobe
positionedoneachsideofsideplateboss.Placeasteel
washeroutsideeachofthenylonwashers(Figure30).
Torquebedbarboltsto27-36N-m(240-320inch-lb).
3.Tightenlocknutsequallyoneachsideuntiltheouter
steelwasherscannotberotatedbyhand.Thenloosen
thelocknutsuntiltheoutersteelwashersjustrotateby
hand,yetbedbarendplayisremoved(Figure30).
Note:Overtighteninglocknutscandeectsideplates
andbedbar,whichcanaffectreel/bedknifecontact.
Note:Washersoninsidemayhaveagap.
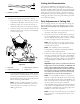
4.Tightenspringtensionnutuntilspringiscollapsed,
thenbackoff1/2turn(Figure31).
Note:Donotovertightenasdamagetothespring
mayoccur.
g016648
1
2
Figure31
1.Springtensionnut2.Spring
18