
Installation Instructions
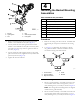
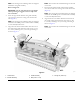
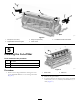
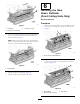
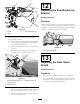
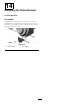
Table Of Contents
- .
- 1 Preparing the Machine
- 2 Mounting the Roller Bumper
- 3 Mounting the Hydro Guard
- 4 Installing the Basket Mounting Assemblies
- 5 Installing the Cut-off Bar
- 6 Installing the New Grass Deflector(Front Cutting Units Only)
- 7 Removing the Support Tube
- 8 Assembling the Rear Grass Basket
- 9 Mounting the Baskets to the Cutting Units
- 10 Adjusting the Front Basket Position
- 11 Adjusting the Rear Basket Position
- 12 Adjusting the Rear Basket Lip Bracket
- 13 Adjusting the Rear Grass Shield
- 14 Adjusting the Roller Bumper

Note:Thecarriageboltsandangeboltsareshipped
installedontheguideassembly.
RearCuttingUnit
Important:Usetheredcoloredrearstop-basket
whenoperatinginruggedterraintohelpretain
therearbasket.
5.Inserttherightbasketbracketwithguideassembly
ontotherightendofthecuttingunitcarrierframe
tube(Figure5).
Note:Thecarriageboltsandangeboltsareshipped
installedinthemiddlepositiononthebracketassembly
toeasenaladjustmentlater.
6.Aligntheholesinthebasketbracketwiththeholein
thecarrierframetubeandsecurewithabolt(5/16x
2-1/4inch)andangenut(5/16inch)positioningas
showninFigure5.
Note:Theboltmustbethreadedthroughthefarwall
ofthetube.
7.Inserttheleftbasketbracketwithbracketassembly
ontotheleftendofthecuttingunitcarrierframetube
(Figure5).
Note:Thecarriageboltsandangeboltsareshipped
installedinthemiddlepositiononthebracketassembly
toeasenaladjustmentlater.
8.Aligntheholesinthebasketbracketwiththeholein
thecarrierframetubeandsecurewithabolt(5/16x
2-1/4inch)andangenut(5/16inch)positioningas
showninFigure5.
Note:Theboltmustbethreadedthroughthefarwall
ofthetube.
g012216
Figure4
1.Carrierframe3.Guideassembly5.Flangenut(5/16inch)
2.Bracketassembly
4.Bolt(5/16x1inch)
4