
Installation Instructions
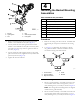
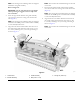
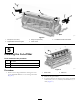
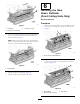
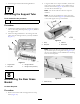
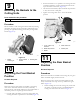
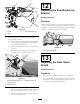
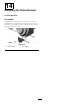
Table Of Contents
- .
- 1 Preparing the Machine
- 2 Mounting the Roller Bumper
- 3 Mounting the Hydro Guard
- 4 Installing the Basket Mounting Assemblies
- 5 Installing the Cut-off Bar
- 6 Installing the New Grass Deflector(Front Cutting Units Only)
- 7 Removing the Support Tube
- 8 Assembling the Rear Grass Basket
- 9 Mounting the Baskets to the Cutting Units
- 10 Adjusting the Front Basket Position
- 11 Adjusting the Rear Basket Position
- 12 Adjusting the Rear Basket Lip Bracket
- 13 Adjusting the Rear Grass Shield
- 14 Adjusting the Roller Bumper

9
MountingtheBasketstothe
CuttingUnits
Partsneededforthisprocedure:
3Basket
Procedure
Mountabaskettoeachcuttingunitcarrierframebyinserting
thebasketmountingpinintothebasketguidebracketand
pressingtheoppositemountingpinintothepivotingbasket
bracket(Figure14).
g012225
Figure14
1.Basket
mountingpin
2.Pivotingbasket
bracket
3.Basketguide
10
AdjustingtheFrontBasket
Position
NoPartsRequired
Procedure
Makesurethatthefrontbasketsareparalleltothecutting
unitswithaminimumclearanceof6mm(0.250inch)
betweenthelipofthebasketandthereel.Ifanadjustmentto
thebasketpositionisrequired,proceedasfollows:
•Oneachendofthebasket,loosenthecarriageboltnuts
securingthebasketstopbracketstothebasket(Figure15).
•Positionthebasketsoitisparalleltothecuttingunitwith
aminimumclearanceof6mm(0.250inch)betweenthe
lipofthebasketandthereel(Figure15).
•Oneachendofthebasket,adjustthebasketstopbrackets
sotheyeachcontactasideplate.
•Tightenthecarriageboltnutstosecurethebasket
position.
g012275
Figure15
1.6mm(0.250inch)
clearance
4.Carrierframearm
2.Basketstopbracket
5.Contactpoint
3.Basket
11
AdjustingtheRearBasket
Position
NoPartsRequired
Procedure
Whentherearbasketisinstalledonthecuttingunit,thegrass
basketshouldbeslightlyraisedintherear.
Whenthecuttingunitisraised,therollerbumpershould
alwayscontactthewearstriponthetopshieldofthegrass
basket(Figure16).
1.Wheninstallingtherearcentercuttingunit,ensurethat
thespacerontheliftarmpinisinstalledbehindthe
cuttingunitcarrierframeasshowninFigure16.
8