
Installation Instructions
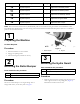
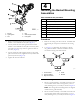
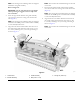
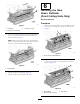
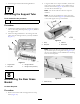
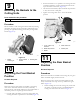
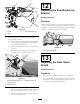
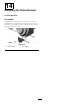
Table Of Contents
- .
- 1 Preparing the Machine
- 2 Mounting the Roller Bumper
- 3 Mounting the Hydro Guard
- 4 Installing the Basket Mounting Assemblies
- 5 Installing the Cut-off Bar
- 6 Installing the New Grass Deflector(Front Cutting Units Only)
- 7 Removing the Support Tube
- 8 Assembling the Rear Grass Basket
- 9 Mounting the Baskets to the Cutting Units
- 10 Adjusting the Front Basket Position
- 11 Adjusting the Rear Basket Position
- 12 Adjusting the Rear Basket Lip Bracket
- 13 Adjusting the Rear Grass Shield
- 14 Adjusting the Roller Bumper

g195002
Figure16
1.Spacer3.Grassshieldwearstrip
2.Roller
2.Adjustthebasketsothattherearofthebasketis
slightlyraised,asfollows:
A.Oneachendofthebasket,loosenthecarriagebolt
nutssecuringtheguideandbracketassembliesto
thebasketbrackets(Figure17).
B.Tightenthecarriageboltnutstosecurethebasket
position.
C.Raiseandlowerthecuttingunitstoensurethat
therolleralwayscontactsthewearstrip.
g012877
Figure17
1.Bracketassembly(leftend
ofbasketshown)
3.Carriageboltnuts(2)
2.Basketbracket
D.OnatractionunitwiththeSidewinderfeature,
alsomovethecuttingunitssidetosideandensure
thattherolleralwayscontactsthewearstrip.
E.Iftherollerdoesnotcontactthewearstrip,raise
therearofthebasketmore.
12
AdjustingtheRearBasketLip
Bracket
NoPartsRequired
Procedure
Checktomakesurethatthetopoftherearbasketlipbracket
isushto6mm(0.250inches)withtheroller(Figure18).If
thebracketisnotushwiththeroller,loosenthemounting
capscrewsandadjustthebracketasrequired.
g013779
Figure18
1.Rearbasketlipbracket
13
AdjustingtheRearGrass
Shield
NoPartsRequired
Procedure
•Adjusttherearshieldallthewayupforwetconditions.
•Indryconditions,therearshieldmayneedtobeslightly
loweredtoensurethattheclippingsarethrownintothe
rearofthebasket.Adjustitasrequired.
9