
Operator's Manual

g191340
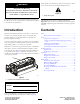
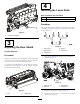
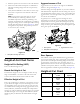
Figure12
1.Kickstand
3.Rotatethereelsothatabladecrossesthebedknife
approximately25mm(1inch)infromtheendofthe
bedknifeontherightsideofthecuttingunit.Putting
anidentifyingmarkonthisbladewillmakesubsequent
adjustmentseasier.Insertthe0.05mm(0.002inch)
shimbetweenthemarkedreelbladeandthebedknife
atthepointwherethebladecrossesthebedknife.
4.Turntherightbedbaradjusterclockwiseuntilyoufeel
lightpressure(i.e.drag)ontheshim,thenbackoffthe
bedbaradjustertwoclicksandremovetheshim.
Note:Becauseadjusting1sideofthecuttingunit
affectstheotherside,the2clicksprovideclearancefor
whentheothersideisadjusted.
Note:Ifstartingwithalargegap,bothsidesshould
initiallybedrawncloserbyalternatelytighteningthe
rightandleftsides.
5.Slowlyrotatethereelsothatthesamebladethatyou
checkedontherightsideiscrossingthebedknife
approximately25mm(1inch)infromtheendofthe
bedknifeontheleftsideofthecuttingunit.
6.Turntheleftbedbaradjusterclockwiseuntiltheshim
canbeslidthroughthereeltobedknifegapwithlight
drag.
7.Returntotherightsideandadjustasnecessarytoget
lightdragontheshimbetweenthesamebladeand
bedknife.
8.Repeatsteps6and7untiltheshimcanbeslidthrough
bothgapswithslightdrag,but1clickinonbothsides
preventstheshimfrompassingthroughonbothsides.
Thebedknifeisnowparalleltothereel.
Note:Thisprocedureshouldnotbeneededondaily
adjustments,butshouldbedoneaftergrindingor
disassembly.
9.Fromthisposition(i.e.,1clickinandshimnotpassing
through)turnthebedbaradjustersclockwise1click
each.
Note:Eachclickturnedmovesthebedknife0.022
mm(0.0009inches).Donotovertightenthe
adjustingscrews.
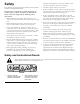
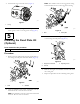
10.Testthecuttingperformancebyinsertingalong
stripofcuttingperformancepaper(ToroPartNo.
125-5610)betweenreelandbedknife,perpendicular
tothebedknife(Figure13).Slowlyrotatethereel
forward;itshouldcutthepaper.
G003323G003323
g003323
Figure13
Note:Ifexcessivereeldragoccurseitherbacklap
orgrindthecuttingunittoachievethesharpedges
neededforprecisioncutting.
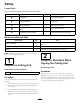
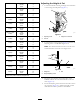
AdjustingtheRearRoller
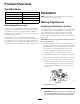
1.Adjusttherearrollerbrackets(Figure14)tothedesired
height-of-cutrangebypositioningtherequiredamount
ofspacersbelowtheside-platemountingange(Figure
14)pertheHOCChart.
g003324
Figure14
1.Spacer3.Side-platemountingange
2.Rollerbracket
2.Raisetherearofthecuttingunitandplaceablock
underthebedknife.
3.Removethe2nutssecuringeachrollerbracketand
spacertoeachside-platemountingange.
4.Lowertherollerandscrewsfromtheside-plate
mountingangesandspacers.
8