
Operator's Manual

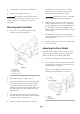

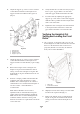

Adjusting the Bedknife Parallel to
the Reel
1. A 3/4 in. (19 mm) wrench will be needed to
rotate the bedknife adjustment knob. Each notch
on the knob will move the bedknife .013mm (Fig.
3). Make sure reel contact is removed by rotating
the bedknife adjustment knob counterclockwise.
Figure 3
1. Bedknife adjusting knob
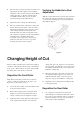
2. Set the cutting unit as shown in Figure 4. Do not
rest the cutting unit on the bedknife adjusting
knob as this will affect the reel-to-bedknife
clearance. Place a block of wood under the round
cross tube to hold the adjustment knob above the
surface.
Figure 4
3. Rotate the reel, by hand, while tightening the
bedknife adjustment knob. Stop when you feel
light contact.
4. Insert a long strip of dry newspaper between the
reel and the bedknife (Fig. 4) at either end of the
bedknife, and rotate the reel by hand. The paper
should be cleanly cut. Repeat this procedure at
other end of the reel. If the paper does not cut
cleanly, tighten the bedknife adjusting knob a
maximum of two clicks and check to see if paper
is cut cleanly. If it is not, go to the next step.
5. Remove the counter weights from the ends of the
cutting units.
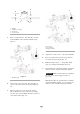
6. Loosen the two lock nuts securing the bedbar
adjuster to the cutting unit side plate (Fig. 5).
Figure 5
1. Bedbar adjuster
2. Lock nuts
3. Adjustment nuts
7. Adjust the nuts to move the bedbar adjuster up or
down until paper is cut along the entire bedknife
surface, when the bedknife adjustment knob is
adjusted to no more than two clicks beyond first
contact of reel bedknife (Fig. 5).
8. Tighten the lock nuts to 200 in.-lb. and verify
adjustment.
9. On the Reelmaster 3100-D cutting units, install
counter weights to appropriate ends of the cutting
units (left side of center and front left cutting
units and right side of the front right cutting
unit).
10. On the Reelmaster 2300/2600 cutting units,
install covers to appropriate ends of the cutting
units (covers mounted to left side of center and
the front left cutting units and right side of the
front right cutting unit).
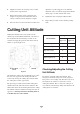
Setting Height of Cut and
Leveling the Rear Roller
1. Position the cutting unit on a surface plate.
5
1