
Operator's Manual


9
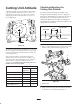
Changing
Height-of-Cut
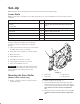
This procedure describes how to change the height-of-cut
after a cutting unit has been set up as described in Setup,
page 4. The height-of-cut can be changed with the cutting
units on or off the traction unit.
Reposition Front Roller
Note: If front roller position does not need to change, as
indicated on height-of-cut plates, proceed to Reposition
Rear Roller, page 9.
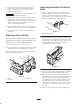
1. Loosen nut securing each front roller bracket to front
angle brackets.
2. Remove hairpin cotters securing front height–of–cut
pins and reinstall in the desired setting as indicated on
the height-of-cut plate.
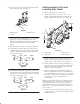
3. Tighten nut securing one front roller bracket to angle
bracket. On this same end of the cutting unit, place the
gauge bar across the front and rear rollers and adjust
the screw on the gauge bar until the underside of the
screw engages the bedknife cutting edge.
4. Move the gauge bar to the other end of the reel and
adjust the roller support screw, on the reel, until the
underside of the screw head, on the gauge bar, engages
the bedknife cutting edge.
5. Tighten nut securing this front roller bracket to angle
bracket.
Reposition Rear Roller
1. On gauge bar, set head of screw to desired
height-of-cut. This measurement is from bar face to
underside of screw head. Gauge Bar (Part No.
98–1852) may be obtained from your local Toro
Distributor.
2. Slightly loosen nut securing each rear roller bracket to
angle brackets.
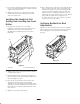
3. Remove hairpin cotters securing rear height–of–cut
pins and reinstall in the desired setting as indicated on
the height-of-cut plate.
4. Place the bar across the front and rear rollers and
adjust the rear roller support screws until the underside
of screw head engages the bedknife cutting edge. Do
this on both ends of reel.
5. Tighten nuts securing roller brackets.
6. Repeat this procedure on remaining cutting units.