Form No. 3350–283 Dethatcher Kit for Reelmaster 5100/5300D Model No.
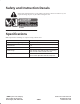
Safety and Instruction Decals Safety decals and instructions are easily visible to the operator and are located near any area of potential danger. Replace any decal that is damaged or lost. 67-7960 Specifications Note: Specifications and design are subject to change without notice. Reel Construction Blades and spacers bolted to hex shaft. Height of Dethatching Range 1/8” below turf to 1–3/16” above turf. Reel Diameter 5 in. Power Hydraulic motor splined to reel shaft.
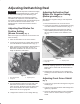
Adjusting Dethatching Reel Adjusting Dethatcher Reel Blades For Negative Setting (Below ground)(Fig. 2) Important Read this Operator’s Manual thoroughly before operating the dethatching unit. Failure to do so may result in damage to the dethatching reel. Note: The dethatching reel is shipped completely assembled. Two capscrews, two lockwashers, and two washers shipped loose with each dethatching unit are used to mount the reel drive motor to the dethatching unit.
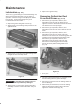
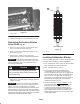
Note: As the dethatcher blades wear, the diameter of the reel will decrease, and the positive or negative setting will change. Check the height setting periodically to insure the desired setting is achieved. 1 2 3 1 2 Figure 4 1. Front roller scraper 2. Roller bracket 4 2. Retighten capscrews securing roller scraper to front roller scraper brackets. Figure 3 1. Front grass shield 2. Front grass shield screws 3. Rear grass shield 4. Rear grass shield screws Adjusting Rear Roller Scraper (Fig.
4. Assemble the mounting capscrews, lockwashers and washers for the reel drive motor to each dethatching unit (Fig. 7). Leave approximately 1/2” of threads exposed on each mounting bolt. Installing Dethatcher Reels (Fig. 6–7) Important If the dethatcher reels are set at a negative setting care must be taken to prevent damage to the reel blades due to contact with a concrete floor or a paved surface. Note: All dethatcher reels are interchangeable, therefore, they are all installed the same way. 1.
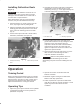
Maintenance 5. Wipe excess grease away. Lubrication (Fig. 8–9) There are (7) grease fittings on each dethatching unit, which must be lubricated after every 15 hours of operation. Lubricate using a #2 multipurpose lithium base grease. A hand operated grease gun is recommended for best results. Removing Dethatcher Reel From Reel Frame (Fig. 10–11) 1. Remove the (2) capscrews, washers, and lockwashers from the end cap weight on the opposite end of the dethatcher reel from the driven end.
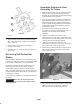
1 1 Figure 11 1. Locking collars 7. Slide the bearings off of the dethatcher reel shaft. Removing Dethatcher Blades From Shaft (Fig. 12) This end in vise 1. With a 1–11/16 in. wrench on each end of shaft, turn in a counter–clockwise direction. Figure 12 2. Place the drive end of dethatcher shaft in a vise and secure (Fig. 12). 1. 1–1/8” nut 3. Remove the 1–1/8 in. nut from shaft and disassemble the spacers and dethatching blades. 2.
Assemble Dethatcher Reel Assembly To Frame 1. Slide the reel bearings onto the reel shaft with the locking collars facing inward and not tightened. Orientate the grease fittings on the bearings facing up and forward on the reel frame. 1 2. After reel shaft assembly has been placed into the frame apply blue loctite #242 unto (6) capscrews before assembly onto (2) outside bearing plates.
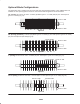
Optional Blade Configurations The dethatching reel is shipped from the factory with 3/4” spacing between blades. Three additional kits are available for other spacing options if desired. Kits are listed and configurations are shown below. 1/2” spacing, Kit Part No. 82–7000 – Includes (9) Blades (part no. 17–1590) and (66) 1/4” Thick Spacers (part no. 17–1600) (Fig. 15). Part No. 17–1600 Part No. 17–1590 Figure 15 3/4” Spacing, (Standard) – Includes (24) Blades (part no.
The Toro General Commercial Products Warranty A Two-Year Limited Warranty Conditions and Products Covered The Toro Company and its affiliate, Toro Warranty Company, pursuant to an agreement between them, jointly warrant your Toro Commercial Product (“Product”) to be free from defects in materials or workmanship for two years or 1500 operational hours*, whichever occurs first.