
Operator's Manual


3
Adjusting Dethatching Reel
Important Read this Operator’s Manual thoroughly
before operating the dethatching unit. Failure to do
so may result in damage to the dethatching reel.
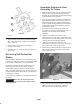
Note: The dethatching reel is shipped completely
assembled. Two capscrews, two lockwashers, and
two washers shipped loose with each dethatching unit
are used to mount the reel drive motor to the
dethatching unit. Retain these fasteners for later
installation.
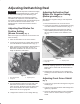
Adjusting Reel Blades For
Positive Setting
(Above Ground)
(Fig. 1)
Note: Rear height of cut brackets are mounted to rear
frame assembly.
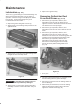
1. Place the dethatcher reel on a level surface.
2. Loosen the (2) locknuts on carriage bolts securing
rear roller brackets to dethatcher frame (Fig. 1).
3. Place a gauge bar, which has the desired height of
blade above ground, under both ends of the
dethatcher reel blades. Be sure bar covers full
length of dethatcher reel blades.
1
2
3
Figure 1
1. Rear roller brackets
2. Gauge bar
3. Adjusting screw
4. Turn the adjusting capscrew on each side of the
dethatcher reel so that the rear roller bracket
raises or lowers. Both front and rear rollers must
be in contact with the flat surface and the reel
blades must rest on the gauge bar.
5. Retighten the locknuts on the carriage bolts (2).
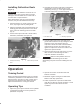
Adjusting Dethatcher Reel
Blades For Negative Setting
(Below ground)
(Fig. 2)
Note: Maximum negative setting is 1/8” deep blade
penetration.
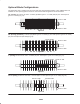
1. Place the dethatcher reel on a level surface.
2. Loosen the (2) locknuts on carriage bolts securing
rear roller brackets to dethatcher frame (Fig. 2).
3. Place (2) gauge bars, which have the desired
depth of blade penetration below ground, under
the front and rear rollers of the dethatcher reel
(Fig. 2).
1
2
3
Figure 2
1. Rear roller brackets
2. Gauge bar
3. Adjusting screw
4. Turn the adjusting capscrew so the dethatcher reel
blades come in contact with the level surface on
both ends.
5. Retighten the (2) locknuts on the carriage bolts
securing the rear roller brackets to the dethatcher
frame.
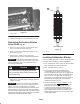
Adjusting Front Grass Shield
(Fig. 3)
1. Loosen the (2) capscrews retaining the front grass
shield (Fig.3).
2. Pull top of front grass shield to desired height and
tighten (2) capscrews.
3. Rotate the dethatcher blades to insure the blades
do not contact or interfere with the front grass
shield.