
Operator's Manual


7
1
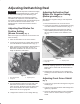
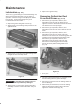
Figure 11
1. Locking collars
7. Slide the bearings off of the dethatcher reel shaft.
Removing Dethatcher Blades
From Shaft
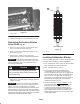
(Fig. 12)
1. With a 1–11/16 in. wrench on each end of shaft,
turn in a counter–clockwise direction.
2. Place the drive end of dethatcher shaft in a vise
and secure (Fig. 12).
3. Remove the 1–1/8 in. nut from shaft and
disassemble the spacers and dethatching blades.
Important When disassembling blades from hex
shaft, pay close attention to the position of the index
holes in the blades. This is very important for the
reassembly of the blades.
Use caution when removing blades from shaft as
they are extremely sharp and may have burrs that
will cut your hands.
Caution
4. After blades and spacers are removed, clean and
lubricate hex shaft with a light coating of grease to
simplify assembly.
Important The two 1/4” spacers must assembled
on each end of shaft. Do not invert dethatching reel
blades. The order of disassembly is extremely
important. Do not invert dethatching reel blades when
disassembling or reverse the order when assembling.
Note the thatcher blades index hole. The index hole is
provided for assembly in order to obtain the PROPER
HELIX FOR THE DETHATCHING REEL.
This end in vise
1
Figure 12
1. 1–1/8” nut 2.
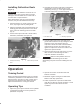
Installing Dethatcher Blades
Use the following procedure to assure the proper helix
is attained when installing the dethatcher blades.
1. First, assemble the 1/4 in. spacer on the reel shaft,
then assemble a reel dethatcher blade.
2. Next, assemble a 3/4 in. spacer.
3. Do not invert dethatcher reel blades when
reassembling on reel shaft. If the blades are
inverted, the blades that are in use, (rounded) will
be mixed with the sharp ends of the blades which
were not in use. This will cause unsatisfactory
performance in the dethatcher reel unit. Attention
should always be taken when disassembling
dethatching blades from reel.
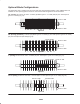
4. Install the next blade counter–clockwise
so the
index reference hole is not aligned with the first
blade hole by one hex of the shaft (Fig. 13).
Continue to install spacers and blades in this
manner until the full complement of blades have
been installed. When properly assembled, the
blades will be staggered in such a manner to give
a helix appearance.