
Installation Instructions

The Toro Company – 1999
All Rights Reserved
Printed in USA
1
FORM NO. 3323–816
Installation
Instructions
Model No. 03526
Rear Roller Brush Kit
For Reelmaster
5000D
1. Park the tractor on a level surface and engage the
parking brake.
2. Ensure that the cutting units are disengaged. Turn the
engine off and remove the key. Remove all cutting
units.
CAUTION
POTENTIAL HAZARD
• If you leave the key in the ignition switch,
someone could start the engine.
WHAT CAN HAPPEN
• Accidental starting of the engine could seriously
injure you or other bystanders.
HOW TO AVOID THE HAZARD
• Remove the key from the ignition switch before
you do any maintenance.
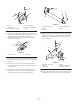
3. Remove the (2) locknuts securing the counter weight
to the left end of the cutting unit. Remove the counter
weight (Fig. 1). For Reelmaster 5100 and 5300,
remove the reel shaft magnet and capscrew. Also
remove the speed sensor from the counter weight and
set it aside (Fig. 1).
1
2
5
3
4
Figure 1
1. Locknut
2. Counter weight
3. Reel shaft magnet
4. Capscrew
5. Speed sensor
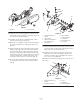
4. Apply removable No. 242 Loctite (blue) to the threads
on the tang drive. Slide the new magnet onto the tang
drive and screw the tang drive into the reel shaft
(Fig. 2). The tang drive must be oriented with the
shallow end facing outward as shown. Torque to 27 to
33 ft-lbs.
Note: To keep the reel from rotating while tightening the
tang drive, place a block of wood between the reel and
bedknife.
IMPORTANT: Backlapping at the incorrect reel speed
may loosen and strip the tang drive threads. Refer to
the Cutting Unit Operator’s Manual for backlapping
procedure.
1
2
3
Figure 2
1. Magnet
2. Tang drive
3. Cutting unit reel assembly
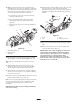
5. At the rear of the cutting unit, remove the carriage bolt
and locknut securing the rear height-of-cut brackets to
the cutting unit side plates (Fig. 3). Remove the
height-of-cut adjustment bolts. Remove the
height-of-cut brackets and rear roller. Set all parts
aside.