
Installation Instructions

1
All Rights Reserved
Printed in the USA
W 2006 by The Toro Company
8111 Lyndale Avenue South
Bloomington, MN 55420-1196
Rear Roller Brush Kit
Reelmaster
)
5200D and 5400D
Model No. 03533
Form No. 3354–587 Rev A
Installation Instructions
Important It is recommended that the Rear Roller
Brush Kit only be used when cutting in the height of cut
range of 1/4” to 7/8”.
Rear Roller Brush Kit may be used on the following:
• Model 03527 and 03528 Cutting Units
• All RM5200 and RM5400 Traction Units
• On RM5100 and 5300 Traction Units, the clip ace (reel
speed sensors) function must be by–passed. Contact
your local Toro distributor for information.
Loose Parts
Description Quantity
Adjusting bolt–3/8–24 x 1–1/2” lg.
Adjusting bolt–3/8–24 x 1” lg.
2
2
Drive bolt–3/8–16 x 1/2” lg. 1
End weight
Lock nut–3/8–16
1
2
Roller brush assembly
Key
Bolt–5/16–18 x 1–1/4” lg.
Flange nut–5/16
1
1
2
2
Brush plate assembly 1
Flange bolts–5/16–18 x 5/8” lg. 2
Driven pulley 1
Flange bolts–5/16–18 x 5/8” lg. 1
Belt 1
Wear pad 1
Bolt–3/8–16 x 2–1/4” lg.
Lock nut–3/8–16
1
1
Arm bracket 2
Installation instructions 1
Parts catalog 1
Tools / Materials Required for Assembly:
• 1/8” Allen wrench
• Alignment punch and hammer
• 3/8” wrench (6 in. length)
• 1/2” wrench
• 1/2” deep well socket
• 7/16” wrench
• 9/16” wrench
• 9/16” Deep well socket
• 5/8” socket
• 6” crescent wrench
• 242 Loctite (blue)
• Never Seize
• Torque wrench (range: 15–33 ft.–lbs)
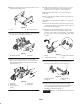
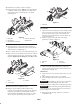
Installation
1. Park the traction unit on a level surface and engage the
parking brake.
2. Ensure that the cutting units are disengaged. Turn the
engine off and remove the key. Remove all cutting units
from traction unit.
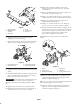
3. Remove bedbar/bedknife assembly from cutting unit as
follows:
• Remove (2) bedknife adjusting screws from each
adjuster bracket on cutting unit (Fig. 1).
• Remove wheel bolt and spacer securing each end of
bedbar to cutting unit.
4. Remove the (2) bolts securing the counter weight to the
left end of the cutting unit. Remove the counter weight
(Fig. 1).
5. Remove drive bolt from end of reel shaft (Fig. 1).
Note: Retain all components for re–installation or future
applications.