
Installation Instructions


5
InstallingtheEnd-WeightKit
(Model03618only)
Partsneededforthisprocedure:
1
End-weightkit(soldseparately)
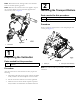
Procedure
Buyandinstalltheendweightkitappropriateforthe
congurationofyourmachine(Figure8).
•WeightKitModel03411forelectricreelmotors
•WeightKitModel03412forhydraulicreelmotors
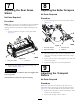
Figure8
1.Endweight(largeweightshown)
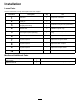
Theverticutterscanbeinstalledatanyofthe5locationson
thetractionunit.Figure4showstheorientationofthedrive
motorforeachofthelocations.Foranyofthelocations
requiringthemotortobemountedontherightendofthe
verticutter,installacounterweightontheleftendofthe
verticutter.Forthelocationsrequiringthemotortobe
mountedontheleftend,installacounterweightontheright
endoftheverticutter.
Note:ForModel03619,counterweightsareshipped
installedtotherightendoftheverticutters.Theboltsonthe
leftendaretobeusedforsecuringthemotor.
6
AdjustingtheBladeDepth
NoPartsRequired
Procedure
Note:Themaximumrecommendedbladepenetration
depthsareasfollows:
•Model03618is3mm(1/8inch).
•Model03619is6mm(1/4inch).
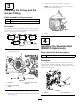
1.Placetheverticutterreelonalevelsurface.
2.Place2gaugebars,whichhavethedesireddepthof
bladepenetrationbelowtheground,underthefront
andrearrollersoftheverticutterreeloneachendof
thereel(Figure9).
Figure9
1.Gaugebars
2.Adjustingbolts
Note:Theverticutterbladesmustnottouchthe
gaugebars.
3.Turntheadjustingboltoneachheight-of-cutbracket
(Figure9)sothatthereelbladescomeincontactwith
thelevelsurfaceonbothends.
Note:Astheverticutterbladeswear,thediameterof
thereelwilldecreaseandthedepthsettingwillchange.
Checkthedepthsettingperiodicallytoensurethatthe
desiredsettingisachieved.
8