
Operator's Manual


RemovingtheVerticutter
BladesfromtheShaft
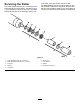
1.Securetheendoftheverticuttershaft,which
hasonlyonewasherandnut,inavise.
2.Onotherendofshaft,rotatethenut
counter-clockwiseandremovethenut.
CAUTION
Thebladesareextremelysharpandmay
haveburrsthatwillcutyourhands.
Wearglovesandusecautionwhen
removingthebladesfromtheshaft.
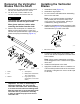
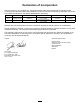
3.Removethesmallspacer,thewasher,the
blades,andthelargespacers.Cleanand
lubricatethesquareshaftwithalightcoatingof
greasetosimplifytheassembly(Figure14).
g010889
Figure14
1.Shaft4.Smallspacer
2.Nut
5.Blade(25formodel03618;
16formodel03619)
3.Washer
6.Largespacer(24for
model03618;15formodel
03619)
Important:Theorderofdisassemblyis
extremelyimportant.Donotinvertthe
verticutterreelbladeswhendisassembling
orreversetheorderwhenassemblingthem.
Notetheindexholeineachverticutterblade.
Theindexholeisprovidedforassembly
inordertoobtaintheproperhelixforthe
verticutterreel.
InstallingtheVerticutter
Blades
1.Assembleablade(Figure15).
2.Assemblealargespacer.
3.Donotinvertthereelbladeswhenassembling
themonthereelshaft.
Note:Ifyouinverttheblades,thebladesin
use(rounded)willmixwiththesharpends
ofthepreviouslyunusedblades,resultingin
unsatisfactorycuttingperformance.
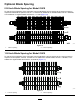
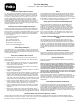
4.Installthenextbladeclockwisesothattheindex
referencehole(Figure15)isnotalignedwiththe
rstbladeholebyoneatoftheshaft.
g017524
Figure15
1.Indexreferencehole
5.Continuetoinstallspacersandbladesinthis
manneruntilthefullcomplementofbladeshave
beeninstalled.
Note:Whenproperlyassembled,theblades
willbestaggeredinsuchamannerastoappear
likeahelix.
6.Installthesmallspacertotheshaft.
7.ApplyBlueLoctite242tothenut.Installthenut
ontotheshaft(machinedsideofthenuttoward
thespacer),andtightenitto109to135N-m(80
to100ft-lb).
13