
Operator's Manual


g034113
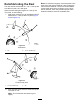
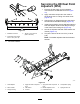
Figure26
1.Bedknife(vertical)
2.Angleindicator
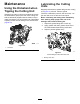
2.PresstheAltZerobuttonontheangleindicator.
3.Placetheangle-indicatormountontheedge
ofthebedknifesothattheedgeofthemagnet
mateswiththeedgeofthebedknife(Figure27).
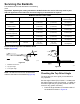
Note:Thedigitaldisplayshouldbevisiblefrom
thesamesideduringthisstepasitwasinstep1.
g034114
Figure27
1.Angle-indicatormount
3.Bedknife
2.Edgeofthemagnetmated
withtheedgeofthe
bedknife
4.Angleindicator
4.Placetheangleindicatoronthemountasshown
inFigure27.
Note:Thisistheanglethatyourgrinder
produces,andshouldbewithin2degreesofthe
recommendedtopgrindangle.
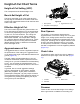
ServicingtheBedbar
RemovingtheBedbar
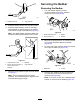
1.Turnthebedbar-adjustingscrews
counterclockwisetobackthebedknife
awayfromthereel(Figure28).
g006498
Figure28
1.Bedbar-adjustingscrew3.Bedbar
2.Spring-tensionnut
4.Washer
2.Backoutthespring-tensionnut,untilthewasher
isnolongertensionedagainstthebedbar
(Figure28).
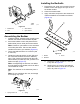
3.Oneachsideofthemachine,loosenthelocknut
securingthebedbarbolt(Figure29).
g003334
Figure29
1.Bedbarbolt2.Locknut
4.Removeeachbedbarboltallowingbedbarto
bepulleddownwardandremovedfromthe
machinebolt(Figure29).
Note:Accountfor2nylonand1stampedsteel
washeroneachendofthebedbar(Figure30).
18