
Operator's Manual

CheckingtheTopGrindAngle
Theanglethatyouusetogrindyourbedknivesis
veryimportant.
Usetheangleindicator(T oroPartNo.131-6828)and
theangle-indicatormount(T oroPartNo.131-6829)to
checktheanglethatyourgrinderproducesandthen
correctforanygrinderinaccuracy.
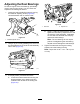
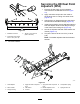
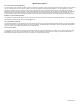
1.Placetheangleindicatoronthebottomsideof
thebedknifeasshowninFigure35.
g034113
Figure35
1.Bedknife(vertical)
2.Angleindicator
2.PresstheAltZerobuttonontheangleindicator.
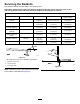
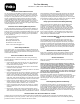
3.Placetheangle-indicatormountontheedgeof
thebedknifesothattheedgeofthemagnetis
matedwiththeedgeofthebedknife(Figure36).
Note:Thedigitaldisplayshouldbevisiblefrom
thesamesideduringthisstepasitwasinstep1.
g034114
Figure36
1.Angle-indicatormount
3.Bedknife
2.Edgeofthemagnetmated
withtheedgeofthe
bedknife
4.Angleindicator
4.Placetheangleindicatoronthemountasshown
inFigure36.
Note:Thisistheanglethatyourgrinder
produces;itshouldbewithin2degreesofthe
recommendedtopgrindangle.
ServicingtheBedbar
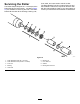
RemovingtheBedbar
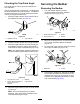
1.Turnthebedbar-adjustingscrews
counterclockwisetobackthebedknife
awayfromthereel(Figure37).
g006498
Figure37
1.Bedbar-adjustingscrew3.Bedbar
2.Spring-tensionnut
4.Washer
2.Backoutthespring-tensionnutuntilthewasher
isnolongertensionedagainstthebedbar
(Figure37).
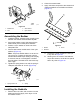
3.Oneachsideofthemachine,loosenthelocknut
securingthebedbarbolt(Figure38).
g003334
Figure38
1.Bedbarbolt2.Locknut
4.Removeeachbedbarbolt,allowingthebedbar
tobepulleddownwardandremovedfromthe
machinebolt(Figure38).Accountfor2nylon
washersand1stampedsteelwasheroneach
endofthebedbar(Figure39).
21