
Operator's Manual
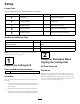
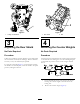
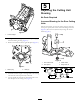
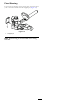
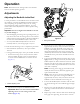
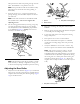

Figure6
1.Counterweight
3.Onrightendofcuttingunit,removetheplasticplug
fromthebearinghousing(Figure7).
4.Removethe2boltsfromtherightsideplate(Figure7).
G003321
1
2
Figure7
1.Plasticplug
2.Bolts(2)
5.Installthecounterweighttotherightendofthecutting
unitwiththe2screwspreviouslyremoved.
6.Looselyinstallthe2reelmotormountingboltstothe
leftsideplateofthecuttingunit(Figure7).
5
AdjustingtheCuttingUnit
Steering
NoPartsRequired
IncreasedSteeringfortheRearCutting
Units
Increasethesteeringontherearcuttingunitsbyremoving
the2pivotspacers,hexsocketscrewsandangelocknuts
(Figure8)fromtherear(#2and#3)cuttingunitcarrier
frames(Figure9).
1
2
3
4
G015978
Figure8
1.Hexsocketscrew
3.Carrierframe
2.Pivotspacer4.Flangelocknut
Figure9
6