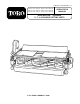
FORM NO. 3318-296 GB Rev A Model No. 03741 - 60001 & UP Model No. 03753 - 60001 & UP Model No. 03751 - 60001 & UP Model No. 03754 - 60001 & UP Model No. 03752 - 60001 & UP Model No.
FOREWORD TABLE OF CONTENTS The cutting unit’s have advanced concepts in engineering, design and safety; and if maintained properly, they will give excellent service. Specifications 3 Cutting Unit—Overview 4 Since the cutting unit’s are high quality products, Toro is concerned about the future use of them and the safety of the user. Read this manual to familiarize yourself with the proper set up, adjustment and maintenance instructions.
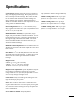
Specifications Construction: Welded steel frame and reel with heavyduty, self-aligning ball bearings. Heavy-duty steel rear roller with tapered roller bearings. Rear roller and bedbar are isolated and mounted in rubber bushings for quiet, vibration-free operation. Adjustable deflector shields are standard. Stainless steel components are used at key points for added durability. Reel Configuration: The 5-, 7- and 11-blade, heavyduty welded reels all have 8 in. (20.3 cm) diameters and are 29-3⁄4 in. (75.
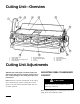
Cutting Unit—Overview 1. 2. 3. 4. Drive housing cover Drive housing Drive plate shield & shipping cover Grass deflector 5. 6. 7. 8. Rear roller adjuster (2) Reel-to-bedknife adjuster Guard Cone nut 9. 10. 11. 11. Reel assembly Front roller (optional) Top Covers Top covers Cutting Unit Adjustments IMPORTANT: Thoroughly read both Cutting Unit and Traction Unit operator manuals. Failure to do so may result in damage to the cutting unit and/or poor performance.
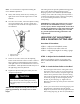
Note: A 3⁄4-inch wrench is required for making the reel-to-bedknife adjustment. A. Slowly and carefully rotate the reel, listening for light contact across the full length of the reel and bedknife. B. If no there is no contact, loosen the adjuster locking nut on each adjuster (Fig. 1). Then, equally turn each adjuster knob clockwise until light contact is felt and heard. The cutting units will provide optimum mowing performance when adjusted and maintained correctly.
must contact the bar stock along its full length. the jam nuts have been tightened. Check roller contact by trying to slide paper between the roller and the flat surface. Figure 2 Cutting Unit Float Position 1. 2. Figure 4 Contact alone the full length at “A” and “B” levels levels the rear roller to the reel. Lockout pin Jam nut 1. 2. 3. 4. 5. 6.
knife (Fig. 6). Tighten the front roller nuts. Figure 5 Contact alone the full length at “A” and “B” levels levels the rear roller to the reel. 1. 2. Jam nut Adjust for final height-of-cut setting and the rear roller leveled to the reel (Step 2) the cutting unit may be quickly changed from one height-of-cut to another by using the gauge bar (Part #98-1852) and adjusting the front roller only.
bedknife adjustment and height-of-cut adjustment. 2. Position the cutting units on a flat, level surface 25 mm thick piece of plywood). 3. Skids and front rollers used to prevent scalping should not ride on the ground. Adjust each skid or front roller so it is 3–6 mm or higher above the level surface. Allow greater clearance at the higher height-of-cut settings. 4.
Lubrications Before and after greasing, wipe each grease fitting with a clean rag. Use a hand-operated grease gun and #2 general purpose grease to lubricate the eight grease fittings. Applying too much pressure will ruin the seals and leaking grease could cause damage to grass. IMPORTANT: Before washing the machine, shut off the engine and remove the key. Toro recommends daily lubrication of reels and rollers immediately after washing the machine.
PRODUCT IDENTIFICATION The cutting unit has two identification numbers: a model number and a serial number that are stamped into a plate. The identification plate is located on the reel side plate opposite drive housing. In any correspondence concerning the traction unit, supply the model and serial numbers to ensure correct information and replacement parts are obtained. To order replacement parts from an Authorized TORO Distributor supply the following information: 1.