
Installation Instructions

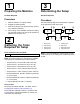
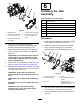


LooseParts
Usethechartbelowtoverifythatallpartshavebeenshipped.
ProcedureDescription
Qty.
Use
1
Nopartsrequired
–
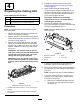
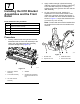
Preparethemachine.
2
Torquewrench(Notincluded)
–
Gatherthetoolsrequiredforsetup.
3
Nopartsrequired
–
Determinewhereonthecuttingunitto
installthegroomer.
Extendedsplinedinsert(right-hand
threads)
3
Extendedsplinedinsert(left-hand
threads)
2
4
Flangelocknut(3/8inch)—Model03768
only
10
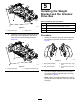
Preparethecuttingunit.
Weightbracket
5
Hex-socket,button-headbolt(3/8x3/4
inch)
10
Groomerdrivebox(leftdrive)
3
5
Groomerdrivebox(rightdrive)
2
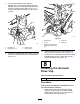
Installtheweightbracketandgroomer
drivebox.
Hex-socketbolt10
Pivothub
5
O-ring
5
Idlerassembly(left)
2
Idlerassembly(right)
3
Flangelocknut(3/8inch)—Model03763
only
10
6
Jamlocknut(3/8inch)—Model03768
only
10
Installtheidlerassembly.
LeftHOCbracketassembly
5
RightHOCbracketassembly
5
Shoulderbolt
10
Hardenedwasher
5
7
Flangelocknut(3/8with5/8hex)
10
InstalltheHOCbracketassembliesand
thefrontroller.
8
Cap
5
Installthegroomerdrivecap(For
universalgroomerassemblieswithno
rearrollerbrushkitinstalledonly).
Bolt(1/4x1-1/2inches)
20
Jamnut20
Shaftclamp
20
9
Groomingreel(orderseparately)
5
Installthegroomerassemblyand
optionalbroomerkit.
10
Washer(PartNo.3256-24,notincluded)
–
Adjustthegroomerspringforce.
11
Hydraulictting—45°(PartNo.
340–101;soldseparately)
1
Installtheangledtting(forReelmaster
3550and3555machines,#1front,
centercuttinglocationandkitModel
133-0150).
2